Relay is a GraphQL client that offers tons of functionality for React web apps such as declaring per-component data dependencies using fragments and a normalized data store that updates components efficiently when querying the server and optimistic UI updates.
Relay’s 17.0 update comes with new features like the alias directive, improvements to schema compiler validation, improvements to VS Code editor integration, and a new iteration to experimental Relay Resolvers.
Relay supports features that create “real-time” applications, including optimistic UI updates which update the UI instantly when a mutation is made and GraphQL subscriptions which allow for the server to update the client via a WebSocket connection.
With the above in mind, let’s build a real time application with Relay 17 by iterating on the Relay websites tutorial app and enhancing it with these real time capabilities. I also wrote more information about Relay 17, which you can find at the end of the tutorial.
Let’s do a quick ramp up on how Relay works. To start, Relay requires GraphQL API servers to conform to certain conventions:
Another key concept is Relay’s compiler is that it runs as a separate process, similar to webpack, and enables per-component GraphQL fragment declarations. This compiler brings numerous benefits, including query optimization, type generation, and the ability to catch errors at build time. With this in mind, let’s dive in.
To demonstrate further what makes Relay special, we’ll walk through the features it has to support building real-time applications. This application shows a newsfeed of user’s posts using mocked data from a locally running GraphQL API server. We’ll add optimistic UI mutations, which means the user won’t need to wait for a response from the server to see their actions take place.
Then we will add server-pushed updates using GraphQL Subscriptions. This will make the app update without page refreshes or clicks. Both of these have first-class support in Relay, and this will all make our app feel like its updating in real-time.
First, let’s setup the application on our computer. Clone the template from the tutorial:
git clone <https://github.com/relayjs/relay-examples.git>
cd relay-examples/newsfeed
npm install
Make sure the Relay Compiler is installed correctly. Run the compiler to have Relay generate the initial artifacts:
npm run relay
Inspect the initial page in the browser. Run the development server, and this should run webpack and the server in watch mode:
npm run dev
If the Relay Compiler fails to start up in watch mode, that is likely due to watchman not being installed properly. It’s not game over as you can you run it manually with npm run relay whenever you change a file.
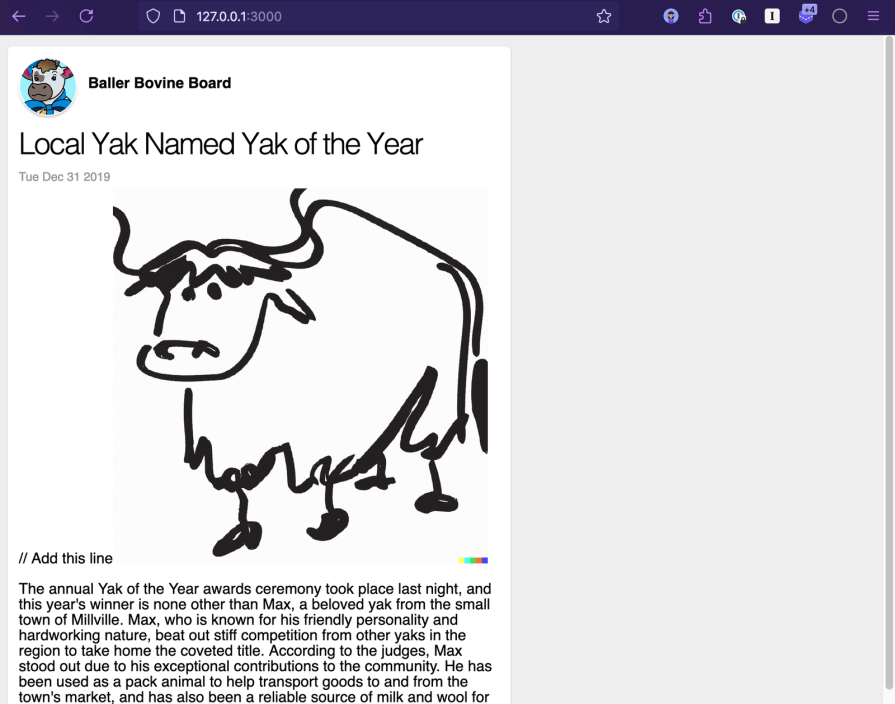
Ensure the web page is shown by opening up localhost:3000 in a web browser:
The default app does not query for any data, so let’s add basic queries that are needed for subsequent real-time features. We’ll use GraphQL Fragments to achieve this.
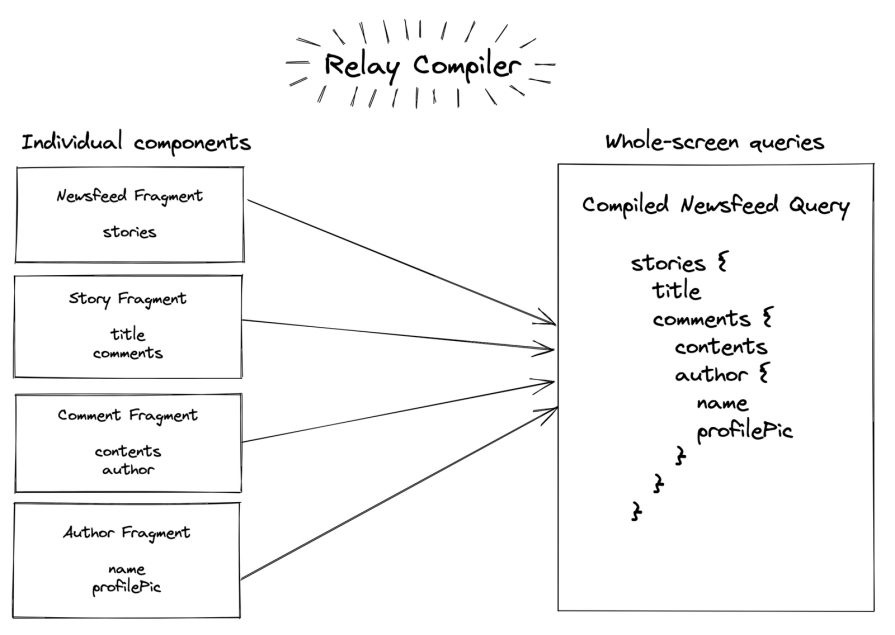
Relay takes a different approach compared to other React frameworks which encourage you to have large container components do the querying. Relay allows for GraphQL fragments to be declared at the component level. This means every component declares exactly the data it needs.
The Relay Compiler handles the work of adding it to every query that can be triggered from around the application (root level, container queries).
Here is how Relay compiles your fragment queries:
We will perform some steps from the first two Relay tutorial sections, Query Basics and Fragments. This will give us some basic data for our main page, including the stop story and its data.
Go to the src/components/Newsfeed.tsx file, and switch the static data for a query:
import * as React from "react";
import Story from "./Story";
import { useLazyLoadQuery, graphql } from "react-relay";
import type { NewsfeedQuery as NewsfeedQueryType } from "./__generated__/NewsfeedQuery.graphql";

const NewsfeedQuery = graphql`
  query NewsfeedQuery {
    topStory {
      ...StoryFragment
    }
  }
`;

// eslint-disable-next-line no-empty-pattern
export default function Newsfeed({}) {
  const data = useLazyLoadQuery<NewsfeedQueryType>(NewsfeedQuery, {});
  const story = data.topStory;
  return (
    <div className="newsfeed">
      <Story story={story} />
    </div>
  );
}
Go to the src/components/Story.tsx file, and switch the static data for a fragment:
import * as React from "react";
import Card from "./Card";
import Heading from "./Heading";
import PosterByline from "./PosterByline";
import StorySummary from "./StorySummary";
import Image from "./Image";
import { graphql, useFragment } from "react-relay";
import Timestamp from "./Timestamp";
import { StoryFragment$key } from "./__generated__/StoryFragment.graphql";

const StoryFragment = graphql`
  fragment StoryFragment on Story {
    title
    summary
    createdAt
    poster {
      name
      profilePicture {
        url
      }
    }
    thumbnail {
      url
    }
  }
`;

type Props = {
  story: StoryFragment$key;
};

export default function Story({ story }: Props): React.ReactElement {
  const data = useFragment(StoryFragment, story);
  return (
    <Card>
      <PosterByline poster={data.poster} />
      <Heading>{data.title}</Heading>
      <Timestamp time={data.createdAt} /> // Add this line
      <Image image={data.thumbnail} width={400} height={400} />
      <StorySummary summary={data.summary} />
    </Card>
  );
}
Lets add a “like” button that will show up on stories. Add these items to the src/components/Story.tsx file:
import * as React from "react";
import Card from "./Card";
import Heading from "./Heading";
import PosterByline from "./PosterByline";
import StorySummary from "./StorySummary";
import Image from "./Image";
import { graphql, useFragment } from "react-relay";
import Timestamp from "./Timestamp";
import { StoryFragment$key } from "./__generated__/StoryFragment.graphql";
import StoryLikeButton from "./StoryLikeButton";

const StoryFragment = graphql`
  fragment StoryFragment on Story {
    title
    summary
    createdAt
    poster {
      name
      profilePicture {
        url
      }
    }
    thumbnail {
      url
    }
    ...StoryLikeButtonFragment
  }
`;

type Props = {
  story: StoryFragment$key,
};

export default function Story({ story }: Props): React.ReactElement {
  const data = useFragment(StoryFragment, story);
  return (
    <Card>
      <PosterByline poster={data.poster} />
      <Heading>{data.title}</Heading>
      <Timestamp time={data.createdAt} /> // Add this line
      <Image image={data.thumbnail} width={400} height={400} />
      <StorySummary summary={data.summary} />
      <StoryLikeButton story={data} />
    </Card>
  );
}
Mutations look like a lot of other frameworks if you’ve used them in the past. Call the mutation inside of the src/components/StoryLikeButton.tsx file:
import * as React from "react";
import { useFragment, graphql, useMutation } from "react-relay";

import type { StoryLikeButtonFragment$key } from "./__generated__/StoryLikeButtonFragment.graphql";

type Props = {
  story: StoryLikeButtonFragment$key;
};

const StoryLikeButtonFragment = graphql`
  fragment StoryLikeButtonFragment on Story {
    id
    likeCount
    doesViewerLike
  }
`;

const StoryLikeButtonLikeMutation = graphql`
  mutation StoryLikeButtonLikeMutation($id: ID!, $doesLike: Boolean!) {
    likeStory(id: $id, doesLike: $doesLike) {
      story {
        id
        likeCount
        doesViewerLike
      }
    }
  }
`;

export default function StoryLikeButton({ story }: Props): React.ReactElement {
  const data = useFragment<StoryLikeButtonFragment$key>(
    StoryLikeButtonFragment,
    story
  );
  const [commitMutation, isMutationInFlight] = useMutation(
    StoryLikeButtonLikeMutation
  );
  const onLikeButtonClicked = () => {
    commitMutation({
      variables: {
        id: data.id,
        doesLike: !data.doesViewerLike,
      },
    });
  };
  return (
    <div className="likeButton">
      <LikeCount count={data.likeCount} />
      <LikeButton
        doesViewerLike={data.doesViewerLike}
        onClick={onLikeButtonClicked}
        disabled={isMutationInFlight}
      />
    </div>
  );
}

// not shown the <LikeButton /> component
Refresh the page in the browser. Try liking the story, and you should see the count go up and the words go blue:

Now that we are querying the server for data, we can add the optimistic UI. When we add an optimistic updater, the Relay mutation assumes success and updates the local Relay store immediately on user click.
In the rare case it ends in failure, it’s rolled back. We can use optimisticResponse to achieve this by providing a response object that is based on the current data in the store. At the same time, we can remove the disabled prop on the <LikeButton />, which makes the like button respond in real time.
Update the code inside of the mutation inside of the src/components/StoryLikeButton.tsx file:
export default function StoryLikeButton({ story }: Props): React.ReactElement {
  const data = useFragment<StoryLikeButtonFragment$key>(
    StoryLikeButtonFragment,
    story
  );
  const [commitMutation] = useMutation(StoryLikeButtonLikeMutation);
  const onLikeButtonClicked = () => {
    commitMutation({
      variables: {
        id: data.id,
        doesLike: !data.doesViewerLike,
      },
      optimisticResponse: {
        likeStory: {
          story: {
            id: data.id,
            likeCount: data.likeCount + (data.doesViewerLike ? -1 : 1),
            doesViewerLike: !data.doesViewerLike,
          },
        },
      },
    });
  };
  return (
    <div className="likeButton">
      <LikeCount count={data.likeCount} />
      <LikeButton
        doesViewerLike={data.doesViewerLike}
        onClick={onLikeButtonClicked}
      />
    </div>
  );
}
StoryLikeButtonSubscription subscription to the serverAnother aspect for real-time apps are when the server is pushed to the client which simulates other user actions. The story likes that we implemented can be updated in real time from the server using GraphQL subscriptions.
As other people like posts, our counter keeps updating. We can do this with the browser establishing a long-lived connection to the server using websockets.
Unfortunately, the existing server cannot support websockets and subscriptions, so a new GraphQL server is provided inside of this fork I created of the tutorial repository. It lives under server-2 and provides an apollo-server which implements subscriptions.
Implement the changes needed in the following files:
- `package.json`
- `server/*`
- `server-2/*`
Set up the Relay client to connect to subscriptions inside of src/relay/environment.ts:
import type { FetchFunction, IEnvironment, SubscribeFunction } from "relay-runtime";
import { createClient } from 'graphql-ws';

const wsClient = createClient({
  url: 'ws://localhost:8081/graphql',
  lazy: true,
  keepAlive: 1000,
});

const subscribe: SubscribeFunction = (operation, variables) => {
  return Observable.create((sink) => {
    return wsClient.subscribe(
      {
        operationName: operation.name,
        query: operation.text,
        variables,
      },
      (sink as any),
    );
  });
}

export function createEnvironment(): IEnvironment {
  // add the new subscribe function here!
  const network = Network.create(fetchFn, subscribe);
  const store = new Store(new RecordSource());
  return new Environment({ store, network });
}
Run npm install.
We can use the subscription query in our component. This will create a websocket connection to the server and update our local store in real-time as updates come in.
Add these updates to the src/components/StoryLikeButton.tsx file:
import {
  useFragment,
  graphql,
  useMutation,
  useSubscription,
} from "react-relay";

function useStoryLikeCountSubscription(storyId: string) {
  return useSubscription({
    subscription: graphql`
      subscription StoryLikeButtonSubscription {
        storyLikeCount
      }
    `,
    variables: {},
    // update the store with the new like count
    updater(store) {
      const story = store.get(storyId);
      if (story) {
        const likeCount = story.getValue("likeCount");
        if (typeof likeCount === "number") {
          story.setValue(likeCount + 1, "likeCount");
        }
      }
    },
  });
}

export default function StoryLikeButton({ story }: Props): React.ReactElement {
  const data = useFragment<StoryLikeButtonFragment$key>(
    StoryLikeButtonFragment,
    story
  );
  // use the new React hook we built here!
  useStoryLikeCountSubscription(data.id);
  const [commitMutation] = useMutation(StoryLikeButtonLikeMutation);
  const onLikeButtonClicked = () => {
    commitMutation({
    // ...
  }
// ...
}

We can now see the updates come in!
There is new functionality in Relay v17 that improves the developer experience. Relay’s client-side schema validation is now stable and turned on by default. This includes GraphQL schemas used for client-side schema extensions and Relay Resolvers. It also includes “edge” (Relay connection edges) name validation inside of queries which use @prependNode and @appendNode.
Relay’s new schema validation works on local schemas, which define local fields to be used in client schema extensions and Relay Resolvers. The compiler now runs GraphQL spec-compliant validations against these client schemas. This is beneficial as your want this schema to be GraphQL-spec-compliant.
This schema may be a preview of upcoming features released soon in the server-side GraphQL API schema you integrate with. You can see all of the validations supported here.
Here is an example of a client schema which now fails the Relay CLI validator:
# src/clientSchema.graphql

type Note {
  id: ID!
  title: String
  body: String
  # npm run relay -> "Duplicate field 'body' found."
  body: String
}
Relay has a normalized GraphQL data store which stores data client-side for caching purposes. For regular mutations which return a node and have an id field, Relay knows how to automatically update the node in the local client side store. There are shortcuts for developers which can make this better.
For lists (e.g. connections), you can use the GraphQL directives @appendNode or @prependNode to automatically add nodes to the end of client-side store connections when additions are made inside mutations.
Relay 17 adds validation for these directives, making sure the edge type you provide inside of the directive parameters is valid. For example, when a new comment is made on a blog post, the mutation can send the new data to the server and/or update the local cache.
Here is a small example schema which defines a Story and has a list of comments:
type Story implements Node {
  id: ID!
  comments(
    first: Int
    after: String
    last: Int
    before: String
  ): CommentsConnection!
}

type Query {
  story(id: ID!): Story
}

type Mutation {
  commentCreate(input: CommentCreateInput!): CommentCreatePayload!
}

type CommentsConnection {
  edges: [CommentsEdge!]!
  pageInfo: PageInfo!
}

type CommentsEdge {
  node: Comment!
  cursor: String!
}
And this is how you could use the directives inside of a React component Relay mutation:
const connectionID = fragmentData?.comments?.__id;

const connectionID = ConnectionHandler.getConnectionID(
  '<story-id>',
  'StoryComponent_story_comments_connection',
);

// ...

commitMutation<AppendCommentMutation>(environment, {
  mutation: graphql`
    mutation AppendCommentMutation(
      # Define a GraphQL variable for the connections array
      $connections: [ID!]!
      $input: CommentCreateInput
    ) {
      commentCreate(input: $input) {
        feedbackCommentNode @appendNode(
                connections: $connections,
                # HERE IS WHERE THE EDGE TYPE NAME MUST BE VALID
                edgeTypeName: "CommentsEdge"
               ) {
          id
        }
      }
    }
  `,
  variables: {
    input,
    // Pass the `connections` array
    connections: [connectionID],
  },
});
Notably, Relay v17 also adds a new directive @alias. Deemed experimental, this directive improves type safety when using fragments with:
Node interface used in the schema above@skip and @include@requiredThe new directive adds new properties to the response object inside of React components. This enhances usability, and you can use the new properties to do powerful things like knowing if a query that used @skip sent the query to the server or not.
Before @alias was released, you had to inspect input variables to know if a data fetch happened, potentially passing around the variable all over your application. Here is example of not using @alias where at line 7, an extra null check needs to be made:
function MyUser({userKey, someVar}) {
  const user = useFragment(graphql`
    fragment MyFragment on User {
      ...ConditionalData @skip(if: $someVar)
    }`, userKey);

  if(user.someVar == null) {
    return "No data fetched";
  }
  return <ConditionalData userKey={user.ConditionalData} />
}
This is how you can use @alias to add an explicit check based on the query response. We can check ConditionalData as it only exists if the query was sent or not:
function MyUser({userKey}) {
  const user = useFragment(graphql`
    fragment MyFragment on User {
      ...ConditionalData @skip(if: $someVar) @alias
    }`, userKey);

  if(user.ConditionalData == null) {
    return "No data fetched";
  }
  return <ConditionalData userKey={user.ConditionalData} />
}
You can find a whole host of other improvements in the Relay version 17 release notes.
Coming from Relay v16, some breaking changes are introduced. These are reserved to the new validations mentioned previously, client-side schema and edge-types inside of @appendNode or @prependNode.
They may produce errors, and you will have to either fix them or turn off the validation using the provided compiler flag.
To test this, upgrade to Relay v17 and run the Relay Compiler. If it successfully compiles the project, that means validation has passed; if not, proceed to fix or disable.
Here is how you disable the new validations:
// relay.config.json
{
    //...
    "featureFlags": {
       "disable_schema_validation": false,
       "disable_edge_type_name_validation_on_declerative_connection_directives": {
          "kind": "disabled"
       }
    }
}
Building a real-time application with Relay v17 offers a powerful and efficient way to create dynamic, responsive web experiences.
By leveraging Relay’s capabilities for data fetching, mutations, and subscriptions, developers can create applications that update seamlessly in real-time. The combination of optimistic updates and server-pushed changes through subscriptions ensures that users always see the most up-to-date information without sacrificing performance or user experience.
As demonstrated in this tutorial, implementing features including real-time like counts and updates can significantly enhance the interactivity of your application. With Relay 17, you have the tools to build modern, real-time web applications that can scale and perform efficiently.
While GraphQL has some features for debugging requests and responses, making sure GraphQL reliably serves resources to your production app is where things get tougher. If you’re interested in ensuring network requests to the backend or third party services are successful, try LogRocket.


LogRocket lets you replay user sessions, eliminating guesswork around why bugs happen by showing exactly what users experienced. It captures console logs, errors, network requests, and pixel-perfect DOM recordings — compatible with all frameworks.
LogRocket's Galileo AI watches sessions for you, instantly aggregating and reporting on problematic GraphQL requests to quickly understand the root cause. In addition, you can track Apollo client state and inspect GraphQL queries' key-value pairs.

A guide for using JWT authentication to prevent basic security issues while understanding the shortcomings of JWTs.

Discover how to build, render, and automate product demo videos with Remotion, replacing traditional screen recordings with reusable React code.

Chrome’s Modern Web Guidance embeds modern web platform skills into AI coding agents, helping them choose native HTML, CSS, and browser APIs over legacy patterns.

Learn how to use Fallow to analyze AI-generated code, detect dead code, duplicate logic, and complexity issues, and integrate automated code quality checks into your AI-assisted development workflow.
Would you be interested in joining LogRocket's developer community?
Join LogRocket’s Content Advisory Board. You’ll help inform the type of content we create and get access to exclusive meetups, social accreditation, and swag.
Sign up now

