Remix is a full-stack web framework that lets you focus on the UI and work through web standards to deliver a fast, slick, and resilient UX. Remix is also a versatile framework that provides an opinionated approach to structure UIs, efficient routing, and server-side rendering capabilities.

In this tutorial, you will build a simple full-stack application using Remix, Prisma, and MySQL as the database. It will be a simple contact-list app where users can read, create, update, and delete contacts. You will also explore the core concepts of data modeling using Prisma ORM, database integration, creation of API endpoints, and frontend integration using Remix component-based architecture.
To complete this tutorial, you will need a basic knowledge of Remix, familiarity with working with Prisma, and a basic understanding of MySQL.
Jump ahead:
The Replay is a weekly newsletter for dev and engineering leaders.
Delivered once a week, it's your curated guide to the most important conversations around frontend dev, emerging AI tools, and the state of modern software.
To get started with Remix installation, run the following command:
npx create-remix@latest contact-list
For this project, we will be installing the following dependencies:
npx prisma @prisma/client esbuild-register ts-node tsconfig-paths
Once the dependencies have all been installed, we can move to the next step of initializing Prisma ORM in the project and connecting it to the MySQL database.
Now, we need to connect to our MySQL database. Start by running the following command:
npx prisma init
This will initialize the Prisma directory in the project folder and createschema.prisma and an envfile where the database connection will be implemented. We will use the MySQL Workbench to create the MySQL database. Now, click the + icon to create a new database connection:
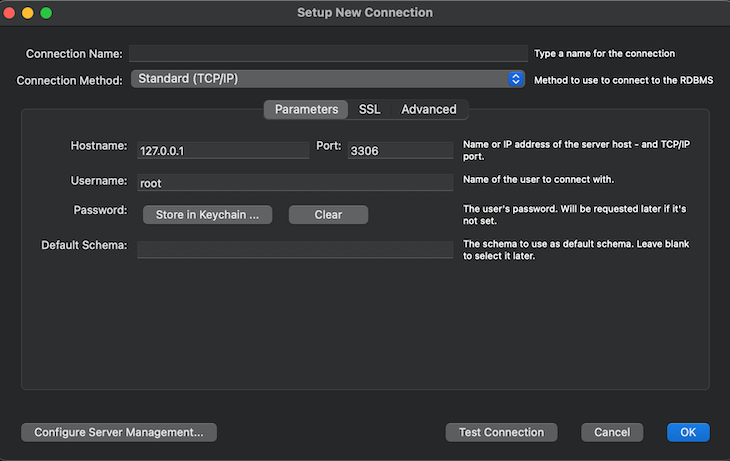
In the connection name, enter ContactList as the name, and select Test Connection. From there, you should see a successful connection popup modal:

Select OK to create the database. Next, set the DATABASE_URL in the .env file in the project directory with the database URL as shown below:
DATABASE_URL="mysql://root:[email protected]:3306/ContactList"
Now, go to the folder created in the project directory and in the schema.prisma file set the provider of the data source as MySQL. The URL value should load the DATABASE_URL in the .env file, like so:
prisma/schema.js

generator client {
 provider = "prisma-client-js"
}

datasource db {
 provider = "mysql"
 url      = env("DATABASE_URL")
}
Now, create a schema model in the same file below:
model ContactList {
 id        Int     @id @default(autoincrement())
 firstName String
 lastName  String
 email     String  @unique
 phone     String? @unique
 createdAt DateTime @default(now())
 updatedAt DateTime @updatedAt
}
Then, run npx prisma migrate dev to create a new table in the database named ContactList and apply any pending migrations. You should see a message like the image below, indicating that your database is now in sync with the newly created schema:

To confirm that the schema exists in the MySQL database, go to MySQL WorkBench and connect to the database created earlier. You should see the following schema:
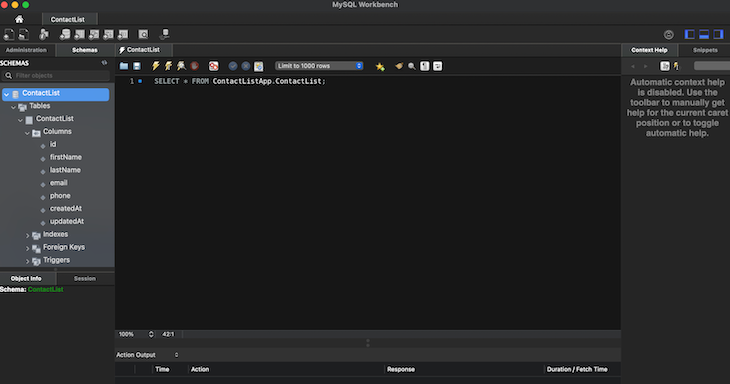
Nice work; the database is connected!
Seeding data essentially refers to filling a database with preliminary data. This is accomplished by introducing example data into the database table, which is an initial step in the application’s development. First, create a new seed.ts. file in the Prisma directory. Then, inside this file, add this block of code:
prisma/seed.ts
This is a typescript file

import { PrismaClient } from "@prisma/client";

const seedData = [
 {
   firstName: "John",
   lastName: "Doe",
   email: "[email protected]",
   phone: "+123456789",
 },
 {
   firstName: "Jane",
   lastName: "Smith",
   email: "[email protected]",
   phone: "+987654321",
 },
];

async function seed() {
 const prisma = new PrismaClient();

 try {
   for (const contact of seedData) {
     await prisma.contactList.create({
       data: contact,
     });
   }

   console.log("Seed data has been inserted successfully.");
 } catch (error) {
   console.error("Error seeding data:", error);
 } finally {
   await prisma.$disconnect();
 }
}

seed();
We used the code above to seed data into the created database. Then, we declared a seedData array with two objects. Inside the asynchronous seed function, we initiated a fresh PrismaClient instance and used a try-catch block to handle any potential errors.
We also used a for loop to iterate over each of the contact objects inside seedData. Additionally, the initiated PrismaClient was used to create a new contact in the contactList table of the database. Lastly, we used the disconnect method on PrismaClient to close the database connection.
Now, go ahead and run the node --require esbuild-register prisma/seed.tscommand to insert the seed data. You should see a message like this in your terminal:
![]()
To confirm the seeded data, go to the database on MySQL WorkBench and run the following query:
SELECT * FROM ContactList.ContactList;
This command retrieves all rows and columns from the ContactList table in the ContactList schema. Now, we have two sets of data seeded inside the database:

In this section, we will go through how to build the backend with Prisma. We will be creating the methods to create, read, update, and delete contacts using the PrismaClient method.
When called from the frontend, the getAllContacts method will retrieve all the contacts from our database. Add the below code in the prisma/contact file:
// prisma/contact.ts
// This is a typescript file

import { PrismaClient } from "@prisma/client";
import type { ContactListInterface } from "~/routes/contacts.enum";

const db = new PrismaClient();

export const getAllContacts = async () => {
 return await db.contactList.findMany();
};
In the code above, we use PrismaClient to interact with the database and fetch all the contacts from the contactList table. The GetAllContacts interface defined the Contact data structure. Now, add the following code:
//app/routes/contacts.enum.tsx
// This is a typescript file

export type GetAllContacts = {
 id: number;
 firstName: string;
 lastName: string;
 email: string;
 phone: string;
};

export type CreateContact = {
 firstName: string;
 lastName: string;
 email: string;
 phone: string;
};

export type UpdateContact = {
 id?: number;
 firstName: string;
 lastName: string;
 email: string;
 phone: string;
};
In the code block above, we initiated a PrismaClient instance using the new PrismaClient() method and stored a db variable. As you can see, the getAllContacts function fetched all the contacts from the contactList table using Prisma’s findMany() method.
So, whenever this function is called on the frontend, it will return all the contacts in the database. Now that we’ve gone over getting all the contact lists, let’s review how to retrieve one contact. Enter the following code:
//prisma/contact.ts
// This is a typescript file

export const getContactById = async (id: number) => {
 return await db.contactList.findUnique({
   where: {
     id,
   },
 });
};
In the code block above, we used getContactById to retrieve a single contact. This function takes id as an argument. Then, the findUnique method is used to find one contact by the ID passed to the function.
The creareContact, updateContact, and deleteContact methods will be created in this section, which will be called when integrating on the frontend to perform the operations specifically. Starting with the createContact function, add the below code to the contact.ts file:
//prisma/contact.ts
// This is a typescript file

export const createContact = async (contact: CreateContact) => {
 try {
   return await db.contactList.create({ data: contact });
 } catch (error) {
   console.error("Error creating contact:", error);
   throw error;
 }
};
In the code above, we used createContact to create new contact data and took the contact object as the argument. Then, we used try-catch to wrap the code around creating a new contact to handle errors. From there, we use try block to create a new contact from the contact data sent from the frontend. Now, any errors will be caught by the catch block.
Now, we’ll explore how to update a contact. Enter the following code:
//prisma/contact.ts
// This is a typescript file

export const updateContact = async (
 id: number,
 contact: ContactListInterface
) => {
 return await db.contactList.update({
   where: {
     id,
   },
   data: contact,
 });
};
The updateContact function takes in two arguments: the contact id and the updated contact object. In the function, the update method from the initialized Prisma client is called on the contactList table to update the contact through its ID.
The last thing we need to do is go over how to delete a contact. The deleteContact function takes in the id as an argument and uses delete used on db to access the contactList table and delete a contact by its ID. Here’s what that looks like:
//prisma/contact.ts
// This is a typescript file

export const deleteContact = async (id: number) => {
 return await db.contactList.delete({
   where: {
     id,
   },
 });
};
In this section, we will work on the frontend part of the project, where we will create the UI and perform CRUD operations on the UI based on the methods we created using Prisma.
To get started, the getAllContacts method will be used to get all contacts currently in the database and render it on the UI. In the contact.tsx file inside the route folder, add the below code:
//app/routes/contact.tsx
// This is a typescript file

import { Link, Outlet, useLoaderData } from "@remix-run/react";
import { getAllContacts } from "prisma/contacts";
import type { GetAllContacts } from "./contacts.enum";
export const loader = async () => {
 const contactList = await getAllContacts();
 return contactList;
};

export default function ContactLists() {
 const data = useLoaderData();
 return (
   <div>
     <h1>Contacts Lists</h1>
     <Link to="/contacts/new">
       <button>Create Contact</button>
     </Link>

     {data.map((contact: GetAllContacts) => {
       return (
         <Link to={`/contacts/${contact.id}`} key={contact.id}>
           <h2>
             {contact.firstName} {contact.lastName}
           </h2>
         </Link>
       );
     })}
     <Outlet />
   </div>
 );
}
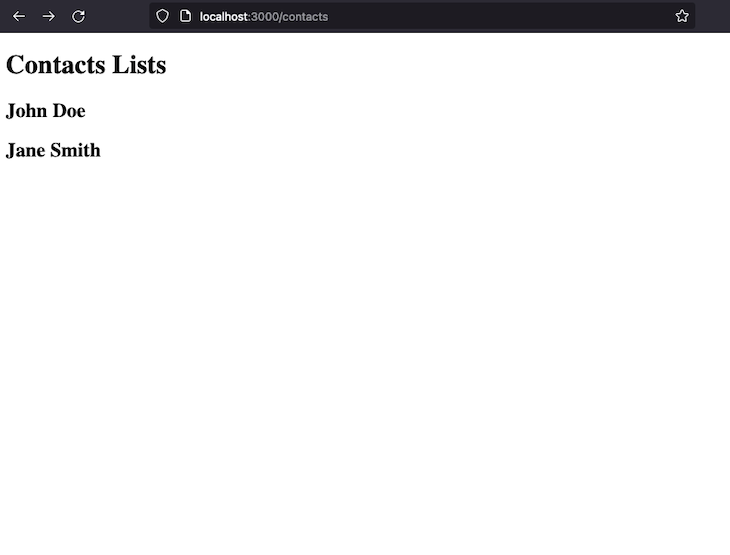
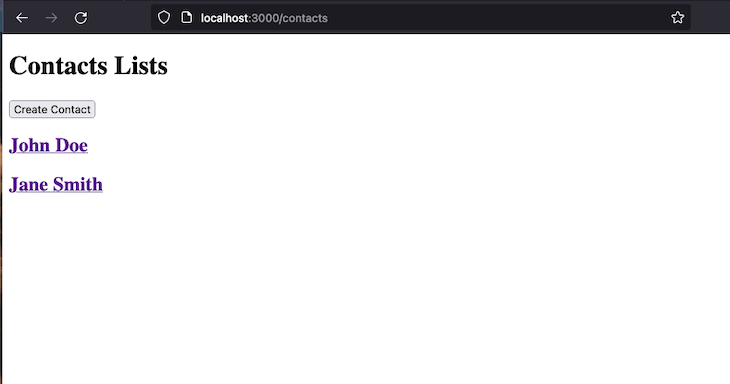
Here, the loader function fetches all the contacts from the database using the getAllContacts function we created earlier. The useLoaderData Hook is used to access the data loaded by the loader in the component. This will make the component access the contact list data and render it during the server-side rendering (before the page loads).
The array of data returned is mapped over while rendering each contact’s first and last names. Let’s test this out by going to the contact route:
To get started, add a Link component to wrap the contacts name in the contacts.tsx file. This allows us to navigate to the id of the contact page we are clicking at a particular time. Here’s what that looks like:
This is a typescript file

/app/routes/contacts.tsx

 {data.map((contact: GetAllContacts) => {
       return (
         <Link to={`/contacts/${contact.id}`} key={contact.id}>
           <h2>
             {contact.firstName} {contact.lastName}
           </h2>
         </Link>
       );
     })}
Now, create a new file in the routes directory with the name contacts.$contactId.tsx. The $contactId part of the file name signifies a dynamic parameter in the contacts route. With this naming convention, the rendering and logic of a dynamic page related to contacts will be handled properly.
For example, if the route is /contacts/1, the 1 represents the contactId specified in the file name. Now, enter the following code:
This is a typescript file
/app/routes/contacts.$contactsId.tsx
import type { LoaderArgs, LoaderFunction } from "@remix-run/node";
import { getContactById } from "prisma/contacts";
import type { ContactListInterface } from "./contacts.enum";
import { useLoaderData } from "@remix-run/react";
export const loader: LoaderFunction = async ({ params }: LoaderArgs) => {
const contact = await getContactById(Number(params.contactId));
return contact;
};
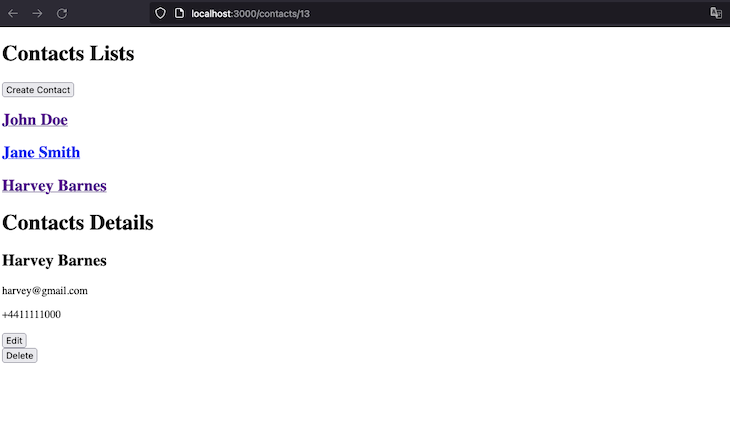
export default function ContactDetailsData() {
const { firstName, lastName, email, phone } =
useLoaderData<ContactListInterface>();
return (
<div>
<h1>Contacts Details</h1>
<div>
<h2>
{firstName} {lastName}
</h2>
<p>{email}</p>
<p>{phone}</p>
</div>
</div>
);
}
Here, we defined the loader again to load the data for a specific contact route using the LoaderFunction. This function takes in the params object as an argument, which contains the dynamic parameters passed to the loader, in this case, the contactId.
Then, we called getContactById in the loader. The contactId inside the params object is passed as the argument while parsing it as a number using the Number method. Then, the retrieved contact is returned from the loader and made available to the component through useLoaderData.
You can click any of the names rendered in the contact list page, and it will redirect you to the route of that particular contact with the ID:
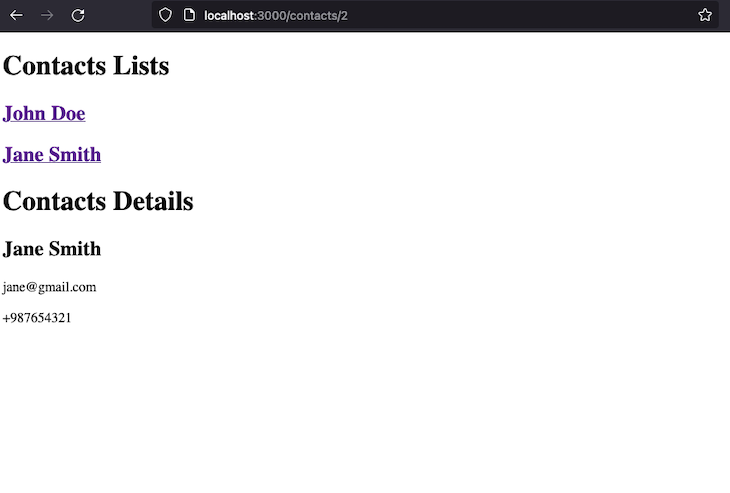
When the first name is clicked, it takes us to the route (/contacts/1) of Jane Smith with the full contact info, same as the second contact.
To create a new contact on the frontend, we will create a new - contacts.new.tsx file. The .new addition to the route filename creates a / in the URL, i.e., /contact/new. Here’s what that looks like:
This is a typescript file
// app/routes/contacts.new.tsx

import type { CreateContact } from "./contacts.enum";
import { Form, useActionData } from "@remix-run/react";
import type { ActionFunction } from "@remix-run/node";
import { redirect } from "@remix-run/node";
import { createContact } from "prisma/contacts";

export const action: ActionFunction = async ({ request }) => {
 const formData = await request.formData();
 const data: CreateContact = {
   firstName: formData.get("firstName") as string,
   lastName: formData.get("lastName") as string,
   email: formData.get("email") as string,
   phone: formData.get("phone") as string,
 };

 await createContact(data);

 return redirect("/contacts");
};

export default function Create() {
 const data = useActionData<CreateContact>();
 return (
   <div>
     <h1>Create Contact</h1>
     <Form method="post">
       <label htmlFor="firstName">First Name</label>
       <input type="text" name="firstName" id="firstName" />
       <label htmlFor="lastName">Last Name</label>
       <input type="text" name="lastName" id="lastName" />
       <label htmlFor="email">Email</label>
       <input type="text" name="email" id="email" />
       <label htmlFor="phone">Phone</label>
       <input type="text" name="phone" id="phone" />
       <button type="submit">Submit</button>
     </Form>
   </div>
 );
}
In the code block above, we created a Create component with an h1 heading. Then, the Form component was used to wrap the form input and submit button. Additionally, the action function creates the contact logic.
Then, it takes in an object containing the request parameter that represents the HTTP request of the object. The request.formData() method was used to get the formData submitted with the request. The formData extracted was then used to populate the data object, which was passed as the argument to the createContact function.
Finally, we redirected the user to the contacts page once the contact was created. Now, go ahead and add a Create button to the contacts.tsx file like this:
<h1>Contacts Lists</h1>
     <Link to="/contacts/new">
       <button>Create Contact</button>
     </Link>
Let’s create a new contact and see how it works:
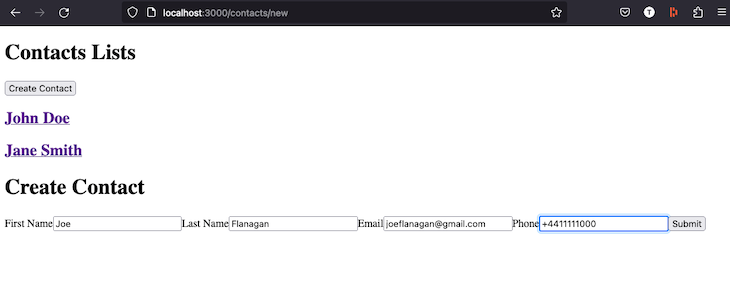
Once you submit the information, you should be redirected to the Contacts page and see the newly created contact:


To implement the update feature, create a new file namedcontact.edit.$contactId.tsx. Here’s what the code will look like:
// This is a typescript file
// app.routes/contacts.edit.$contactId.tsx

import { Form, useLoaderData } from "@remix-run/react";
import type { UpdateContact } from "./contacts.enum";
import type {
 ActionFunction,
 LoaderArgs,
 LoaderFunction,
} from "@remix-run/node";
import { redirect } from "@remix-run/node";
import { getContactById, updateContact } from "../../prisma/contacts";

export const loader: LoaderFunction = async ({ params }: LoaderArgs) => {
 const contact = await getContactById(Number(params.contactId));
 return contact;
};

export const action: ActionFunction = async ({ request, params }) => {
 const contactId = Number(params.contactId);
 const formData = await request.formData();
 const updatedContact: UpdateContact = {
   firstName: formData.get("firstName") as string,
   lastName: formData.get("lastName") as string,
   email: formData.get("email") as string,
   phone: formData.get("phone") as string,
 };

 await updateContact(contactId, updatedContact);

 return redirect("/contacts");
};

export default function Edit() {
 const contact = useLoaderData<Partial<UpdateContact>>();
 return (
   <div>
     <h1>Edit Contact</h1>
     <Form method="post">
       <label htmlFor="firstName">First Name</label>
       <input
         type="text"
         name="firstName"
         id="firstName"
         defaultValue={contact?.firstName}
       />
       <label htmlFor="lastName">Last Name</label>
       <input
         type="text"
         name="lastName"
         id="lastName"
         defaultValue={contact?.lastName}
       />
       <label htmlFor="email">Email</label>
       <input
         type="text"
         name="email"
         id="email"
         defaultValue={contact?.email}
       />
       <label htmlFor="phone">Phone</label>
       <input
         type="text"
         name="phone"
         id="phone"
         defaultValue={contact?.phone}
       />
       <button type="submit">Save</button>
     </Form>
   </div>
 );
}
The loader will use the LoaderFunction method to load the data for this route. The contact object is retrieved from the useLoaderData Hook, which is then used to prefill the input fields once the user goes to the edit page.
The action used the ActionFunction method to handle data mutations for this route. It takes in two arguments, the request and params object. The contactId is extracted from the params and request.formData() is used to get the body of the edited form data.
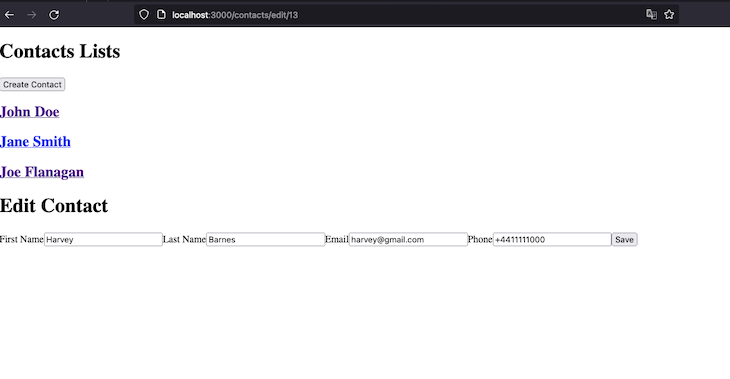
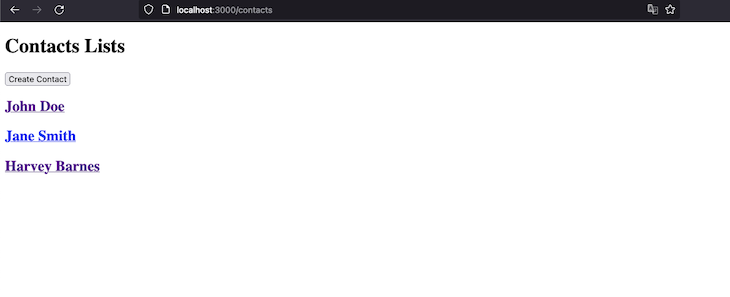
The updateContact function is then called, and the extracted contactId and formData are passed as the argument. Lastly, the redirect method is called to redirect the user to the /contact page once the edit is done successfully. Now, let’s edit the newly created data:
To delete a contact, the code addition will be done in the contact.$contactId.tsx file. Add the following code:
export const action: ActionFunction = async ({ params }) => {
 await deleteContact(Number(params.contactId));
 return redirect("/contacts");
};
The action function here takes in the params as an argument. This object contains the parameters passed to the route. Inside the function, the deleteContact function is called with the params.contactId as the argument representing the ID of the contact we want to delete.
The Number method converts the ID from a string to a number. Finally, after deleting a contact, the application is redirected to the /contacts route. Also, add the Delete button in the same file with the following code:
<Form method="post">
       <button type="submit">Delete</button>
     </Form>
Now, let’s test it out:
There are several options for deploying a Remix app, but Remix has a favorite provider for deployment. The deployment method of choice is Fly. Visit the deployment docs on the Fly for step-by-step of deploying your Remix app.
That’s it! We have come to the end of building a basic full-stack application using Remix, Prisma, and MySQL. So far, we learned how to set up the development environment when creating such applications, needed dependencies, initializing Prisma in the project, working with data schemas, seeding data, creating API routes, and performing CRUD operations. You can find the source code for this project in my GitHub repository here.
Install LogRocket via npm or script tag. LogRocket.init() must be called client-side, not
server-side
$ npm i --save logrocket

// Code:

import LogRocket from 'logrocket';
LogRocket.init('app/id');
// Add to your HTML:

<script src="https://cdn.lr-ingest.com/LogRocket.min.js"></script>
<script>window.LogRocket && window.LogRocket.init('app/id');</script>

When should you move API logic out of Next.js? Learn when Route Handlers stop scaling and how ElysiaJS helps.

Explore how Dokploy streamlines app deployment with Docker, automated builds, and simpler infrastructure compared to traditional CI/CD workflows.

A side-by-side look at Astro and Next.js for content-heavy sites, breaking down performance, JavaScript payload, and when each framework actually makes sense.

AI-generated tests can speed up React testing, but they also create hidden risks. Here’s what broke in a real app.re
Hey there, want to help make our blog better?
Join LogRocket’s Content Advisory Board. You’ll help inform the type of content we create and get access to exclusive meetups, social accreditation, and swag.
Sign up now

