
PHP developers can find it daunting to code for Gutenberg, the new WordPress editor, since it requires deep knowledge of React and JavaScript.

That was my own experience when I starting building my first block several months ago. Even though I’m still a ways away from mastering the languages, I’ve been able to somewhat adapt to the new paradigm and have succeeded in producing several blocks.
In this article, I will share several tips to understand what to pay attention to when coding for Gutenberg.
The Replay is a weekly newsletter for dev and engineering leaders.
Delivered once a week, it's your curated guide to the most important conversations around frontend dev, emerging AI tools, and the state of modern software.
My main way for learning how to do something in Gutenberg is by checking how the Gutenberg team is doing it, mostly by checking the code in the repo.
Even if we already know React, JavaScript, Redux, webpack, or any of the libraries used by Gutenberg, it is highly advisable to check the code in the repo. Gutenberg provides a layer of abstraction on top of the libraries it depends on, and several of its functionalities only work in a way specific to Gutenberg.
That is the case, for instance, for interacting with the data store, done through package @wordpress/data. Even though this package is implemented on top of Redux, it incorporates several important differences with it, so having experience using Redux from a prior project may still not be enough to know how to use it within Gutenberg.
Any functionality implemented for Gutenberg is also available for our own use. It is a good idea to be a heavy user of the WordPress editor, exploring all of its screens and user interactions, to discover and experiment with these functionalities and decide whether to port them to our own plugins.
For instance, I noticed the welcome screen shown the first time the user interacts with the WordPress editor:
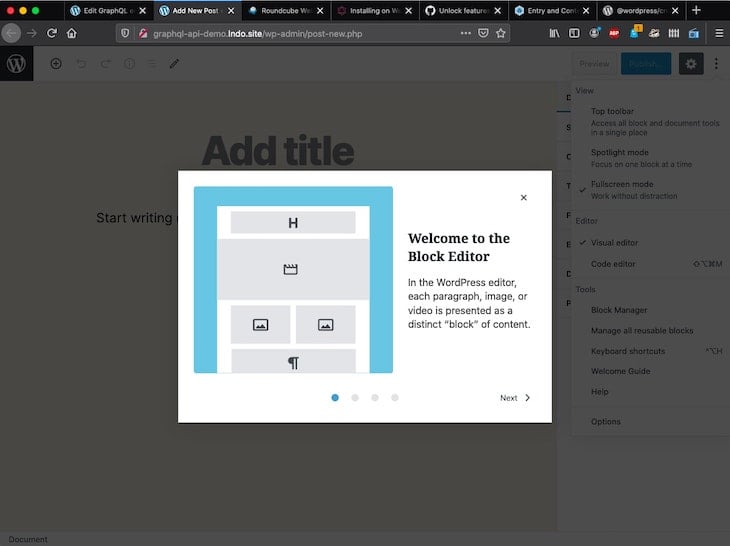
I thought this user interaction was very practical to display user documentation, so I decided to port it over to my own plugin.
To find the code, I searched for string "In the WordPress editor, each paragraph, image, or video" (which appears on the editor’s welcome guide), which produces file packages/edit-post/src/components/welcome-guide/index.js with this code:
// imports...
// ...

export default function WelcomeGuide() {
  // ...

  return (
    <Guide
      className="edit-post-welcome-guide"
      contentLabel={ __( 'Welcome to the block editor' ) }
      finishButtonText={ __( 'Get started' ) }
      onFinish={ () => toggleFeature( 'welcomeGuide' ) }
    >
      <GuidePage className="edit-post-welcome-guide__page">
        <h1 className="edit-post-welcome-guide__heading">
          { __( 'Welcome to the block editor' ) }
        </h1>
        <CanvasImage className="edit-post-welcome-guide__image" />
        <p className="edit-post-welcome-guide__text">
          { __(
            'In the WordPress editor, each paragraph, image, or video is presented as a distinct “block” of content.'
          ) }
        </p>
      </GuidePage>

      /* More <GuidePage> components */
      /* ... */
    </Guide>
  );
}
I copy/pasted the code from the repository to my plugin and edited it to suit my needs. The result ended up being very satisfactory:
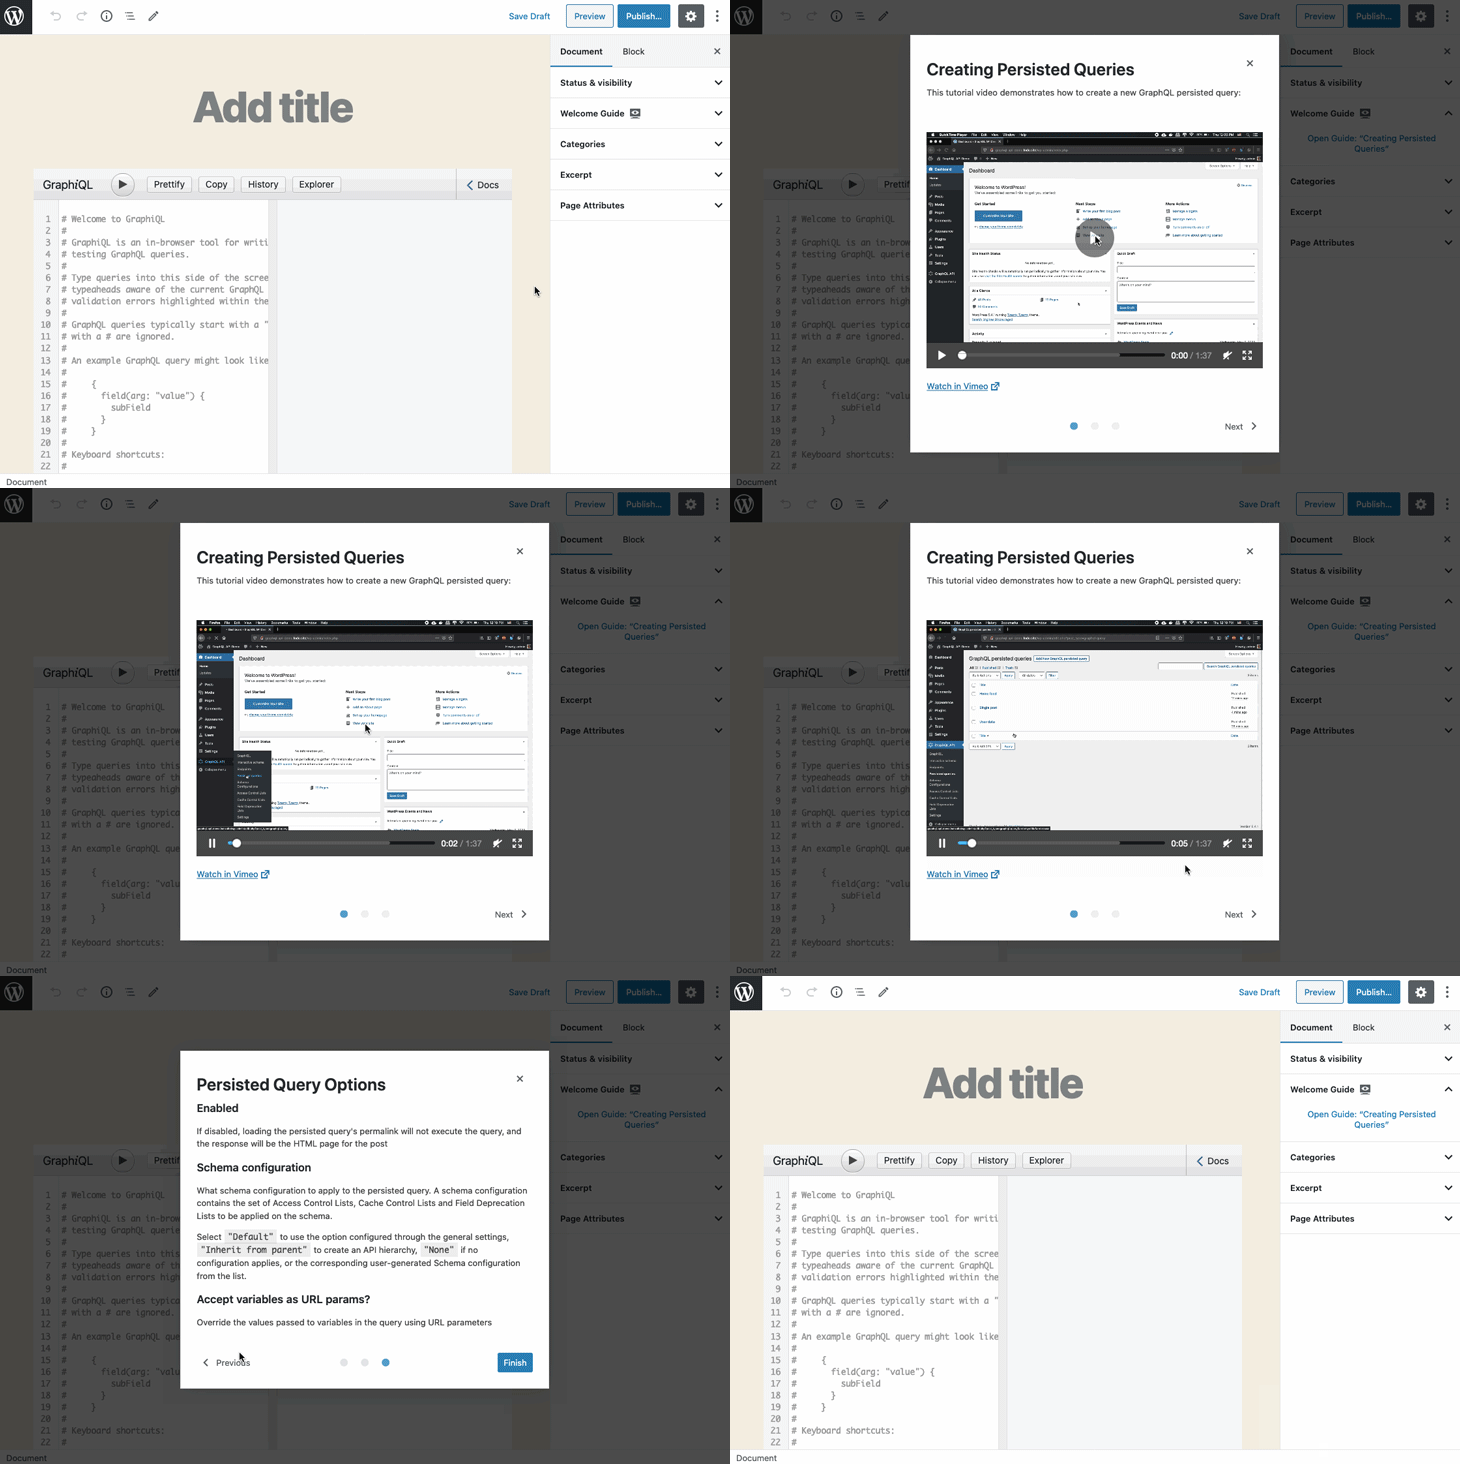
Gutenberg’s documentation is found in the Block Editor Handbook. It is not yet thorough, which makes it difficult for beginners to start coding for Gutenberg.
For instance, I got the following impressions when learning from it:
Even though it has plenty of room to improve, the existing documentation can still be very helpful. So do browse all of the documentation, reading it a few times until things start clicking. And whenever it is not good enough concerning some topic, try to fill the blanks by learning from the code in the repository, as much as possible.
@wordpress/create-block package to scaffold a new block@wordpress/create-block is a tool for scaffolding new blocks, maintained by the Gutenberg team. I described how to use this package in my previous article, Setting up your first Gutenberg project.
Gutenberg is based on React, a JavaScript library for building user interfaces described through components. A component is a JavaScript class or function intended to render some specific interface and customize it through properties. It is also composable, i.e., a component can contain another component, thus reusing its code.
Gutenberg is based on blocks, where a block is a high-level React component with certain features (for instance, its attributes are saved to the database). Thus, it follows that blocks can be composed of components (and blocks can also contain nested blocks, but this is a different matter).
Even though Gutenberg is seemingly all about blocks, there are certain situations where we interact with Gutenberg not through blocks, but through components.
For instance, the welcome guide shown earlier displays user documentation in a modal window and is triggered via a link placed in the Document TabPanel:
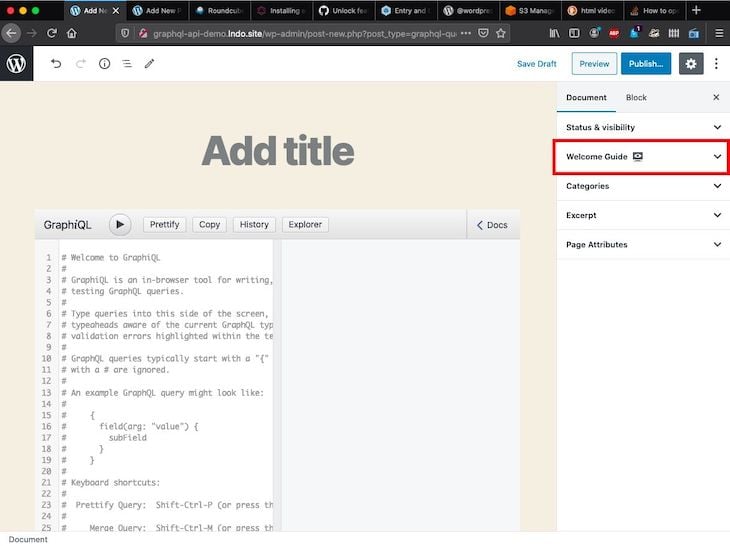
Creating this panel is accomplished through <PluginDocumentSettingPanel>, which is a component, not a block:
import { registerPlugin } from '@wordpress/plugins';
import { PluginDocumentSettingPanel } from '@wordpress/edit-post';

const WelcomeGuidePluginDocumentSettingPanel = () => (
  <PluginDocumentSettingPanel
    name="welcome-guide"
    title="Welcome Guide"
    className="welcome-guide"
  >
    /* Link to open the modal window */
    /* ... */
    /* Modal window */
    /* ... */
  </PluginDocumentSettingPanel>
);

registerPlugin( 'welcome-guide-plugin-document-setting-panel', {
  render: WelcomeGuidePluginDocumentSettingPanel,
  icon: 'welcome-view-site',
} );
Would it be possible to satisfy the same use case — i.e., showing documentation to the user right in the editor — using a block? Let’s check this out.
We could have a block with an accordion element right at the top of the editor, initially closed:
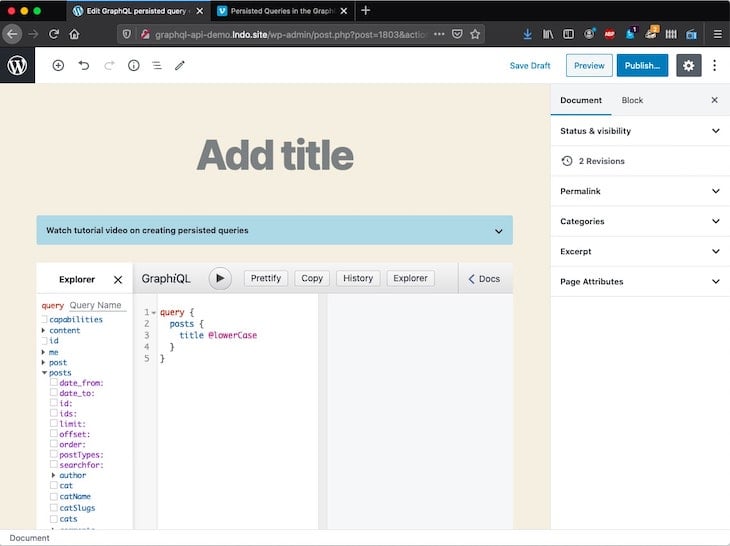
When clicking on it, it would open and display the user documentation, in this case via a video embedded from Vimeo:
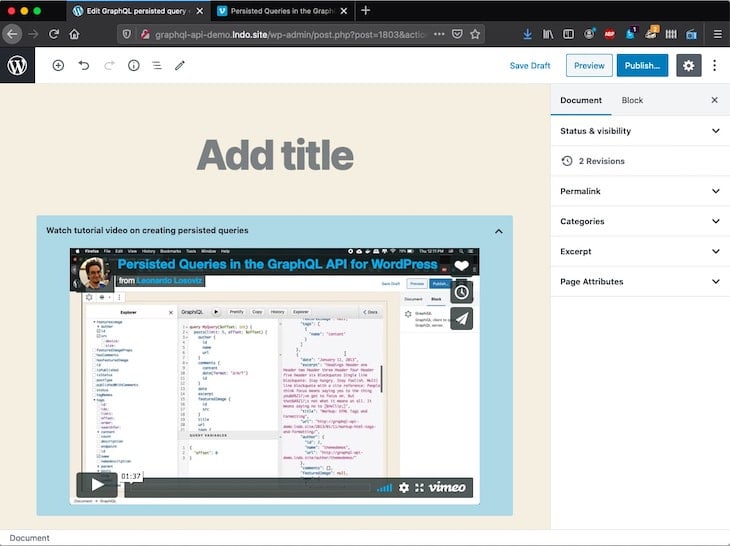
However, this scheme wouldn’t work out because a reference to the block (and its data, unless it’s a reusable block) is stored in the database entry for that post. Then, at least one of the following issues would take place:
core/html block and initialize it with its inner HTML through a template, but this doesn’t work because the template only allows us to define attributes, not content. Even if it did work, passing the HTML to implement an accordion (which requires CSS and maybe some JavaScript, too) through the template would be a hackAnd finally, even if all of these issues were resolved, once the block is added to the CPT, it can’t be modified or removed because Gutenberg shows warning messages when the template and the saved content are out of sync. This would confuse the user since the mismatch has nothing to do with user-provided content:
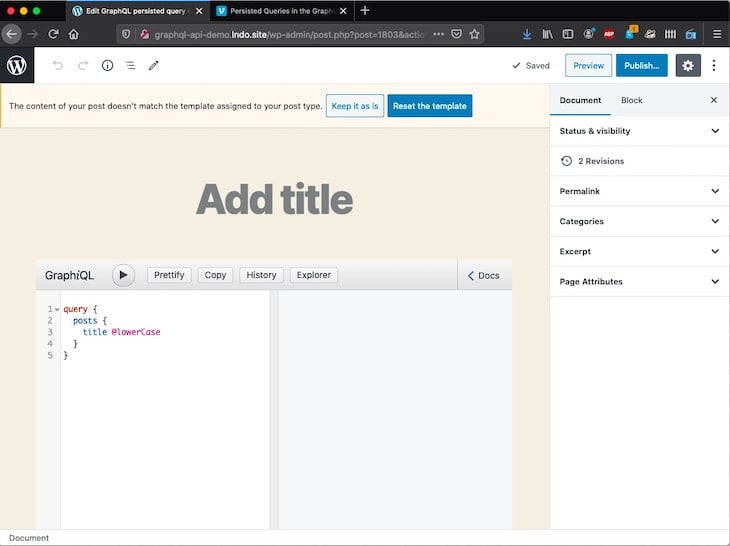
Conclusion: blocks are not suitable for all use cases, so pay attention if you need a block before you start coding it.
Any component shipped with Gutenberg is also available for own use. There are three ways to browse the list of components:
packages/components/srcAll these components are hosted on the @wordpress/components package, so we must install this package as a dependency in the block’s package.json file. To do that, open a terminal window and run in the block’s root folder:
npm install @wordpress/components --save-dev
Now, the block can import any component, such as a <Button>:
import { Button } from '@wordpress/components';

const MyButton = () => (
 <Button isSecondary>
   Label
 </Button>
);
The static import statement can take several forms. In this case, the name of the component, Button, must be wrapped with { }. It’s a good idea to read how module exports and imports work.
You can review the available components to date here.
The components shipped with Gutenberg do not cover all uses cases, so we will quite likely need to import external components from component libraries like Material-UI, React Bootstrap, Chakra UI, or others.
For instance, I needed to implement a multiselect for my plugin, and even though the SelectControl component from Gutenberg allows us to select multiple values, its user interface is not very polished:
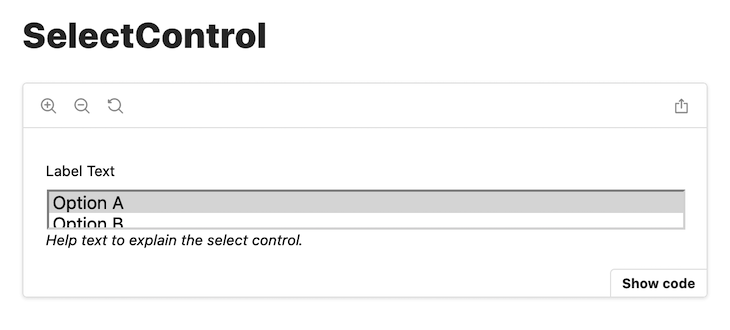
So, I headed to the npm registry, performed a search for “multiselect react”, and installed the first result — the library called react-select.
To install this library for a Gutenberg block (assuming that we have used @wordpress/create-block to create the block), we head to the terminal, step on the root folder of the project, and execute this command:
npm install react-select --save-dev
This command will add the "react-select" JavaScript dependency to file package.json and download the dependency under folder node_modules/. From now on, this library will be available to be used within the block, following its instructions:
import Select from 'react-select';

const MultiSelect = ( props ) => {
  const { defaultValue, options } = props;
  return (
    <Select
      defaultValue={ defaultValue }
      options={ options }
      isMulti={ true }
    />
  )
}
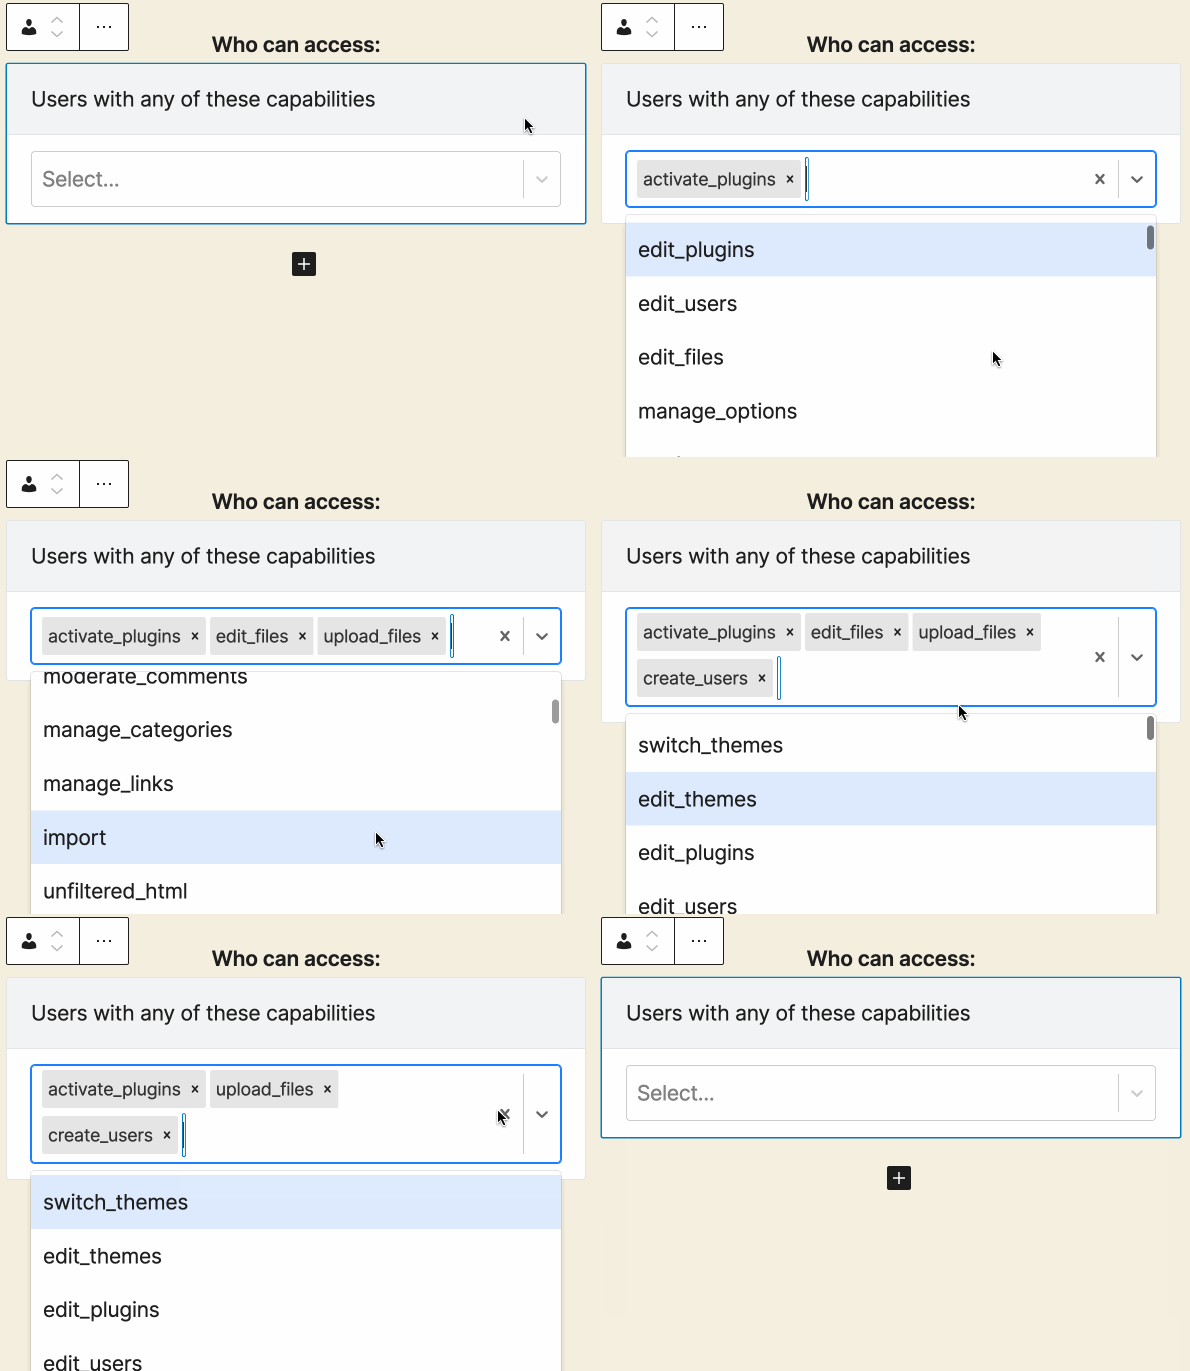
The user experience provided by this component is quite compelling, superior to the one provided by Gutenberg’s <SelectControl>:
When scaffolding a new block using @wordpress/create-block, all styling is, by default, done through the CSS preprocessor Sass. Sass adds scripting features for generating the CSS code — variables, nested rules, mixins, functions, and others.
For instance, the following Sass code:
$base-color: #c6538c;
$border-dark: rgba($base-color, 0.88);

.wp-block-my-block {
  .alert {
    border: 1px solid $border-dark;
  }
}
Produces this CSS output:
.wp-block-my-block .alert {
  border: 1px solid rgba(198, 83, 140, 0.88);
}
Blocks have two separate stylesheets: one for the editing experience, and one for the presentation on the page. Correspondingly, the scaffolded block contains two Sass files:
editor.scss (which is imported by edit.js) contains styles that apply to the editor only and is compiled to build/index.cssstyle.scss (which is imported by index.js) contains styles that apply to both the editor and the frontend and is compiled to build/style-index.css.At the core of Gutenberg lies webpack, the static module bundler for modern JavaScript applications.
webpack can be used to import any kind of asset inside the application, not only JavaScript — images, Markdown files (converting the code to HTML), or anything for which there is a loader.
Gutenberg’s webpack configuration is found here. A block can also provide its own webpack configuration by adding a webpack.config.js file in the root folder. The custom configuration can override the default configuration like this:
// Default webpack configuration
const defaultConfig = require( '@wordpress/scripts/config/webpack.config' );

// Add extra configuration, and export it
module.exports = {
  ...defaultConfig,
  module: {
    ...defaultConfig.module,
    rules: [
      ...defaultConfig.module.rules,
      // Add here a new rule
      // ...
    ],
  },
};
For instance, I have decided to use Markdown files to write the user documentation for the welcome guide shown earlier on. To process the .md files, we must provide webpack with a Markdown loader (and, according to its documentation, with an HTML loader), defining it through a custom webpack.config.js file like this:
const defaultConfig = require( '@wordpress/scripts/config/webpack.config' );

module.exports = {
  ...defaultConfig,
  module: {
    ...defaultConfig.module,
    rules: [
      ...defaultConfig.module.rules,
      {
        test: /\.md$/,
        use: [
          {
            loader: "html-loader"
          },
          {
            loader: "markdown-loader"
          }
        ]
      }
    ],
  },
};
Both the Markdown and HTML loaders are JavaScript dependencies, which must be imported to the project by executing this command in the terminal at the block’s root folder:
npm install --save-dev markdown-loader html-loader
Now, we can import the contents of a Markdown file (already rendered as HTML) and use it within any component:
import UserDocumentationContent from './user-documentation.md';

const UserDocumentation = ( props ) => {
  const { className } = props;
  return (
    <div
      className={ className }
      dangerouslySetInnerHTML={ { __html: UserDocumentationContent } }
    />
  );
}
Gutenberg comes in two versions: the Gutenberg plugin, which releases new features every two weeks, and its integration to WordPress core, which consolidates the new features every three to four months.
If we have used @wordpress/create-block to scaffold the new block, we can keep the block up to date with the latest version of all the WordPress packages by running this command in the root folder:
npm run packages-update
This command will retrieve the list of all the @wordpress/... packages in package.json and upgrade their versions to the latest one.
However, do it with care! WordPress had historically avoided introducing breaking changes to new releases, but that is not the case with Gutenberg, so we must check if anything stops working after upgrading to a newer version.
For instance, after upgrading them to use a newer version of @wordpress/scripts, several blocks stopped working when compiled for production. The reason was not clear at all: the problem could be due to webpack, Babel, Node, or a combination of them.
It took me five days of debugging, researching, and talking to people to find out what was going on and fix it. This setback makes it so clear how complex WordPress has become.
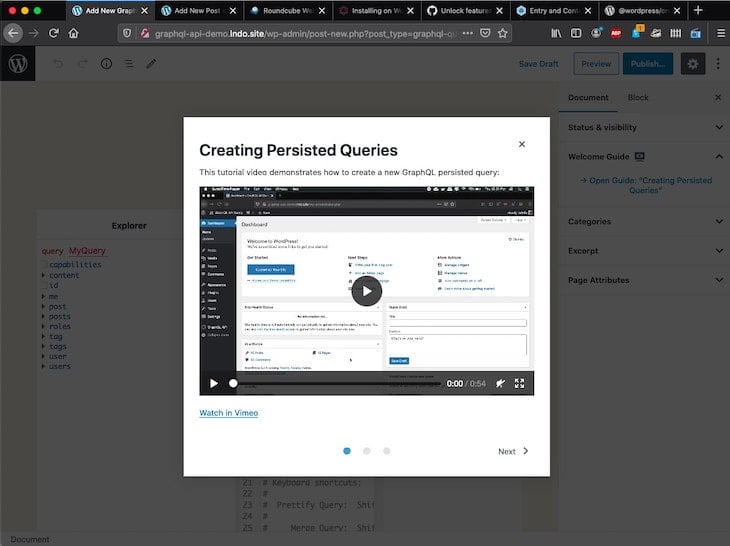
In addition, whenever there is a new release of the Gutenberg plugin, we must check if our blocks still work well, or if they need to be adapted to the new code. For instance, when I first created the welcome guide shown earlier on, it looked like this:
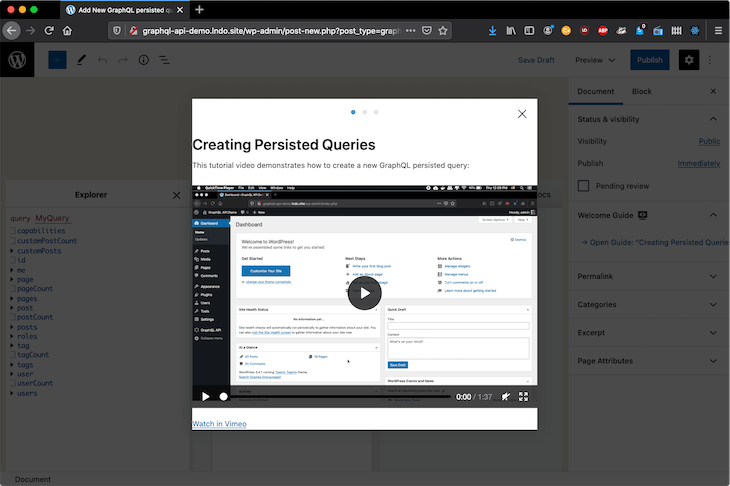
However, starting from Gutenberg version 8.2 onwards, it looks like this:
So, how do we monitor for breaking changes?
All packages use semantic versioning, so the version is composed of three numbers, separated with a dot: MAJOR.MINOR.PATCH. Whenever a version introduces breaking changes, then the MAJOR number is increased (e.g., from 9.1.0 to 10.0.0).
Every package has a CHANGELOG file declaring what has changed from version to version, including the breaking changes. So, we must check the list of @wordpress/... packages in the block’s package.json file and read the CHANGELOG for each of them.
For instance, the CHANGELOG for @wordpress/scripts is this one. I checked the release from which my blocks stopped working (version 10.0.0), but it doesn’t declare breaking changes, so either the problem must be in some other package or the breaking change was introduced unknowingly (and we need to pay extra attention).
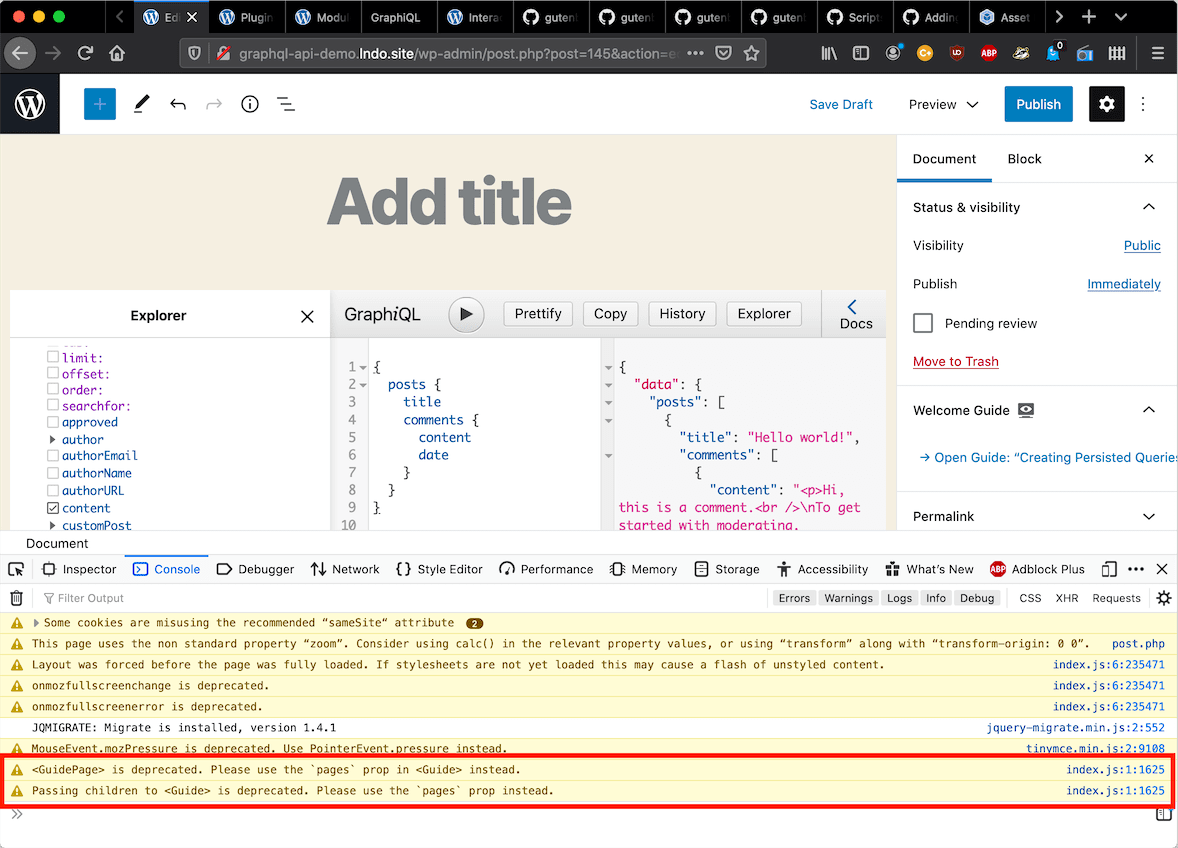
In addition, we must load Gutenberg in the browser and see if we get errors or deprecation notices in the DevTools console. For instance, a deprecation notice indicates to not use the <GuidePage> component anymore, which is the reason why my welcome guide has its styles broken:
Whenever we need to fix the code, we must also make sure it works against the two versions of Gutenberg: the latest release of the plugin, and the one integrated to WordPress core.
Keeping our blocks up to date is a time-consuming activity, to be carried out possibly every two weeks (with each new release of Gutenberg). This should be taken into account when estimating the effort needed to build blocks.
I added this section last, but it should actually be appraised at the very beginning.
A consideration from the information seen above is that Gutenberg is complex, requiring a substantial effort to execute, which can be translated as either time devoted to the project (for learning the technology, coding, testing) or money to employ somebody else to do it.
If you don’t have these, then you should consider whether Gutenberg is worth the trouble.
In certain situations, Gutenberg is certainly worth the trouble. For instance, if your application needs to provide a compelling user experience, then Gutenberg actually makes things easier to do than using legacy WordPress code (which mainly involves a combination of PHP, jQuery, and custom JavaScript).
However, in some other situations, using legacy WordPress PHP code could already be good enough for the use case at hand. For instance, concerning the welcome guide with user documentation shown earlier on, this use case can be satisfied without Gutenberg, using only PHP and CSS code, by reusing a functionality already coded in the WordPress admin:
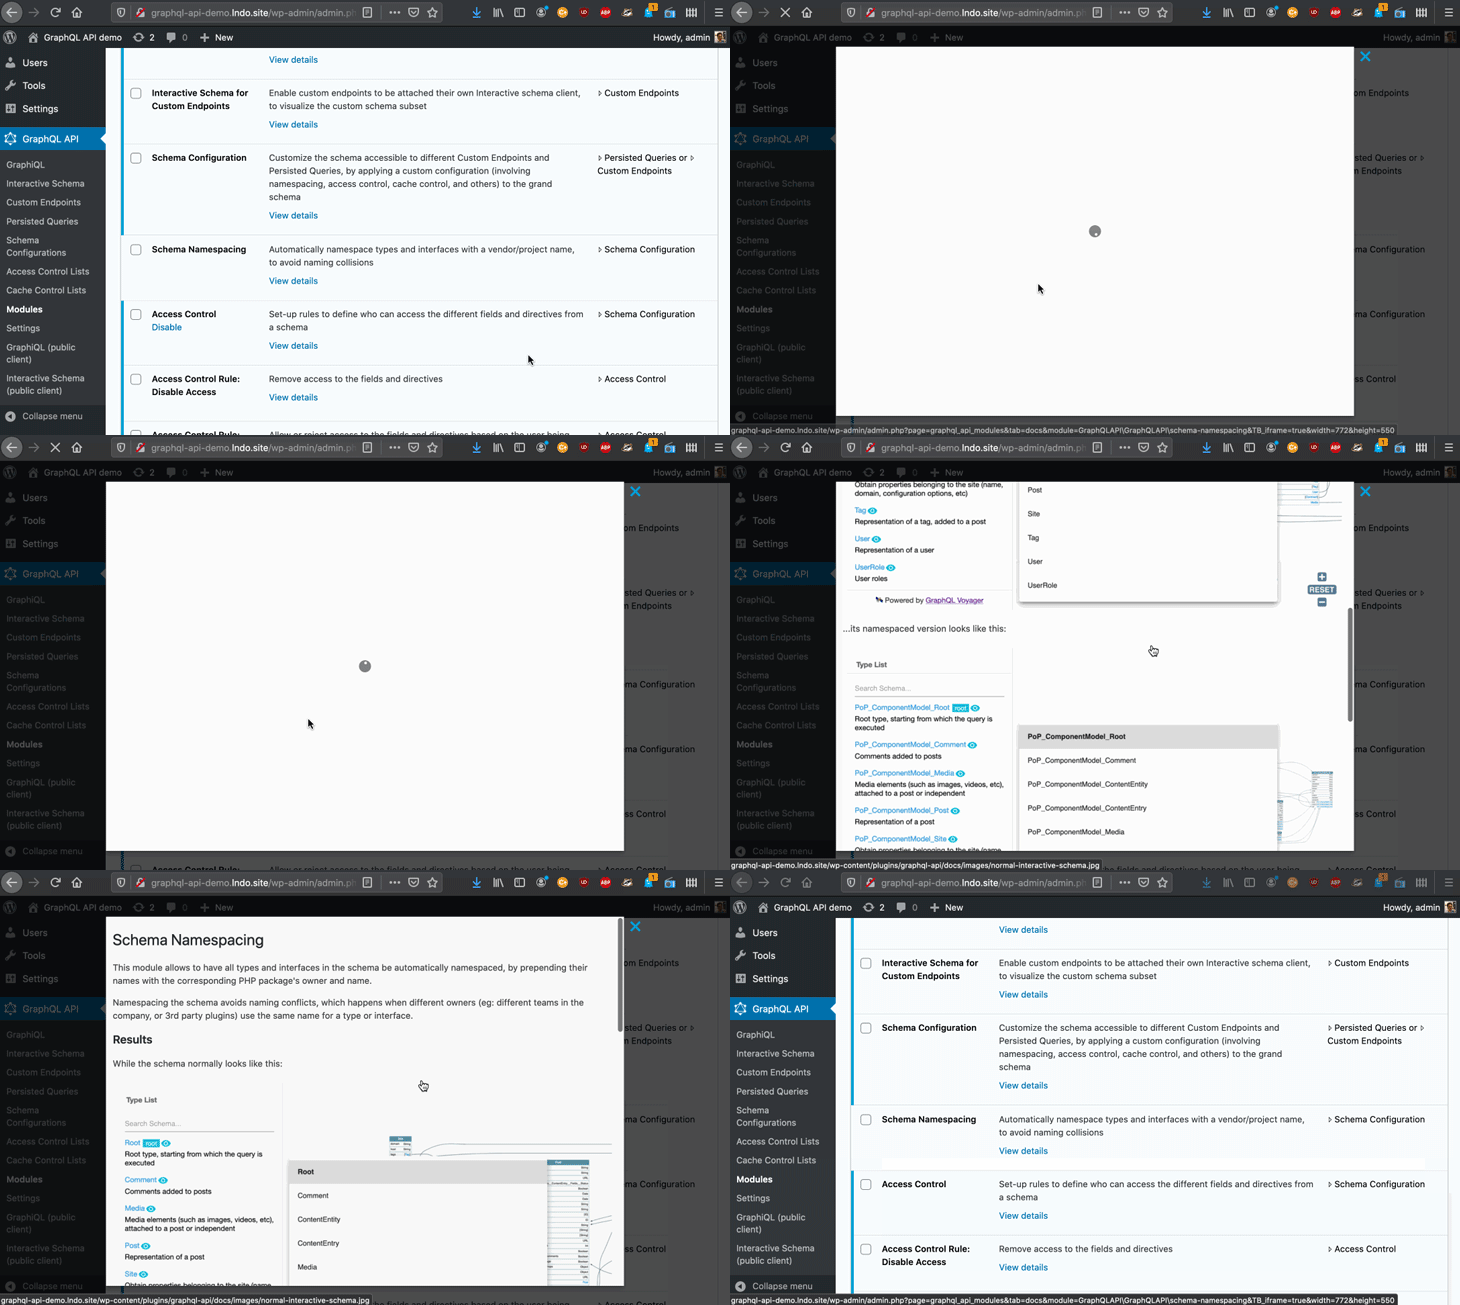
Both solutions succeeded to show documentation in a modal window. The user experience using Gutenberg is highly superior, but it also took me longer to carry out.
In conclusion, before building the block, make sure you really need it.
Gutenberg is extremely powerful, but it has a steep learning curve, especially for developers new to JavaScript.
I started using Gutenberg several months ago being a total beginner to React and JavaScript. I have since then learned a few things, sometimes from reading the documentation, other times from exploring the source code. I’ve shared these tips with my fellow beginners in this article to make it easier to start using Gutenberg.
Now, go build blocks!
Install LogRocket via npm or script tag. LogRocket.init() must be called client-side, not
server-side
$ npm i --save logrocket

// Code:

import LogRocket from 'logrocket';
LogRocket.init('app/id');
// Add to your HTML:

<script src="https://cdn.lr-ingest.com/LogRocket.min.js"></script>
<script>window.LogRocket && window.LogRocket.init('app/id');</script>

@container scroll-state: Replace JS scroll listeners nowCSS @container scroll-state lets you build sticky headers, snapping carousels, and scroll indicators without JavaScript. Here’s how to replace scroll listeners with clean, declarative state queries.

Explore 10 Web APIs that replace common JavaScript libraries and reduce npm dependencies, bundle size, and performance overhead.

Russ Miles, a software development expert and educator, joins the show to unpack why “developer productivity” platforms so often disappoint.

Discover what’s new in The Replay, LogRocket’s newsletter for dev and engineering leaders, in the February 18th issue.
Would you be interested in joining LogRocket's developer community?
Join LogRocket’s Content Advisory Board. You’ll help inform the type of content we create and get access to exclusive meetups, social accreditation, and swag.
Sign up now