Fuse Open is a hybrid mobile development framework that is hardly ever mentioned as an alternative to popular frameworks such as React Native, Flutter, or NativeScript.

That said, Fuse could be an interesting alternative, especially if you already have some web development experience and want to rapidly build prototypes and beautiful looking apps.
Fuse Open is built with designers and JavaScript developers in mind. Coding the UI feels a lot like drawing or using digital design tools such as Sketch or Figma. This makes it very easy move from mockup to actual code.
There is no need to learn a completely new framework — your business logic is written in almost pure JavaScript. Furthermore, Fuse is not a web-view. It compiles down to C++ for optimal native performance on mobile devices and has seamless interoperability with Objective-C (iOS) and Java (Android) where needed. Fuse is easy to learn, fun to write, and incredibly powerful.
Our goal in this tutorial is to create a simple Master–Detail cryptocurrency tracker application that will fetch data from a REST API, display an overview list, and allow us to navigate to individual pages.
We will display the latest and biggest cryptocurrencies for the master page and give each individual coin a dedicated detail page with its logo, name, price, and a detailed description. This is how our CryptoTracker will look like:
![]()
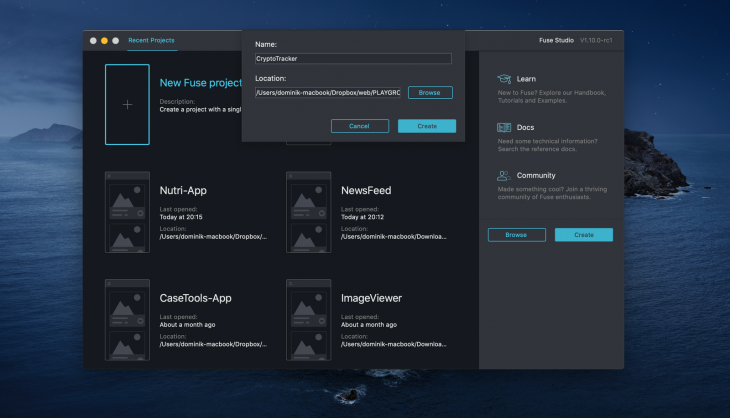
First, we will begin by creating a fresh new project and setting up our development environment. Open the Fuse Studio application, click on New Fuse project, and give your project a name.

Alternatively, you can also use the CLI and write fuse create app CryptoTracker, then cd into the directory, and finally, run fuse preview to launch the preview window. If you set up Fuse Studio correctly, the new Fuse open project should have loaded successfully and you should be able to see your app displayed as a blank page.
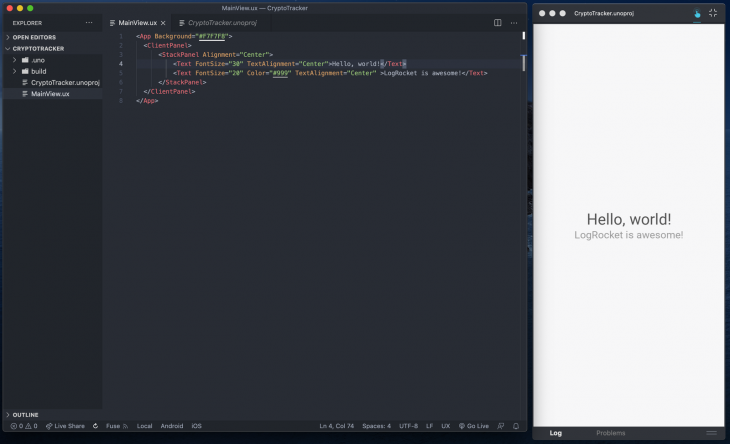
Before we dive into our main goal, let’s get a basic understanding of how Fuse works. I went ahead and positioned my text editor next to the app preview and added some lines of code resembling a typical Hello World example:

That’s it. That’s all it takes to create a Hello World application with Fuse. Whenever we save our project in VSCode, Fuse automagically hot-reloads the preview for us. There are just two files we are working with: MainView.ux and CryptoTracker.unoproj.
MainView.ux is the entry and heart of your application, while the .unoproj file lists all your application’s dependencies.
As you can see, we are working with an HTML-like structure that is called UX markup. Everything you put between the <App></App> tags will constitute the UI of your app. <ClientPanel> compensates for space taken up by the on-screen keyboard, status bar, and other OS-specific elements at the top and bottom edges of the screen.
<StackPanel> stacks children vertically by default. If we would remove the StackPanel, both texts would overlap each other. <Text> is one of Fuse’s primitive elements and helps us to render text.
Primitive elements are the basic building blocks of more complex visual elements. These primitives includes Text, Rectangle, Circle, Image, and Video. We will use some of these in our CryptoTracker later, so stay tuned.
To use JavaScript in our application, all we have to do is wrap our JavaScript code within a <JavaScript></JavaScript> block:
<App Background="#F7F7F8">
    <ClientPanel>
        <StackPanel Alignment="Center">
            <Text FontSize="20">Javascript Observable Example</Text>
            <Text FontSize="15" Color="Blue" Margin="0,20,0,0">Normal Counter</Text>
            <Text Value="{normalCounter}" Clicked="{increaseNormalCounter}" Alignment="Center" Margin="0,10,0,0" />
            <Text FontSize="15" Color="Purple" Margin="0,20,0,0">Observable Counter</Text>
            <Text Value="{observableCounter}" Clicked="{increaseObservableCounter}" Alignment="Center" Margin="0,10,0,0" />
        </StackPanel>
    </ClientPanel>

    <JavaScript>
        var Observable = require("FuseJS/Observable");

        // avoid this 👇
        var normalCounter = 1
        function increaseNormalCounter() {
            normalCounter = normalCounter + 1
        }

        // do this to have reactive data 👇
        var observableCounter = Observable(1)
        function increaseObservableCounter() {
            observableCounter.value = observableCounter.value + 1
        }

        module.exports = {
            normalCounter,
            observableCounter,
            increaseObservableCounter,
            increaseNormalCounter
        }
    </JavaScript>
</App>
Now, this might seem like a lot to take in but actually, it is quite straightforward. The example above shows an app that displays two text elements with the initial value of 1. When clicked, the value should increase by 1.
Notice that we have set up two variables: one is called normalCounter and the other observableCounter. When we use Fuse, we want to use Fuse’s own Observable API to change data in our UX file. This way it will automatically watch for dynamic changes of that value and update the UI in real time.
We also need to make sure that we always module.export our variables and functions. As you can see below, only our observableCounter gets updated in the UI:

That’s all business logic you need for now. We will now dive deeper and learn more about using JavaScript with Fuse while building our project.
Alright, now that we know the basics, let’s build the tracker. Shall we?
Like I have mentioned earlier, everything you put between the <App></App> tags will constitute the UI of your app. That sounds like it might be quite large by the time you build an entire app, right?
The great thing about Fuse is that it is designed to be as modular as possible so that this doesn’t happen. You can structure your app in whatever way that suits you best. Here is the structure we will use for our project:
CryptoTracker
├── build
├── CryptoTracker.unoproj
├── MainView.ux
└── Pages
│     └── Overview.ux
│     └── Detail.ux
└── Components
│     └── (CryptoCard.ux)
└── Assets
     └── imgs
        └── logo.png
MainView.uxLet’s remove the hello world code from above and replace it with the following:
<App Background="#F7F7F8">
        <ClientPanel>
                 <Router ux:Name="router" />
                 <Navigator DefaultPath="Overview">
                         <Overview ux:Template="Overview" router="router" />
                         <Detail ux:Template="Detail" router="router"/>
                 </Navigator>
        </ClientPanel>
</App>
In our project, we want to be able to navigate from an overview page to a detail page. In order to tell Fuse that we want to display and navigate between pages, we need to use the <Navigator> in combination with the <Router> tag.
The navigator expects templates instead of instances for its children. By defining the ux:Template attribute, we can tell the navigator to use our overview page as the DefaultPath. Whenever we start the application, the navigator will default to displaying the overview page.
Now that we’re using a navigator and templates, it’s time to tell the navigator which page we want to navigate. This is where the <Router> comes in! A router manages routing, which includes both specifying where in our app we’ll navigate to, and actually getting us there.
More specifically, a router will navigate through our app using a given route, which determines a sort of “target” that we want to navigate to, as well as possibly including some additional data to go along with it.
A router can also keep track of a history of routes we’ve been to before and navigate there again if we want. We give it a ux:Name so that we can reference it in our pages. Think about ux:Name as a unique identifier similar to a CSS id or class in web development.
overview.uxFirst, let’s add our logo with the title “CryptoTracker” below:
<Page ux:Class="Overview">
  <Router ux:Dependency="router" />
    <DockPanel>
        <StackPanel Dock="Top" Margin="0,50,0,0">
           <Image Width="60" Alignment="Center" File="../Assets/imgs/logo.png" />
           <Text FontSize="25" Alignment="Center" Margin="0,20,0,0" Value="CryptoTracker" />
        </StackPanel>
    </DockPanel>
</Page>
We use <DockPanel> to lay out its children by docking them to the different sides, one after the other. This will allow us to dock our logo to the top part of the page and add content below it.
Essentially, we are avoiding creating too many stack panels and making the code more legible. Next, we use the primitives <Rectangle> and <Circle> to design our “CryptoCard”.
For now, we will display the hard-coded data with the Value attribute instead of wrapping it inside a <Text> tag:
![]()
Right now, we only display one “CryptoCard” in our application. You might wonder how we build a list using UX? The answer is the Each class.
Each is a class that can be used to replicate an object once per item in an array. Each has a property called Items, which we can bind to an array. It will then replicate whatever children it has once per item in that array.
First, let’s create a hard-coded observable array within a <JavaScript> block and export it as a constant so that we can use it in our UX. Be aware that the JavaScript block must be placed inside <Page</Page> block.
<JavaScript>
        var Observable = require("FuseJS/Observable");

        const cryptocurrencies = Observable(
            {symbol: "BTC", name: "Bitcoin", price_usd: 38000},
            {symbol: "ETH", name: "Ethereum", price_usd: 12000},
            {symbol: "USDT", name: "Tether", price_usd: 1}

        );
        module.exports = {
            cryptocurrencies
        }
  </JavaScript>
</Page>
Next, let’s use the array’s data in our UX. First, we will wrap our rectangle with the <Each> tag and pass it to our array by using the items attribute Items="{cryptocurrencies}". Then, we will replace the hardcoded text value attributes with the key name of our defined object.
Instead of <Text Value="$38000" />, we will use <Text Value="{price_usd}" /> to dynamically display the price. Finally, we give the parent StackPanel a ItemSpacing="20" so that we have a nice margin between our CryptoCards.
<StackPanel Margin="0,50,0,0" ItemSpacing="20">
    <Each Items="{cryptocurrencies}">
![]()
Awesome! Isn’t it great to see how clear and concise our code is?
Next, let’s fetch some actual data from the CoinMarketCap API and display it:
<JavaScript>
        var Observable = require("FuseJS/Observable");

        const API_KEY = "XXX-YOUR-API-KEY-YYYY"
        var cryptocurrencies = Observable();

        function cryptocurrency(item) {
            this.symbol = item.symbol
            this.name = item.name
            this.price_usd = item.quote.USD.price.toFixed(2)
        }

        fetch(`https://pro-api.coinmarketcap.com/v1/cryptocurrency/listings/latest?CMC_PRO_API_KEY=${API_KEY}`)
        .then(function(response) { return response.json(); })
        .then(function(responseObject) {
            const data = responseObject.data
            for (var i in data) {
              cryptocurrencies.add(new cryptocurrency(data[i]))
            }
        });

        module.exports = {
            cryptocurrencies
        }
</JavaScript>
First, we declare the cryptocurrencies variable as an empty observable. Then we fetch the API and loop through the JSON result we get back. Inside the for loop, we use Fuse’s Observable API list operator add() to add our currencies to the observable cryptocurrencies list.
We use this specific API instead of a typical push() to make sure that our list is reactive and gets updated in our UX. That’s it.
Now let’s wrap our CryptoCard’s StackPanel inside a <ScrollView>. This allows us to scroll through all the elements displayed by the Each class.
![]()
In case you don’t see the change in the preview, press CMD+SHIFT+R on Mac or F6 on Windows to force a re-compile manually.
Detail.ux pageNext, let’s set up a function so that we can navigate to our Detail.ux page:
function goToDetail(arg) {
    const overviewData = arg.data
    router.push("detail", overviewData)
}
Don’t forget to add it to our module.exports. That is all it takes to navigate from our overview page to the detail one. Next, we want to give our “CryptoCard” a Clicked attribute so we can send the user to the detail page once a card gets clicked:
This will lead to the following result:

Before we move on, let’s think about how would could make our code more concise.
We want to keep our codebase concise and modular. Therefore, we should componentize it as soon as we see an opportunity. Our “CryptoCard” is the perfect candidate for this.
For this, we should use the attribute ux:Class. We use it whenever we want to create a reusable component. While you can use a ux:Class in the middle of your codebase, it is best practice to split each ux:Class into a separate file.
We have already done this when have implemented our both pages with <Page ux:Class="Overview"> and <Page ux:Class="Detail">. We will skip this part for the simplicity of our tutorial, but I highly suggest to read more about componentization.
Detail.uxI went ahead and replaced the dummy code for our detail page with some code for the basic structure of the detail view. You should be familiar with the syntax by now:
<Page ux:Class="Detail">
  <Router ux:Dependency="router" />
    <DockPanel>
        <StackPanel Dock="Top" Margin="0,50,0,0">
           <Image Width="60" Alignment="Center" Url="{logoUrl}" />
           <Text FontSize="25" Alignment="Center" Margin="0,20,0,0" Value="{name}" />
           <Text Value="${price_usd}" Alignment="Center" FontSize="18" Margin="0,10,0,0" Color="#1DDAB8"  />
        </StackPanel>

        <StackPanel Margin="0,30,0,0">
           <Rectangle Color="White" Width="90%"  Height="100%" Padding="25,25,25,25" CornerRadius="12">
              <DropShadow Size="8" Distance="4" Spread="0.03" Color="#DEDEDF" Angle="90" />
              <Text Value="{description}" TextWrapping="Wrap" />
          </Rectangle>
        </StackPanel>
    </DockPanel>
</Page>
Our next goal is to retrieve the data that gets pushed from the overview.ux page and use the symbol value of our overviewData to fetch some metadata of the selected cryptocurrency. We want to display the logo, name, price, and description. We will achieve this by adding some business logic to our UX page with the <JavaScript> tag:
<JavaScript>
     var Observable = require("FuseJS/Observable");

     const API_KEY = "XXX-YOUR-API-KEY-YYYY"

     var name = Observable()
     var price_usd = Observable()
     var logoUrl = Observable()
     var description = Observable()

     this.Parameter.onValueChanged(module, function(param){
      // display price we get from already fetched overviewData
      name.value = param.name
      price_usd.value = param.price_usd
      console.log(JSON.stringify(param))
      // fetch description info based on symbol from already fetched overviewData
      fetch(`https://pro-api.coinmarketcap.com/v1/cryptocurrency/info?symbol=${param.symbol}&CMC_PRO_API_KEY=${API_KEY}`)
      .then(function(response) { return response.json(); })
      .then(function(responseObject) {
              const data = responseObject.data[param.symbol]
              logoUrl.value = data.logo
              description.value = data.description
           });
      });

     module.exports = {
       name,
       price_usd,
       logoUrl,
       description
     }

  </JavaScript>
</Page> // don't forget to place the JavaScript tag inside the Page tag
The magic happens inside the this.Paramater.onValueChanged() event listener. This method allows us to listen to the data that the router passes on to our detail page.
![]()
Finally, we want to be able to navigate back to our overview page. We just need to add
function goBack() {router.goBack()} inside our JavaScript tag, export it, and add a “Back to Overview” button to our UX code.
There is one more feature I would like to introduce: the Fuse gesture <WhilePressed>. This allows us to change our UX while an element is pressed. In our case, we increase the scale by 10 percent and change the text color to blue:
<Text Clicked="{goBack}" Name="backButton" Alignment="Center" Margin="0,30,0,0" Value="👈  Back to Overview">
    <WhilePressed>
        <Scale Factor="1.1" Duration="0.1"/>
        <Change backButton.Color="#3417A6" />
    </WhilePressed>
</Text>
![]()
Awesome, you know what? We have reached the end of our CryptoTracker tutorial. Congratulation, you did a great job! Let’s think about the next steps.
The next step would be check how your app looks like on your phone with the Fuse Preview App (iOS or Android), which is a stand-alone app that is by far the simplest way of previewing your projects and does not require the installation of Xcode or the Android SDKs.
After you are satisfied, you should check your compiled app either via XCode or Android Studio. Then, all is left is to export, sign, and upload your app to the Apple App or Google Play Store.
Yes, you can. As long as they are not using any browser or system native APIs they should work.
Yes, Fuse has a built-in responsive layout system that you can use to adjust the view depending on various device sizes.
Congratulations! In this tutorial, you have successfully built your first mobile app with Fuse. Even cooler, you have created a CryptoTracker that you can show off to your friends. We have used Fuse’s markup language UX to structure our UI and JavaScript based on Fuse’s Observable API to add dynamic data.
What we’ve covered today only scratches the surface of what can be achieved with Fuse. I highly recommend checking out their full documentation and examples. Have fun building awesome apps!
You can find the full source code on GitHub.
Install LogRocket via npm or script tag. LogRocket.init() must be called client-side, not
server-side
$ npm i --save logrocket

// Code:

import LogRocket from 'logrocket';
LogRocket.init('app/id');
// Add to your HTML:

<script src="https://cdn.lr-ingest.com/LogRocket.min.js"></script>
<script>window.LogRocket && window.LogRocket.init('app/id');</script>
Hey there, want to help make our blog better?
Join LogRocket’s Content Advisory Board. You’ll help inform the type of content we create and get access to exclusive meetups, social accreditation, and swag.
Sign up now
This article explores several proven patterns for writing safer, cleaner, and more readable code in React and TypeScript.

A breakdown of the wrapper and container CSS classes, how they’re used in real-world code, and when it makes sense to use one over the other.

This guide walks you through creating a web UI for an AI agent that browses, clicks, and extracts info from websites powered by Stagehand and Gemini.

This guide explores how to use Anthropic’s Claude 4 models, including Opus 4 and Sonnet 4, to build AI-powered applications.