
In May 2022, Meta (the company formerly known as Facebook, which owns WhatsApp) announced that they were opening up the WhatsApp Business API to the public. This article intends to welcome you to Meta’s world of opportunities, where WhatsApp chatbots can help you generate leads, receive orders, schedule appointments, run surveys, take customer feedback, provide scalable customer support, send invoices and receipts, and more.
This tutorial will dive deep into the technical bits of building a WhatsApp chatbot from scratch through the following sections:
By the end of this tutorial, you will have created your own WhatsApp chatbot, as shown in the video below:
Demo: Build an automated e-commerce app with WhatsApp Cloud API and Node.js
This short video was made for this article: https://blog.logrocket.com/build-ecommerce-app-whatsapp-cloud-api-node-js/ Check out more articles @Logrocket: https://blog.logrocket.com/author/daggieblanqx/ #Logrocket #Meta #WhatsappCloudAPI #Chatbots #Ecommerce
Our tutorial focuses on a simple mom-and-pop ecommerce shop that sells household items and fast fashion. The business will have a WhatsApp chatbot where customers can browse and buy from the ecommerce store.
Every ecommerce store needs products (prices, names, descriptions etc.), and for this tutorial, we will use the dummy products from FakeStoreAPI.
Before we proceed, this article assumes that:
The Replay is a weekly newsletter for dev and engineering leaders.
Delivered once a week, it's your curated guide to the most important conversations around frontend dev, emerging AI tools, and the state of modern software.
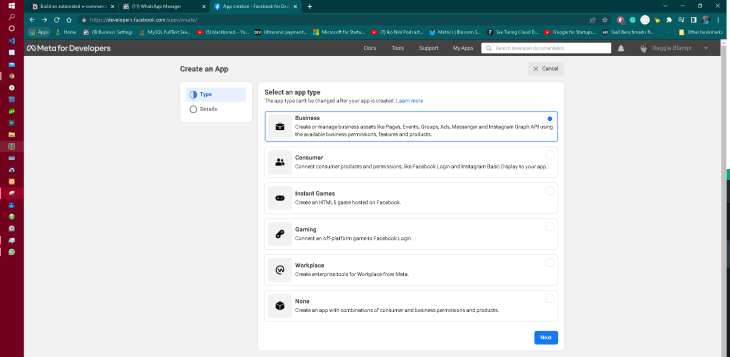
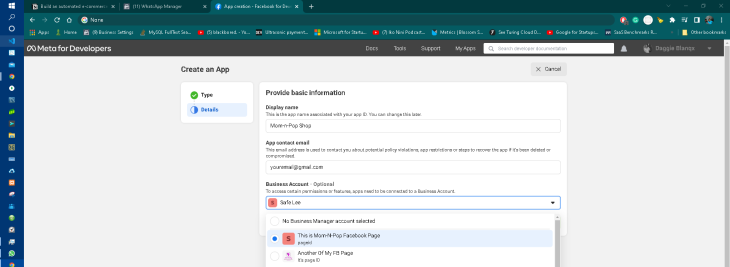
The first step to using any of Meta’s APIs is to create an app on the Meta dashboard, which is free to do.
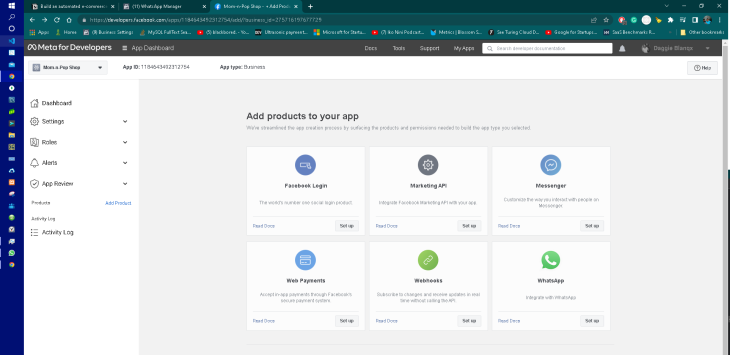
On this screen, select WhatsApp and click its Set up button.
You will then be ushered into a new screen, as shown below.
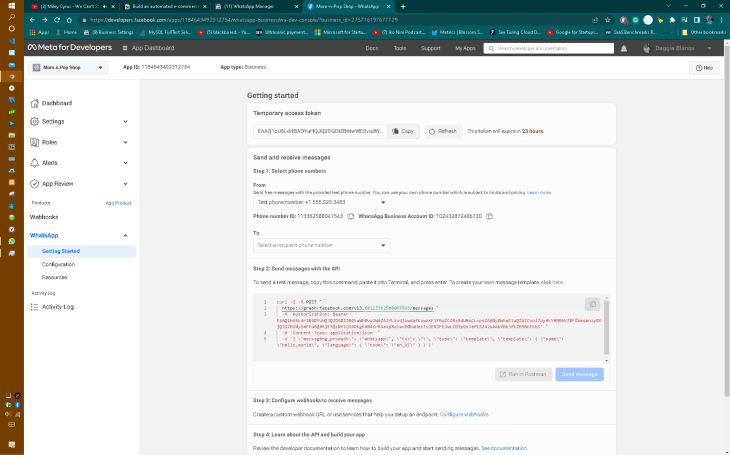
On this screen, take note of:
1184643492312754EAAQ1bU6LdrIBA…+1 555 025 3483
113362588047543102432872486730Please note that the temporary access token expires after 24 hours, at which time we’ll need to renew it. When you switch your app to live mode, you can apply for a permanent access token, which we don’t need to do as our app is in development mode.
The phone number ID and WhatsApp business account ID are tied to the test phone number.
Next, let’s add a phone number to use for receiving messages.
In development mode, Meta restricts us to five recipient numbers for reasons to do with preventing spam/misuse. In live/production mode, the number represents the phone numbers of our customers.
Click Select a recipient phone number and add your own WhatsApp number, as shown in the screenshot below:
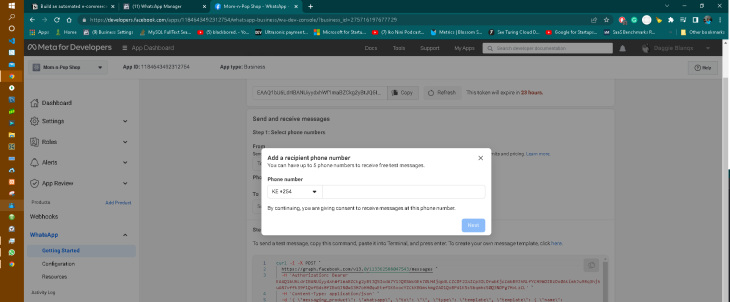
After adding your recipient number, you will see a screen that looks like the one below. If it is your first time adding your phone number to Meta platforms — such as Facebook Pages, Meta Business suite, or the Meta developer dashboard — you will receive an OTP message from Facebook Business that prompts you to verify that you actually own the recipient number.
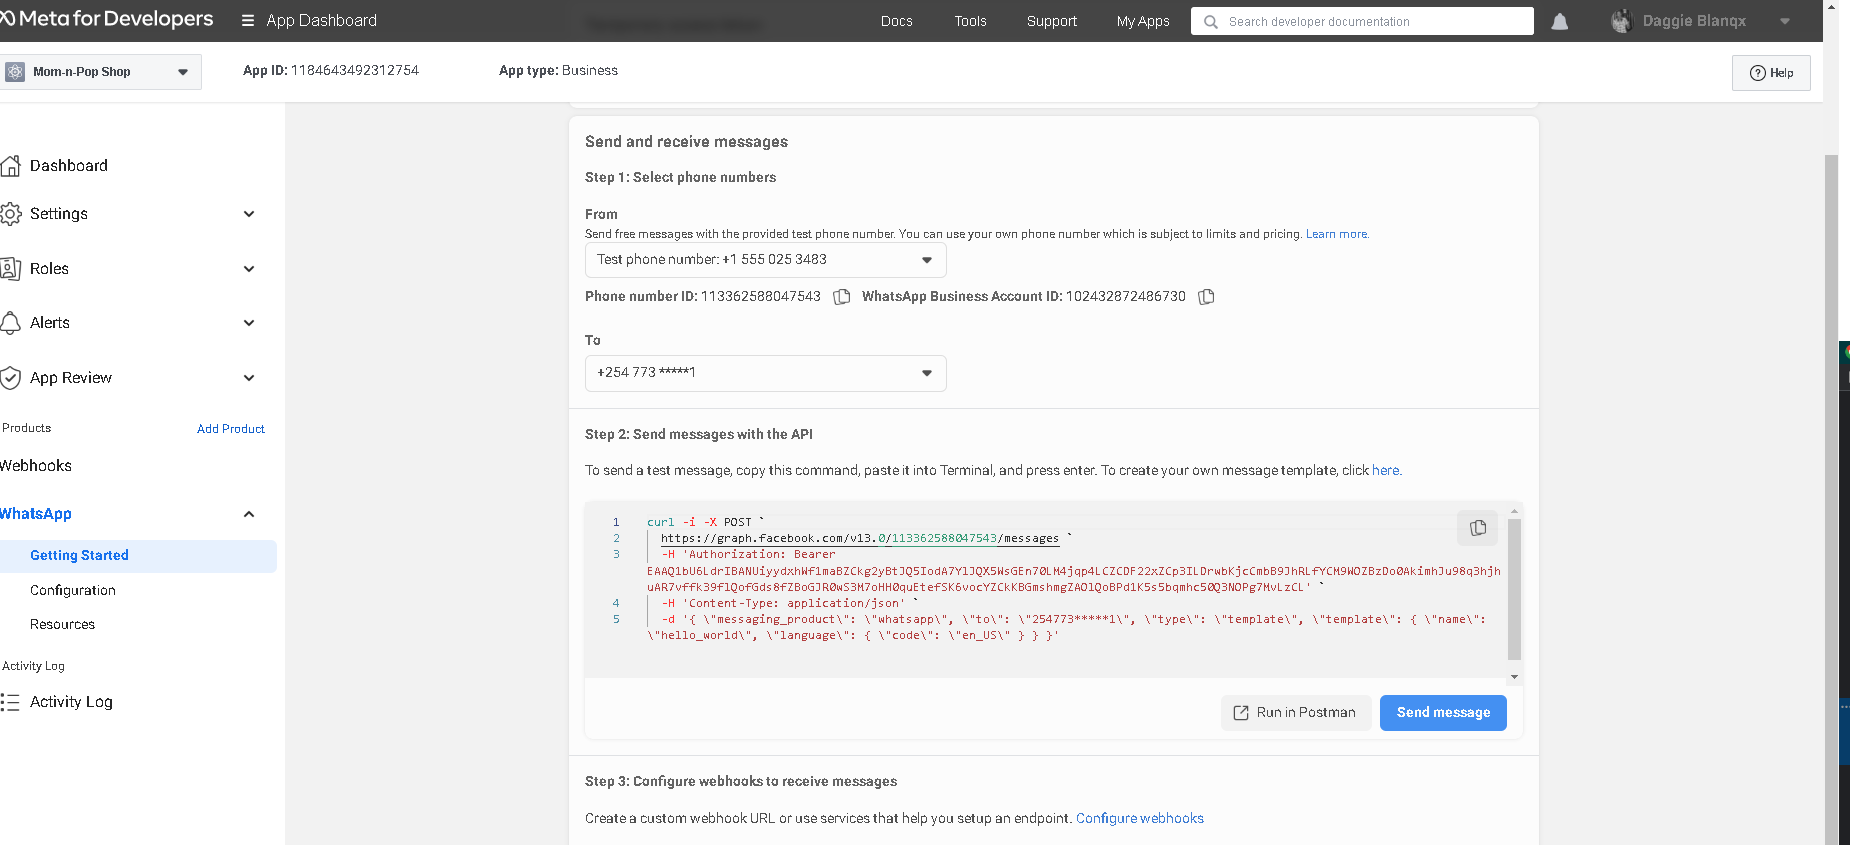
Let’s test if everything up to this step worked well. We will do this by clicking the Send Message button.
If all is well, you should see a message in your WhatsApp inbox from your test number.
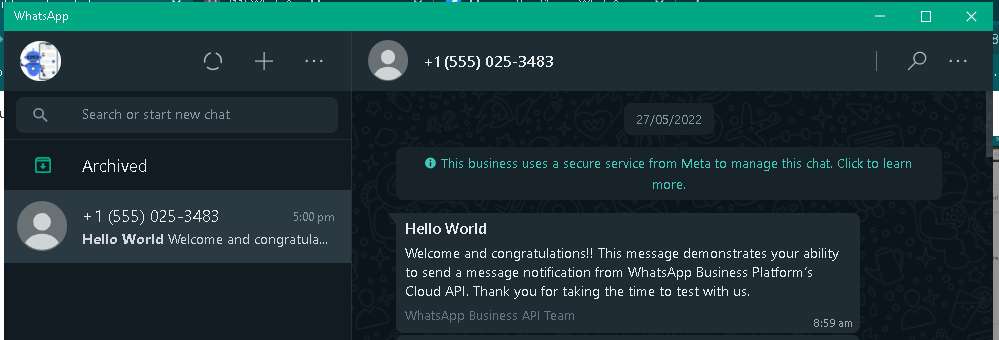
Up to this point, we are doing well! Take a pause and open your code editor. Don’t close your browser tab yet because we will be back in the Meta Developer dashboard in a few minutes.
Now that our setup can successfully send messages, let’s set up a way to receive messages. Time to get our hands dirty and immerse ourselves in writing code. All the code we’ll write for this tutorial is in this GitHub repository.
Create a new folder to contain our project. Open this folder in a terminal and run the below script:
npm init ---yes
Next, we install some packages:
npm install express pdfkit request whatsappcloudapi_wrapper
npm install nodemon --dev
Here’s a brief explanation of each:
express package is important for setting up our server. The server will contain a route that will act as our webhookpdfkit package will be used to generate invoices for our customers when they check outrequest package will help us run fetch requests to the FakeStoreAPIwhatsappcloudapi_wrapper helps us send and receive WhatsApp messagesNext, we are going to create three files:
./app.js./.env.js./routes/index.jsIn our ./.env.js file, type in the below code:
const production = {
    ...process.env,
    NODE_ENV: process.env.NODE_ENV || 'production',
};

const development = {
    ...process.env,
    NODE_ENV: process.env.NODE_ENV || 'development',
    PORT: '9000',
    Meta_WA_accessToken:'EAAKGUD3eZA28BADAJOmO6L19TmZAIEUpdFGHEGHX5sQ3kk4LDQLlnyh607rKSr0x2SAOPJS0kXOUZAhRDIPPGs4vcXQCo2DnfSJMnnIzFW7vaw8EuL7A0HjGZBwE8VwjRnBNam0ARLmfyOCEh1',
    Meta_WA_SenderPhoneNumberId: '113362588047543',
    Meta_WA_wabaId: '102432872486730',
    Meta_WA_VerifyToken: 'YouCanSetYourOwnToken',
};

const fallback = {
    ...process.env,
    NODE_ENV: undefined,
};

module.exports = (environment) => {
    console.log(`Execution environment selected is: "${environment}"`);
    if (environment === 'production') {
        return production;
    } else if (environment === 'development') {
        return development;
    } else {
        return fallback;
    }
};
In the same ./.env.js file:
Meta_WA_accessToken with the temporary access token for your Meta appMeta_WA_SenderPhoneNumberId with your phone number IDMeta_WA_wabaId with your WhatsApp Business Account IDMeta_WA_VerifyToken. It can be either a string or number; you will see how we use it in the webhooks stepThe code above first imports the current environment variables and destructures them, then adds new environment variables and exports the combination of the two as an object.
In the file ./app.js file, insert the below code:
process.env = require('./.env.js')(process.env.NODE_ENV || 'development');
const port = process.env.PORT || 9000;
const express = require('express');

let indexRoutes = require('./routes/index.js');

const main = async () => {
    const app = express();
    app.use(express.json());
    app.use(express.urlencoded({ extended: false }));
    app.use('/', indexRoutes);
    app.use('*', (req, res) => res.status(404).send('404 Not Found'));
    app.listen(port, () =>
        console.log(`App now running and listening on port ${port}`)
    );
};
main();
The first line of the code block above simply imports the ./.env.js file and assigns it to process.env, which is a globally accessible object in Node.js.
In the file ./routes/index.js, insert the below code:
'use strict';
const router = require('express').Router();

router.get('/meta_wa_callbackurl', (req, res) => {
    try {
        console.log('GET: Someone is pinging me!');

        let mode = req.query['hub.mode'];
        let token = req.query['hub.verify_token'];
        let challenge = req.query['hub.challenge'];

        if (
            mode &&
            token &&
            mode === 'subscribe' &&
            process.env.Meta_WA_VerifyToken === token
        ) {
            return res.status(200).send(challenge);
        } else {
            return res.sendStatus(403);
        }
    } catch (error) {
        console.error({error})
        return res.sendStatus(500);
    }
});

router.post('/meta_wa_callbackurl', async (req, res) => {
    try {
        console.log('POST: Someone is pinging me!');
        return res.sendStatus(200);
    } catch (error) {
                console.error({error})
        return res.sendStatus(500);
    }
});
module.exports = router;
Next, open the terminal and run:
nodemon app.js
The Express server will run on port 9000.
Next, open another, separate terminal and run:
ngrok http 9000
This command exposes our Express app to the broader internet. The goal here is to set up a webhook that WhatsApp Cloud can ping.
Take note of the URL that ngrok assigns to your Express server. In my example, ngrok issued me this URL: https://7b9b-102-219-204-54.ngrok.io. Keep both the Express server and the ngrok terminal running.
Next, let’s resume our work in the Meta Developer dashboard. Scroll to the part titled Configure Webhooks to receive messages, and click Configure Webhooks. The link will display a page that looks like the screenshot below:
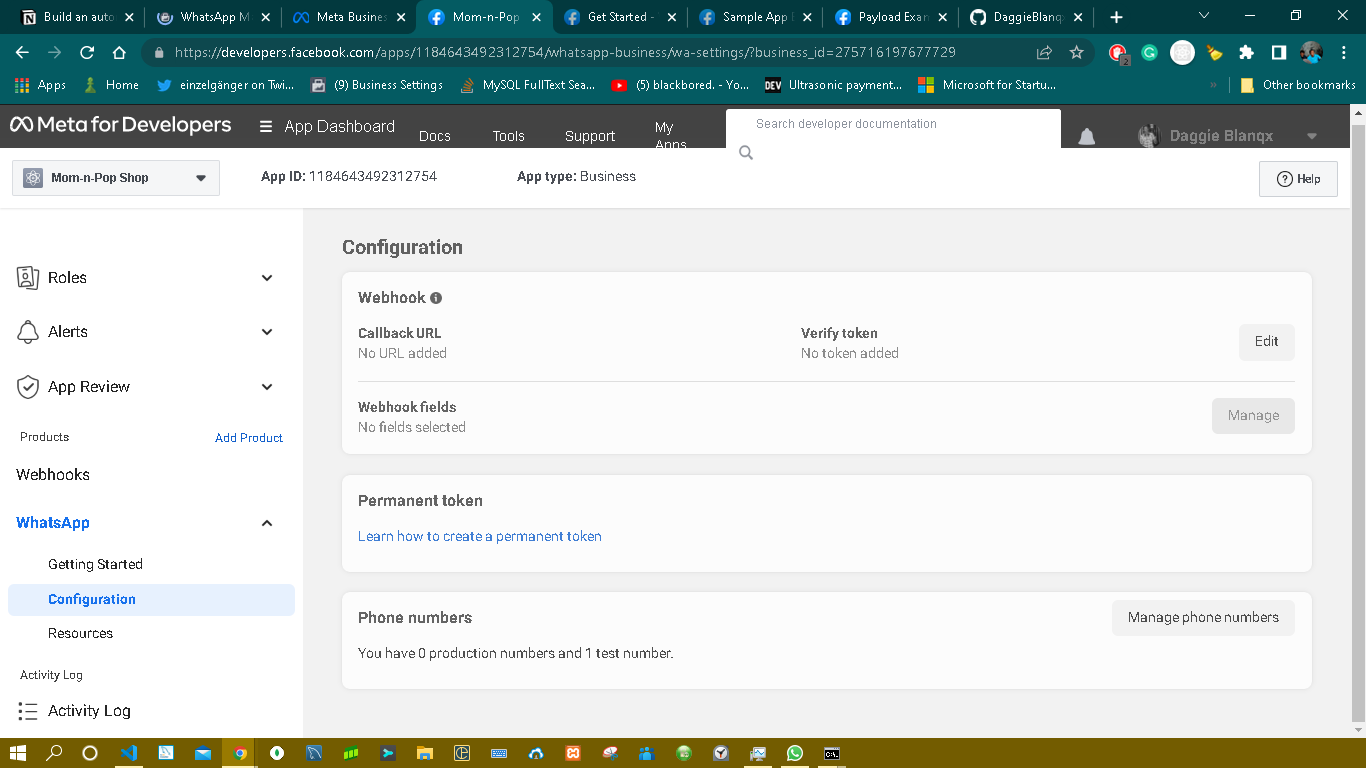
Click the Edit button and a pop-up will show up.
In the Callback URL field, paste in the URL that ngrok issued to you and append it with the callback route, as in the ./routes/index.js directive. My full URL, in this case, is https://7b9b-102-219-204-54.ngrok.io/meta_wa_callbackurl.
In the Verify token field, enter the value of the Meta_WA_VerifyToken as it appears in your ./.env.js file.
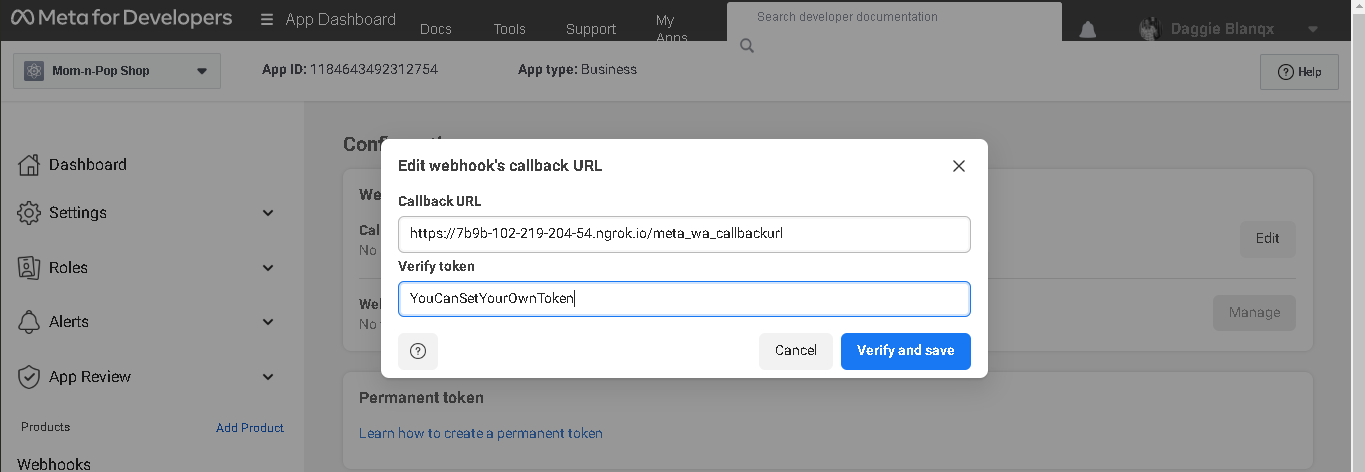
Then click Verify and save.
If you configured this well, you will see a console.log message in your Express server’s terminal that says:
GET: Someone is pinging me!
Now, let’s make our Express server receive subscription messages from Meta.
On the same Meta Developers dashboard screen, click Manage and a pop-up will appear.
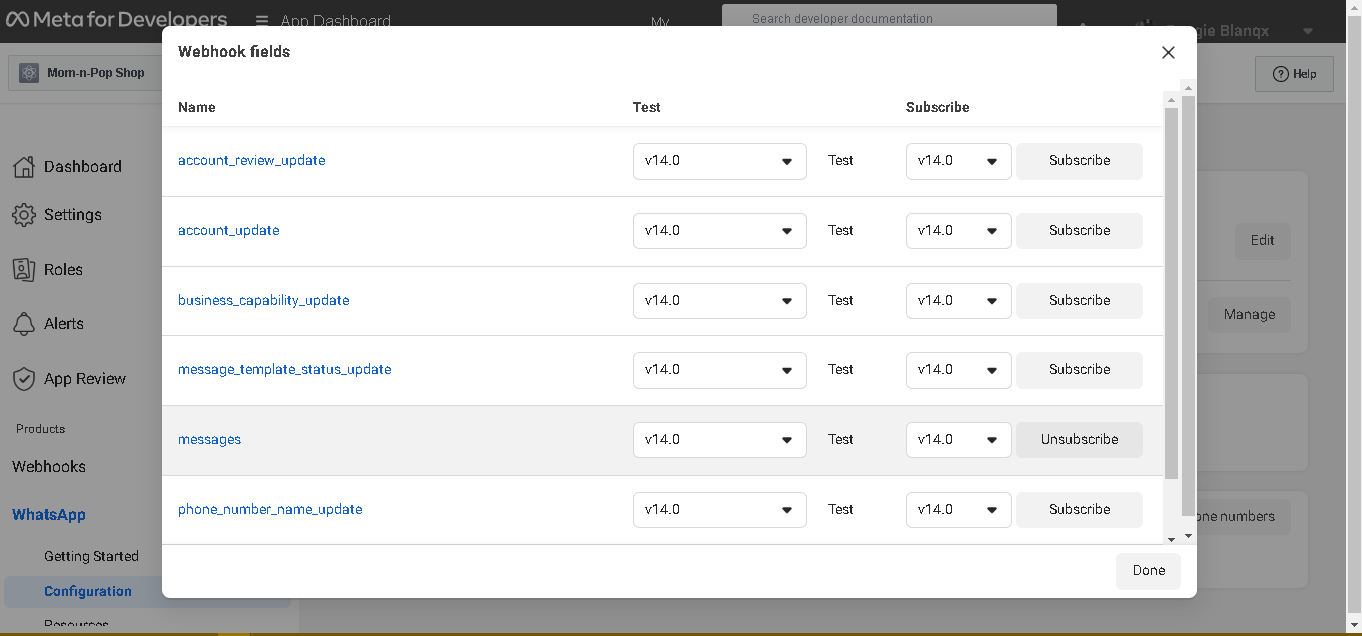
Select Messages and click Test, which is on the same row.
You should see a console.log message in your Express server’s terminal that says:
POST: Someone is pinging me!
If you saw this, get back to the same pop-up and click Subscribe in the same message row. Afterwards, click Done.
First, we’ll set up our logic to fetch data from FakeStoreAPI, generate a PDF invoice, and generate a dummy order pick-up location. We will wrap this logic into a JavaScript class, which we’ll then import into our app’s logic.
Create a file and name it ./utils/ecommerce_store.js. In this file, paste the following code:
'use strict';
const request = require('request');
const PDFDocument = require('pdfkit');
const fs = require('fs');

module.exports = class EcommerceStore {
    constructor() {}
    async _fetchAssistant(endpoint) {
        return new Promise((resolve, reject) => {
            request.get(
                `https://fakestoreapi.com${endpoint ? endpoint : '/'}`,
                (error, res, body) => {
                    try {
                        if (error) {
                            reject(error);
                        } else {
                            resolve({
                                status: 'success',
                                data: JSON.parse(body),
                            });
                        }
                    } catch (error) {
                        reject(error);
                    }
                }
            );
        });
    }

    async getProductById(productId) {
        return await this._fetchAssistant(`/products/${productId}`);
    }
    async getAllCategories() {
        return await this._fetchAssistant('/products/categories?limit=100');
    }
    async getProductsInCategory(categoryId) {
        return await this._fetchAssistant(
            `/products/category/${categoryId}?limit=10`
        );
    }

    generatePDFInvoice({ order_details, file_path }) {
        const doc = new PDFDocument();
        doc.pipe(fs.createWriteStream(file_path));
        doc.fontSize(25);
        doc.text(order_details, 100, 100);
        doc.end();
        return;
    }

    generateRandomGeoLocation() {
        let storeLocations = [
            {
                latitude: 44.985613,
                longitude: 20.1568773,
                address: 'New Castle',
            },
            {
                latitude: 36.929749,
                longitude: 98.480195,
                address: 'Glacier Hill',
            },
            {
                latitude: 28.91667,
                longitude: 30.85,
                address: 'Buena Vista',
            },
        ];
        return storeLocations[
            Math.floor(Math.random() * storeLocations.length)
        ];
    }
};
In the code above, we have created a class called EcommerceStore.
The first method, _fetchAssistant, receives an endpoint that it uses to ping fakestoreapi.com.
The following methods act as query builders for the first method:
getProductById receives a product ID and then gets data pertaining to that specific productgetAllCategories fetches all of the categories that are in fakestoreapi.comgetProductsInCategory receives a category of products and then proceeds to fetch all of the products in that specific categoryThese query builders will invoke the first method.
Moving on, the method generatePDFInvoice receives a piece of text and a file path. It then creates a PDF document, writes the text on it, and then stores the document in the file path provided.
The method generateRandomGeoLocation simply returns a random geolocation. This method will be useful when we send our shop’s order pick-up location to a customer who wants to pick up their item.
To handle our customer journey, we need to keep a session that includes a customer profile and their cart. Each customer will, therefore, have their own unique session.
In production, we could use a database like MySQL, MongoDB, or something else resilient, but to keep our tutorial lean and short, we will use ES2015’s Map data structure. With Map, we can store and retrieve specific, iterable data, such as unique customer data.
In your ./routes/index.js file, add the following code just above router.get('/meta_wa_callbackurl', (req, res).
const EcommerceStore = require('./../utils/ecommerce_store.js');
let Store = new EcommerceStore();
const CustomerSession = new Map();

router.get('/meta_wa_callbackurl', (req, res) => {//this line already exists. Add the above lines
The first line imports the EcommerceStore class, while the second line initializes it. The third line creates the customer’s session that we will use to store the customer’s journey.
Remember the whatsappcloudapi_wrapper package that we installed earlier? It’s time to import and initialize it.
In the ./routes/index.js file, add the following lines of code below the Express router declaration:
const router = require('express').Router(); // This line already exists. Below it add  the following lines:

const WhatsappCloudAPI = require('whatsappcloudapi_wrapper');
const Whatsapp = new WhatsappCloudAPI({
    accessToken: process.env.Meta_WA_accessToken,
    senderPhoneNumberId: process.env.Meta_WA_SenderPhoneNumberId,
    WABA_ID: process.env.Meta_WA_wabaId,
    graphAPIVersion: 'v14.0'
});
The following values are environment variables we defined in our ./.env.js file:
process.env.Meta_WA_accessTokenprocess.env.Meta_WA_SenderPhoneNumberId process.env.Meta_WA_wabaId We initialize the class WhatsAppCloudAPI with the three values above and name our instance Whatsapp.
Next, let’s parse all the data that is coming into the /meta_wa_callbackurl POST webhook. By parsing the body of the requests, we will be able to extract messages and other details, like the name of the sender, the phone number of the sender, etc.
Please note: All the code edits we make from this point will be entirely made in the
./routes/index.jsfile.
Add the following lines of code below the opening bracket of the try{ statement:
try { // This line already exists. Add the below lines

        let data = Whatsapp.parseMessage(req.body);

        if (data?.isMessage) {
            let incomingMessage = data.message;
            let recipientPhone = incomingMessage.from.phone; // extract the phone number of sender
            let recipientName = incomingMessage.from.name;
            let typeOfMsg = incomingMessage.type; // extract the type of message (some are text, others are images, others are responses to buttons etc...)
            let message_id = incomingMessage.message_id; // extract the message id
        }
Now, when a customer sends us a message, our webhook should receive it. The message is contained in the webhook’s request body. To extract useful information out of the body of the request, we need to pass the body into the parseMessage method of the WhatsApp instance.
Then, using an if statement, we check whether the result of the method contains a valid WhatsApp message.
Inside the if statement, we define incomingMessage, which contains the message. We also define other variables:
recipientPhone is the number of the customer who sent us a message. We will send them a message reply, hence the prefix “recipient”recipientName is the name of the customer that sent us a message. This is the name they have set for themselves in their WhatsApp profiletypeOfMsg is the type of message that a customer sent to us. As we will see later, some messages are simple texts, while others are replies to buttons (don’t worry, this will make sense soon!)message_id is a string of characters that uniquely identifies a message we’ve received. This is useful when we want to do tasks that are specific to that message, such as mark a message as readUp to this point, all seems well, but we will confirm shortly.
Since our tutorial will not dive into any form of AI or natural language processing (NLP), we are going to define our chat flow with simple if…else logic.
The conversation logic starts when the customer sends a text message. We won’t look at the message itself, so we won’t know what they intended to do, but we can tell the customer what our bot can do.
Let’s give our customer a simple context, to which they can reply with a specific intent.
We will give the customer two buttons:
To do this, insert the following code below message_id:
if (typeOfMsg === 'text_message') {
    await Whatsapp.sendSimpleButtons({
        message: `Hey ${recipientName}, \nYou are speaking to a chatbot.\nWhat do you want to do next?`,
        recipientPhone: recipientPhone,
        listOfButtons: [
            {
                title: 'View some products',
                id: 'see_categories',
            },
            {
                title: 'Speak to a human',
                id: 'speak_to_human',
            },
        ],
    });
}
The if statement above only lets us handle text messages.
The sendSimpleButtons method allows us to send buttons to a customer. Take note of the title and id properties. The title is what the customer will see, and the id is what we’ll use to know which button the customer clicked.
Let’s check if we did this right. Open your WhatsApp app and send a text message to the WhatsApp business account.
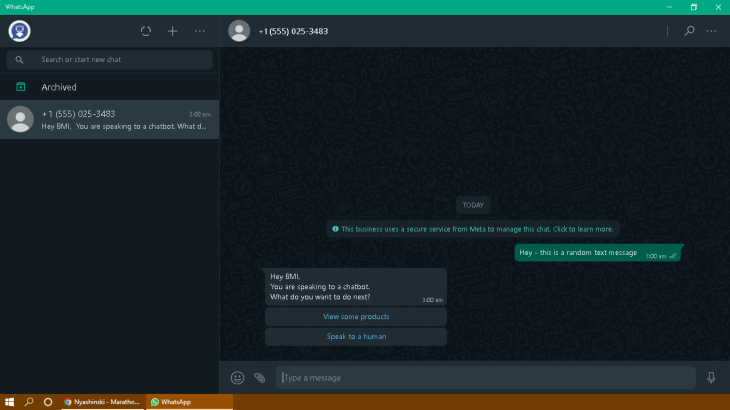
If you get a response like the screenshot above, congratulations! You just sent your first message via the WhatsApp Cloud API.
Since the customer may click either of the two buttons, let’s also take care of the Speak to a human button.
Outside the if statement of the text_message logic, insert the following code:
if (typeOfMsg === 'simple_button_message') {
    let button_id = incomingMessage.button_reply.id;

    if (button_id === 'speak_to_human') {
        await Whatsapp.sendText({
            recipientPhone: recipientPhone,
            message: `Arguably, chatbots are faster than humans.\nCall my human with the below details:`,
        });

        await Whatsapp.sendContact({
            recipientPhone: recipientPhone,
            contact_profile: {
                addresses: [
                    {
                        city: 'Nairobi',
                        country: 'Kenya',
                    },
                ],
                name: {
                    first_name: 'Daggie',
                    last_name: 'Blanqx',
                },
                org: {
                    company: 'Mom-N-Pop Shop',
                },
                phones: [
                    {
                        phone: '+1 (555) 025-3483',
                    },
                                        {
                        phone: '+254712345678',
                    },
                ],
            },
        });
    }
};
The above code performs two actions:
sendText methodsendContact methodThis code also detects the user’s intent using the ID of the button the user clicked (in our case, the ID is the incomingMessage.button_reply.id), and then it responds with the two action options.
Now, return to WhatsApp and click Speak to a human. If you did this right, you will see a reply that looks as follows:
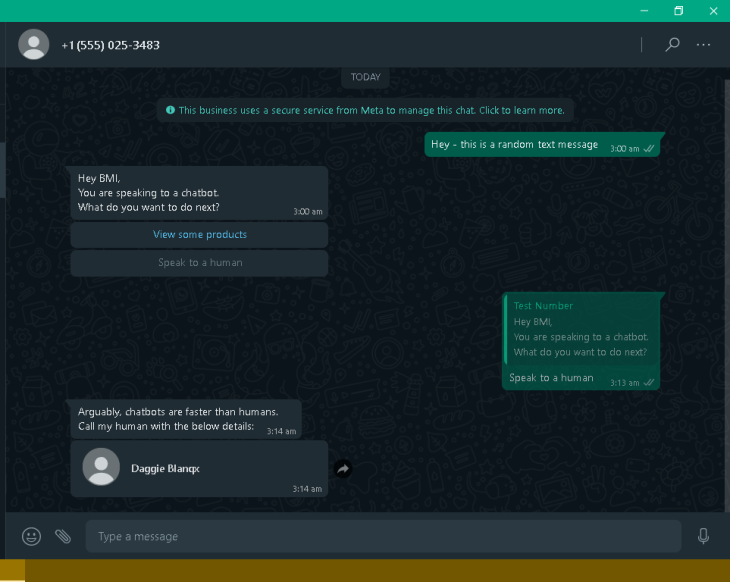
When you click the contact card you received, you should see the following:
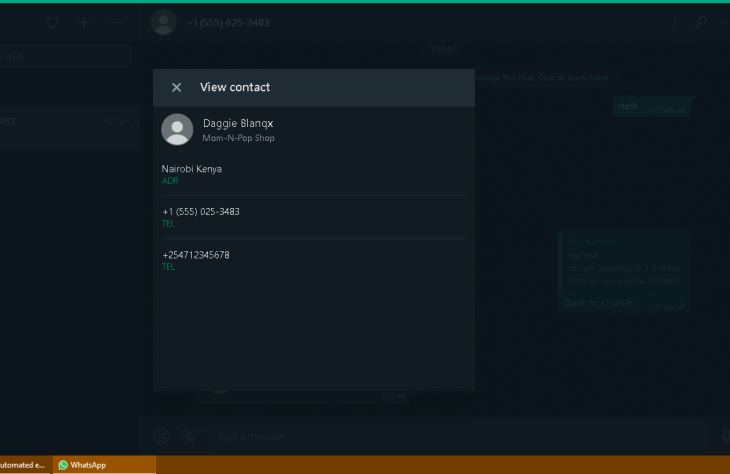
Next, let’s work on the View some products button.
Inside the simple_button_message if statement, but just below and outside the speak_to_human if statement, add the following code:
if (button_id === 'see_categories') {
    let categories = await Store.getAllCategories();
    await Whatsapp.sendSimpleButtons({
        message: `We have several categories.\nChoose one of them.`,
        recipientPhone: recipientPhone,
        listOfButtons: categories.data
            .map((category) => ({
                title: category,
                id: `category_${category}`,
            }))
            .slice(0, 3)
    });
}
Here is what the above code does:
if statement ensures that the user clicked the View some products buttonFakeStoreAPI via the getAllCategories methodslice(0,3) — because WhatsApp only allows us to send three simple buttonstitle and a unique ID that is prefixed with category_sendSimpleButtons method, we send these buttons to the customerReturn again to your WhatsApp app and click See more products. If you did the above steps right, you should see a reply that looks like the screenshot below:
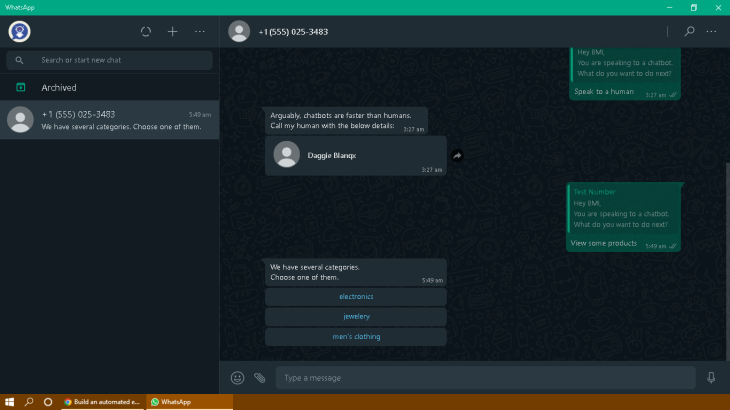
Now, let us create the logic to get products in the category that the customer selected.
Still inside the simple_button_message if statement, but below and outside the see_categories if statement, add the following code:
if (button_id.startsWith('category_')) {
    let selectedCategory = button_id.split('category_')[1];
    let listOfProducts = await Store.getProductsInCategory(selectedCategory);

    let listOfSections = [
        {
            title: `🏆 Top 3: ${selectedCategory}`.substring(0,24),
            rows: listOfProducts.data
                .map((product) => {
                    let id = `product_${product.id}`.substring(0,256);
                    let title = product.title.substring(0,21);
                    let description = `${product.price}\n${product.description}`.substring(0,68);

                    return {
                        id,
                        title: `${title}...`,
                        description: `$${description}...`
                    };
                }).slice(0, 10)
        },
    ];

    await Whatsapp.sendRadioButtons({
        recipientPhone: recipientPhone,
        headerText: `#BlackFriday Offers: ${selectedCategory}`,
        bodyText: `Our Santa 🎅🏿 has lined up some great products for you based on your previous shopping history.\n\nPlease select one of the products below:`,
        footerText: 'Powered by: BMI LLC',
        listOfSections,
    });
}
The if statement above confirms that the button the customer clicked was indeed the button that contains a category.
The first thing we do here is extract the specific category from the ID of the button. Then, we query our FakeStoreAPI for products that belong to that specific category.
After querying, we receive the list of products inside an array, listOfProducts.data. We now loop through this array, and for each product in it we extract its price, title, description, and ID.
We append product_ to the id, which will help us pick up a customer’s selection in the next step. Make sure you trim the length of the ID, title, and description in accordance with WhatsApp Cloud API’s radio button (or list) restrictions.
We then return three values: ID, title, and description. Since WhatsApp only allows us a maximum of 10 rows, we will limit the number of products to 10 using the array method .slice(0,10).
After that, we invoke the sendRadioButtons method to send the products to the customers. Take note of the properties headerText, bodyText, footerText, and listOfSections.
Return to the WhatsApp app and click any category of products. If you followed the instructions right, you should see a reply that looks like the screenshot below:
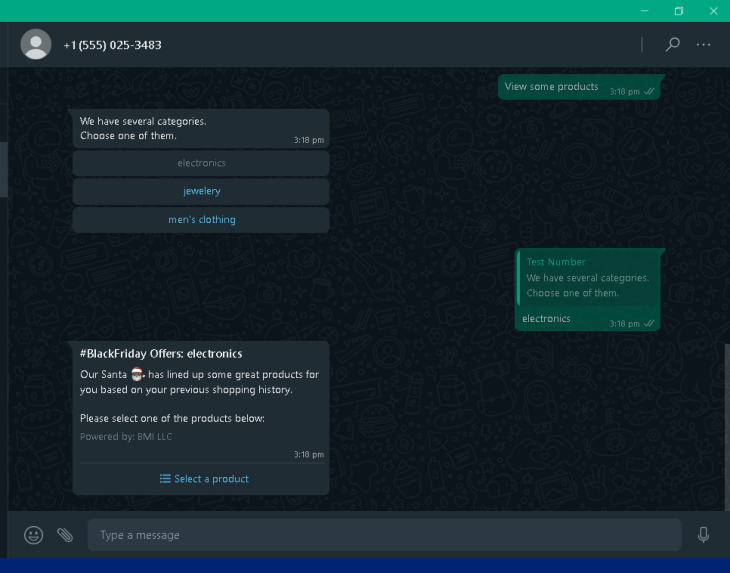
When you click Select a product, you should see the following screen:
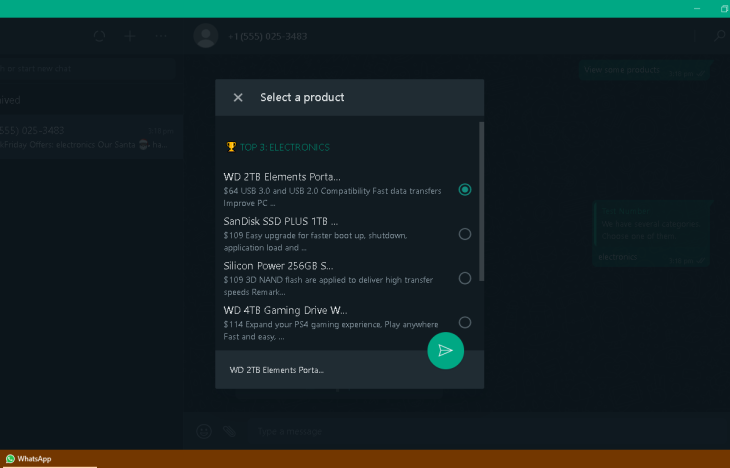 At this point, customers can select a product they find interesting, but can we know what they have selected? Not yet, so let us work on this part.
Outside the simple_button_message if statement, let us add another if statement:
if (typeOfMsg === 'radio_button_message') {
    let selectionId = incomingMessage.list_reply.id; // the customer clicked and submitted a radio button

}
Inside the above if statement and just below the selectionId, add the following code:
if (selectionId.startsWith('product_')) {
    let product_id = selectionId.split('_')[1];
    let product = await Store.getProductById(product_id);
    const { price, title, description, category, image: imageUrl, rating } = product.data;

    let emojiRating = (rvalue) => {
        rvalue = Math.floor(rvalue || 0); // generate as many star emojis as whole number ratings
        let output = [];
        for (var i = 0; i < rvalue; i++) output.push('⭐');
        return output.length ? output.join('') : 'N/A';
    };

    let text = `_Title_: *${title.trim()}*\n\n\n`;
    text += `_Description_: ${description.trim()}\n\n\n`;
    text += `_Price_: $${price}\n`;
    text += `_Category_: ${category}\n`;
    text += `${rating?.count || 0} shoppers liked this product.\n`;
    text += `_Rated_: ${emojiRating(rating?.rate)}\n`;

    await Whatsapp.sendImage({
        recipientPhone,
        url: imageUrl,
        caption: text,
    });

    await Whatsapp.sendSimpleButtons({
        message: `Here is the product, what do you want to do next?`,
        recipientPhone: recipientPhone,
        listOfButtons: [
            {
                title: 'Add to cart🛒',
                id: `add_to_cart_${product_id}`,
            },
            {
                title: 'Speak to a human',
                id: 'speak_to_human',
            },
            {
                title: 'See more products',
                id: 'see_categories',
            },
        ],
    });
}
The above code does the following:
emojiRating function. If a rating is 3.8, it will render three star emojissendImage methodAfter this, we send the customer a list of three buttons using the sendSimpleButtons. One gives the customer an opportunity to add products to their cart. Take note of the button ID that is prefixed with add_to_cart_.
Now, return to your WhatsApp app and select a product. If you followed the instructions correctly, you should see a reply that looks like the following screenshot:
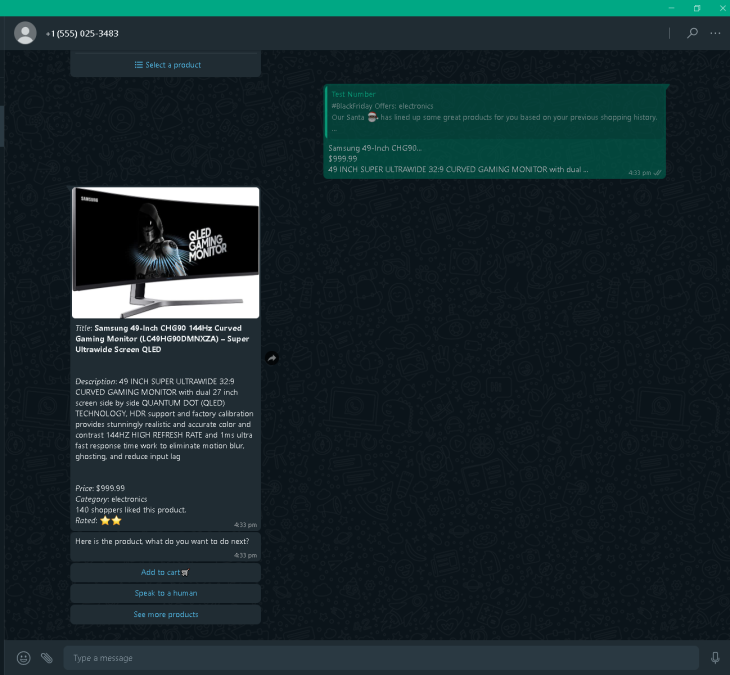
To keep track of the products a customer adds to their cart, we need to have a place to store the cart items. Here is where CustomerSession comes into play. Let’s add some logic to it.
Outside the radio_button_message if statement, and just below the message_id declaration, add the following code:
let message_id = incomingMessage.message_id; // This line already exists. Add the below lines...

// Start of cart logic
if (!CustomerSession.get(recipientPhone)) {
    CustomerSession.set(recipientPhone, {
        cart: [],
    });
}

let addToCart = async ({ product_id, recipientPhone }) => {
    let product = await Store.getProductById(product_id);
    if (product.status === 'success') {
        CustomerSession.get(recipientPhone).cart.push(product.data);
    }
};

let listOfItemsInCart = ({ recipientPhone }) => {
    let total = 0;
    let products = CustomerSession.get(recipientPhone).cart;
    total = products.reduce(
        (acc, product) => acc + product.price,
        total
    );
    let count = products.length;
    return { total, products, count };
};

let clearCart = ({ recipientPhone }) => {
    CustomerSession.get(recipientPhone).cart = [];
};
// End of cart logic

if (typeOfMsg === 'text_message') { ... // This line already exists. Add the above lines...
The code above checks whether a customer’s session has been created. If it has not been created, it creates a new session that is uniquely identified by the customer’s phone number. We then initialize a property called cart, which starts out as an empty array.
The addToCart function takes in a product_id and the number of the specific customer. It then pings the FakeStoreAPI for the specific product’s data and pushes the product into the cart array.
Then, the listOfItemsInCart function takes in the phone number of the customer and retrieves the associated cart, which is used to calculate the number of products in the cart and the sum of their prices. Finally, it returns the items in the cart and their total price.
The clearCart function takes in the phone number of the customer and empties that customer’s cart.
With the cart logic done, let’s build the Add to Cart button. Inside the simple_button_message if statement and below its button_id declaration, add the following code:
if (button_id.startsWith('add_to_cart_')) {
    let product_id = button_id.split('add_to_cart_')[1];
    await addToCart({ recipientPhone, product_id });
    let numberOfItemsInCart = listOfItemsInCart({ recipientPhone }).count;

    await Whatsapp.sendSimpleButtons({
        message: `Your cart has been updated.\nNumber of items in cart: ${numberOfItemsInCart}.\n\nWhat do you want to do next?`,
        recipientPhone: recipientPhone,
        listOfButtons: [
            {
                title: 'Checkout 🛍️',
                id: `checkout`,
            },
            {
                title: 'See more products',
                id: 'see_categories',
            },
        ],
    });
}
The above code extracts the product ID from the button the customer clicked, then invokes the addToCart function to save the product into the customer’s session’s cart. Then, it extracts the number of items in the customer’s session’s cart and tells the customer how many products they have. It also sends two buttons, one of which allows the user to check out.
Take note of the button ID and go back to your WhatsApp app. Click Add to cart. If you followed the instructions well, you should see a reply that resembles the below screenshot:
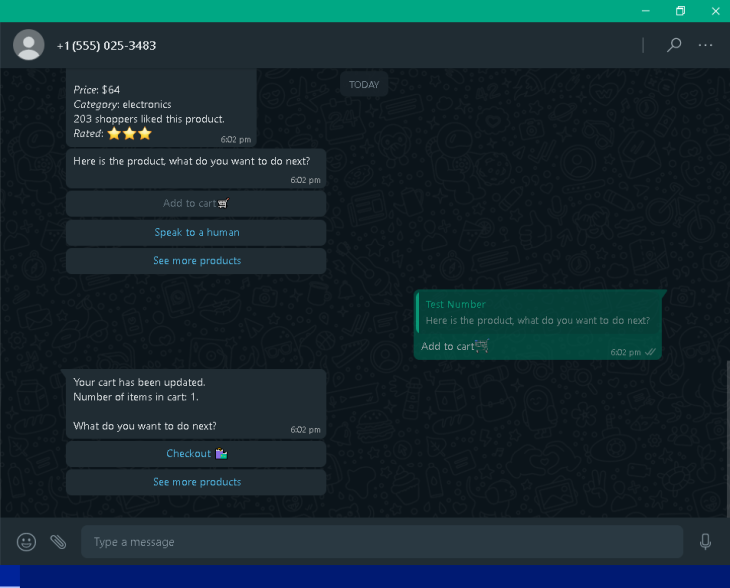
Now that our customers can add items to the cart, we can write the logic for checking out.
Inside the simple_button_message if statement but outside the add_to_cart_ if statement, add the following code:
if (button_id === 'checkout') {
  let finalBill = listOfItemsInCart({ recipientPhone });
  let invoiceText = `List of items in your cart:\n`;

  finalBill.products.forEach((item, index) => {
      let serial = index + 1;
      invoiceText += `\n#${serial}: ${item.title} @ $${item.price}`;
  });

  invoiceText += `\n\nTotal: $${finalBill.total}`;

  Store.generatePDFInvoice({
      order_details: invoiceText,
      file_path: `./invoice_${recipientName}.pdf`,
  });

  await Whatsapp.sendText({
      message: invoiceText,
      recipientPhone: recipientPhone,
  });

  await Whatsapp.sendSimpleButtons({
      recipientPhone: recipientPhone,
      message: `Thank you for shopping with us, ${recipientName}.\n\nYour order has been received & will be processed shortly.`,
      message_id,
      listOfButtons: [
          {
              title: 'See more products',
              id: 'see_categories',
          },
          {
              title: 'Print my invoice',
              id: 'print_invoice',
          },
      ],
  });

  clearCart({ recipientPhone });
}
The above code does the following:
finalBillinvoiceText, which will contain the text we’ll send to the customer as well as the text that will be drafted into the PDF version of the invoice
forEach loop simply concatenates the title and price of each product to the invoicegeneratePDFInvoice method (the same one we defined in our EcommerceStore class) takes in the details of the order, drafts a PDF document, and saves it in the file path in our local directory/folder that we provided it withsendText method sends a simple text message containing the order details to the customersendSimpleButtons sends some buttons to the customer. Take note of the Print my invoice button and its IDclearCart method empties the cartNow, switch back to your WhatsApp app and click Checkout. If you followed the instructions well, you will see a reply that resembles the following screenshot:

At this point, the customer should receive a printable PDF invoice. For this reason, let us work on some logic regarding the Print my invoice button.
Inside the simple_button_message if statement but outside the checkout if statement, add the following code:
if (button_id === 'print_invoice') {
  // Send the PDF invoice
  await Whatsapp.sendDocument({
      recipientPhone: recipientPhone,
      caption:`Mom-N-Pop Shop invoice #${recipientName}`,
      file_path: `./invoice_${recipientName}.pdf`,
  });

  // Send the location of our pickup station to the customer, so they can come and pick up their order
  let warehouse = Store.generateRandomGeoLocation();

  await Whatsapp.sendText({
      recipientPhone: recipientPhone,
      message: `Your order has been fulfilled. Come and pick it up, as you pay, here:`,
  });

  await Whatsapp.sendLocation({
      recipientPhone,
      latitude: warehouse.latitude,
      longitude: warehouse.longitude,
      address: warehouse.address,
      name: 'Mom-N-Pop Shop',
  });
}
The code above gets the PDF document generated in the previous step from the local file system and sends it to the customer using the sendDocument method.
When a customer orders a product online, they also need to know how they will receive the physical product. For this reason, we generated some random coordinates using the generateRandomGeoLocation method of the EcommerceStore class and sent these coordinates to the customer using the sendLocation method to let them know where they can physically pick up their product.
Now, open your WhatsApp app and click Print my invoice.
If you have followed the above instructions correctly, you should see a reply that looks similar to the screenshot below:
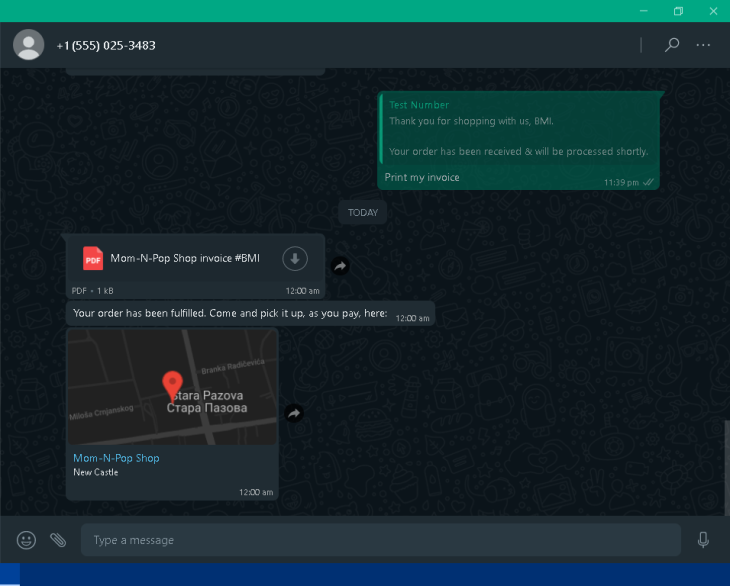
Lastly, you may have noted that the check marks beneath the messages are gray, instead of blue. This indicates that the messages we sent did not return read receipts despite the fact that our bot was reading them.
Gray ticks can be frustrating to customers, and for this reason, we need to work on showing the blue ticks.
Outside the simple_button_message if statement and before the closing curly brace of the data?.isMessage if statement, add the following code:
await Whatsapp.markMessageAsRead({ message_id });
This simple one-liner marks a message as read as soon as we have responded to it.
Now, open your WhatsApp app and send a random text message. Are you seeing what I am seeing?

If your previous chats have been updated with blue ticks, then 🎉 congratulations! You have reached the end of this tutorial and learned a few things along the way.
With a grand total of 2 billion monthly active users, ignoring WhatsApp as an ecommerce strategy is a sure way to fall behind your business’s competition, and since most of your customers are already using WhatsApp in their day-to-day activities, why shouldn’t your business meet them there?
I hope this tutorial has been helpful in demystifying the WhatsApp Cloud API, and I hope you had some fun along the way. If you have questions on this let me know on Twitter or LinkedIn @daggieblanqx. Let me know what other topics you may find interesting, and do not forget to share this article with your tech circles.
LogRocket lets you replay user sessions, eliminating guesswork around why users don't convert by showing exactly what users experienced. It captures console logs, errors, network requests, and pixel-perfect DOM recordings — compatible with all frameworks.
LogRocket's Galileo AI watches sessions for you, instantly identifying and explaining user struggles with automated monitoring of your entire product experience.
Start proactively monitoring your ecommerce apps — try LogRocket for free.

Discover what’s new in The Replay, LogRocket’s newsletter for dev and engineering leaders, in the February 11th issue.

Cut React LCP from 28s to ~1s with a four-phase framework covering bundle analysis, React optimizations, SSR, and asset/image tuning.

Rich Harris (creator of Svelte) joined PodRocket this week to unpack his Performance Now talk, Fine Grained Everything.

Cloudflare strengthens security at the edge, but real protection depends on how you design, layer, and own controls beyond it.
Would you be interested in joining LogRocket's developer community?
Join LogRocket’s Content Advisory Board. You’ll help inform the type of content we create and get access to exclusive meetups, social accreditation, and swag.
Sign up now
21 Replies to "Build an automated ecommerce app with WhatsApp Cloud API and Node.js"
I have a problem, I tried to make my own, I even tested your application, but anyway it seems that it goes into a loop, the chatbot keeps flooding, it seems to have something to do with the webhooks, in addition to those webhook configurations, something was missing that you forgot to suggest?
Hello, I am getting a 404 error and facebook is not validating my callback link. You have any idea why the app.js file is not picking up the indexroutes
Hi @Rebot
Im reaching out to see if you managed to get around the “chatbot flooding messages to users” part?
I created mine too and from time to time the chatbot seems to send duplicate responses to users?
have you any solution?
Hello @Rebot, sorry for that. Can we do a video call on this?
Hello @Sayo, could you please share a screenshot(link to image) of app.js?
A brilliant blog and an even better Node.js library. I can highly recommend the library to ANY developer wanting to integrate with the WhatsApp Cloud API. Well done to all contributors!
Thanks for the example it works but I get a cyclic repetition of the POST.
POST: Someone is pinging me!
POST: Someone is pinging me!
POST: Someone is pinging me!
POST: Someone is pinging me!
How can I avoid it?. Thank you.
Hello @Jairo and @Rebot.
Change the below block of code from:
const WhatsappCloudAPI = require(‘whatsappcloudapi_wrapper’);
const Whatsapp = new WhatsappCloudAPI({
accessToken: process.env.Meta_WA_accessToken,
senderPhoneNumberId: process.env.Meta_WA_SenderPhoneNumberId,
WABA_ID: process.env.Meta_WA_wabaId,
});
to this:
const WhatsappCloudAPI = require(‘whatsappcloudapi_wrapper’);
const Whatsapp = new WhatsappCloudAPI({
accessToken: process.env.Meta_WA_accessToken,
senderPhoneNumberId: process.env.Meta_WA_SenderPhoneNumberId,
WABA_ID: process.env.Meta_WA_wabaId,
graphAPIVersion:’ v14.0′
});
Olá.
Estoura um erro no console quando realizo um teste no webhook.
POST: Someone is pinging me!
{
error: Error: WABA_ID is not valid. Hint: the message is not intended for this Whatsapp Business Account.
at module.exports (C:\Users\cleyton\Documents\app.whatsOficial\api-whats-oficial\node_modules\whatsappcloudapi_wrapper\msg_parser.js:24:15)
at WhatsappCloud.parseMessage (C:\Users\cleyton\Documents\app.whatsOficial\api-whats-oficial\node_modules\whatsappcloudapi_wrapper\index.js:867:16)
at C:\Users\cleyton\Documents\app.whatsOficial\api-whats-oficial\routes\index.js:43:25
at Layer.handle [as handle_request] (C:\Users\cleyton\Documents\app.whatsOficial\api-whats-oficial\node_modules\express\lib\router\layer.js:95:5)
at next (C:\Users\cleyton\Documents\app.whatsOficial\api-whats-oficial\node_modules\express\lib\router\route.js:144:13)
at Route.dispatch (C:\Users\cleyton\Documents\app.whatsOficial\api-whats-oficial\node_modules\express\lib\router\route.js:114:3)
at Layer.handle [as handle_request] (C:\Users\cleyton\Documents\app.whatsOficial\api-whats-oficial\node_modules\express\lib\router\layer.js:95:5)
at C:\Users\cleyton\Documents\app.whatsOficial\api-whats-oficial\node_modules\express\lib\router\index.js:284:15
at Function.process_params (C:\Users\cleyton\Documents\app.whatsOficial\api-whats-oficial\node_modules\express\lib\router\index.js:346:12)
at next (C:\Users\cleyton\Documents\app.whatsOficial\api-whats-oficial\node_modules\express\lib\router\index.js:280:10)
Pode ajudar o que pode ser esse erro, ja verigiquei o id da conta Bussiness.
I’m also having this problem, any solution?
Hi.I was following this tutorial and was working for a month it was working fine but when now I am trying to configure webhook i am getting an “The callback URL or verify token couldn’t be validated. Please verify the provided information or try again later” error.I tried to create with all new accounts but still i am getting this error.Can you please suggest what should I do?
Hi @yash, could you be able to figure out this? I am getting same issue. Plz guide me if you get a solution.
Olá. Passei por problema parecido.
Tente a tag — region au no ngrok.
Na documentação você pode especificar a região do seu servidor usando essa tag. Ficando:
ngrok http 8000 –region au
Na documentação tem as regiões disponíveis.
It still showing the same error
Use ngrok 32bit version it works for me !!
Hie. Thanks for this great article. I have been following through the steps outlines but when i try to configure webhooks url on facebook it gives this error.
“The URL couldn’t be validated. Response does not match challenge, expected value=”481656951″, received=”\u003C!DOCTYPE html>\n\u003Ch…“
Hie. I am getting this error when i try to configure webhooks
`The URL couldn’t be validated. Response does not match challenge, expected value=”481656951″, received=”\u003C!DOCTYPE html>\n\u003Ch…”`
Dear @daggieblanqx,
I wanted to express my gratitude for the outstanding work you have done on this article. Your clear and concise step-by-step instructions have made it easy for anyone to understand and implement. As a result, I was able to successfully create an ecommerce WhatsApp bot using your guidance. Your hard work has paid off and I want to give you my sincerest compliments. Keep up the excellent work.
Best regards,
Luke
Hey, good day, Please how can I have more than 10 products on the radio button, or is there anyway to paginate
Lovely article, please can I get the github repo for this would really appreciate it.