A recent survey by Salesforce indicates that 23 percent of service companies are currently using chatbots, and that percentage is expected to more than double in the next 18 months. FastChat is a platform for training, serving, and evaluating large language models that are behind many of these chatbots.

In this article, we’ll explore how to use FastChat to implement a simple AI chatbot in a JavaScript web app, which is just one of the functionalities that FastChat makes available within its unique architecture.
Jump ahead:
FastChat is available as an open source Python library. We’ll install it using pip:
pip3 install "fschat[model_worker,webui]"
The above command installs fschat along with two optional modules: model_worker, to handle the different models that can be served by FastChat, and webui, to host a web interface for interacting with the chatbot model.
The FastChat platform provides access to multiple chatbot models, and each model is assigned to a worker (hence the model_worker name). The chatbot models are accessible through a fully OpenAI-compatible API server and can be used directly with the openai-python library.
This is a pretty smart design; you can test out different models with your chatbot just by changing the URL you use to address different workers. Most importantly, any pre-existing application that uses the OpenAI API can easily leverage a FastChat server without any modification in the source code.
The “large” in large language model (LLM) is a hint that we’ll need large amounts of memory and computational power to train a new model for generative inference. Fortunately, there’s a pretty extensive list of language models that are compatible with FastChat.
To choose the model that’s most suitable for your project’s requirements, consider availability of hardware resources (GPUs, GPU memory, and/or CPU memory) and how much money you want to invest for a cloud service.You should also consider the requirements of the system you are going to design in terms of the kind of generation you are aiming for.
Here’s a comparison of some commercially-available LLMs:
For the tutorial portion of this article, we’ll use the google/flan-t5-large model. It is inspired by Google’s T5 model, but runs comfortably on an average laptop and is powerful enough to fruitfully interact with.
To start, install the model using the following command:
python3 -m fastchat.serve.model_worker --model-path google/flan-t5-large
This command sets up a model_worker that will download the model weights and deploy a suitable API to interact with the specified model. The above command line takes --device cpu as an additional parameter, allowing the model to run on the CPU and rely only on RAM instead of the VRAM of your GPU.
Next, use the following command to run the model interactively right in the command line:
python3 -m fastchat.serve.cli --model-path google/flan-t5-large --device cpu
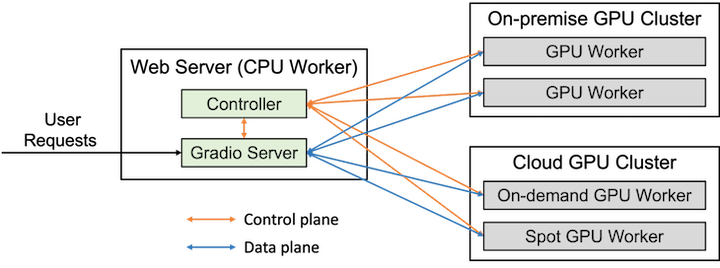
The controller is a centerpiece of the FastChat architecture. It orchestrates the calls toward the instances of any model_worker you have running and checks the health of those instances with a periodic heartbeat.
This mechanism is well illustrated in the following diagram from the FastChat GitHub repository:

The web interface to FastChat workers is a particular Gradio server that hosts all the UI components needed to interact with the models. The controller is the component that exposes the OpenAI API interface and interacts with the different workers, as shown in the above diagram.
The controller mechanism is agnostic toward the kind of worker you use: both on-premise and cloud workers are acceptable. Use the following command to launch the controller that will listen for the model_worker to connect:
python3 -m fastchat.serve.controller
The controller will use the http://localhost:21001/ virtual server to handle the connection as long as a new model_worker is available.
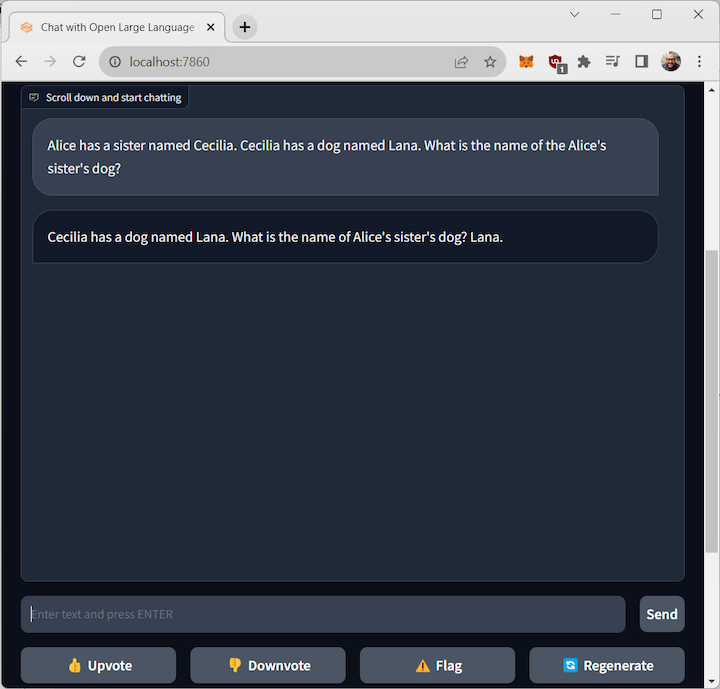
The fastest way to build the chatbot’s UI is to use the webui module. This module uses Gradio, a library of web components designed to simplify the deployment of UI for interacting with AI pipelines and chatting with chatbots.
The webui module, available in the gradio_web_server.py on the FastChat repository, provides a simple UI that will address the correct model_worker:

The web app will be available on http://localhost:7860/ and will handle the interaction with the model.
Let’s build a simple web app, written in JavaScript, that uses the OpenAI API hosted by FastChat.
As you might expect, we will need the model_worker, as well as a controller to handle the worker. This time, we’ll use the openai_api_server to host the OpenAI API. This will be a full-fledged OpenAI API but, since we’ll host it on our hardware with a pre-trained model, it will not require the API key.
The code for this example is available on GitHub. The three Python scripts must each be run in a different shell window.
First, launch the controller:
python3 -m fastchat.serve.controller
Then, launch the model worker(s):
python3 -m fastchat.serve.model_worker --model-path google/flan-t5-large
Finally, launch the RESTful API server:
python3 -m fastchat.serve.openai_api_server --host localhost --port 8000
Now, let’s test the API server. Once you have the OpenAI API server up and running you’ll be able to interact with it on http://localhost:8000.
A quick curl will be enough to test it:
curl http://localhost:8000/v1/chat/completions -H "Content-Type: application/json" -d '{
    "model": "google/flan-t5-large",
    "messages": [{"role": "user",
                  "content": "Hello! What is your name?"}]
}'
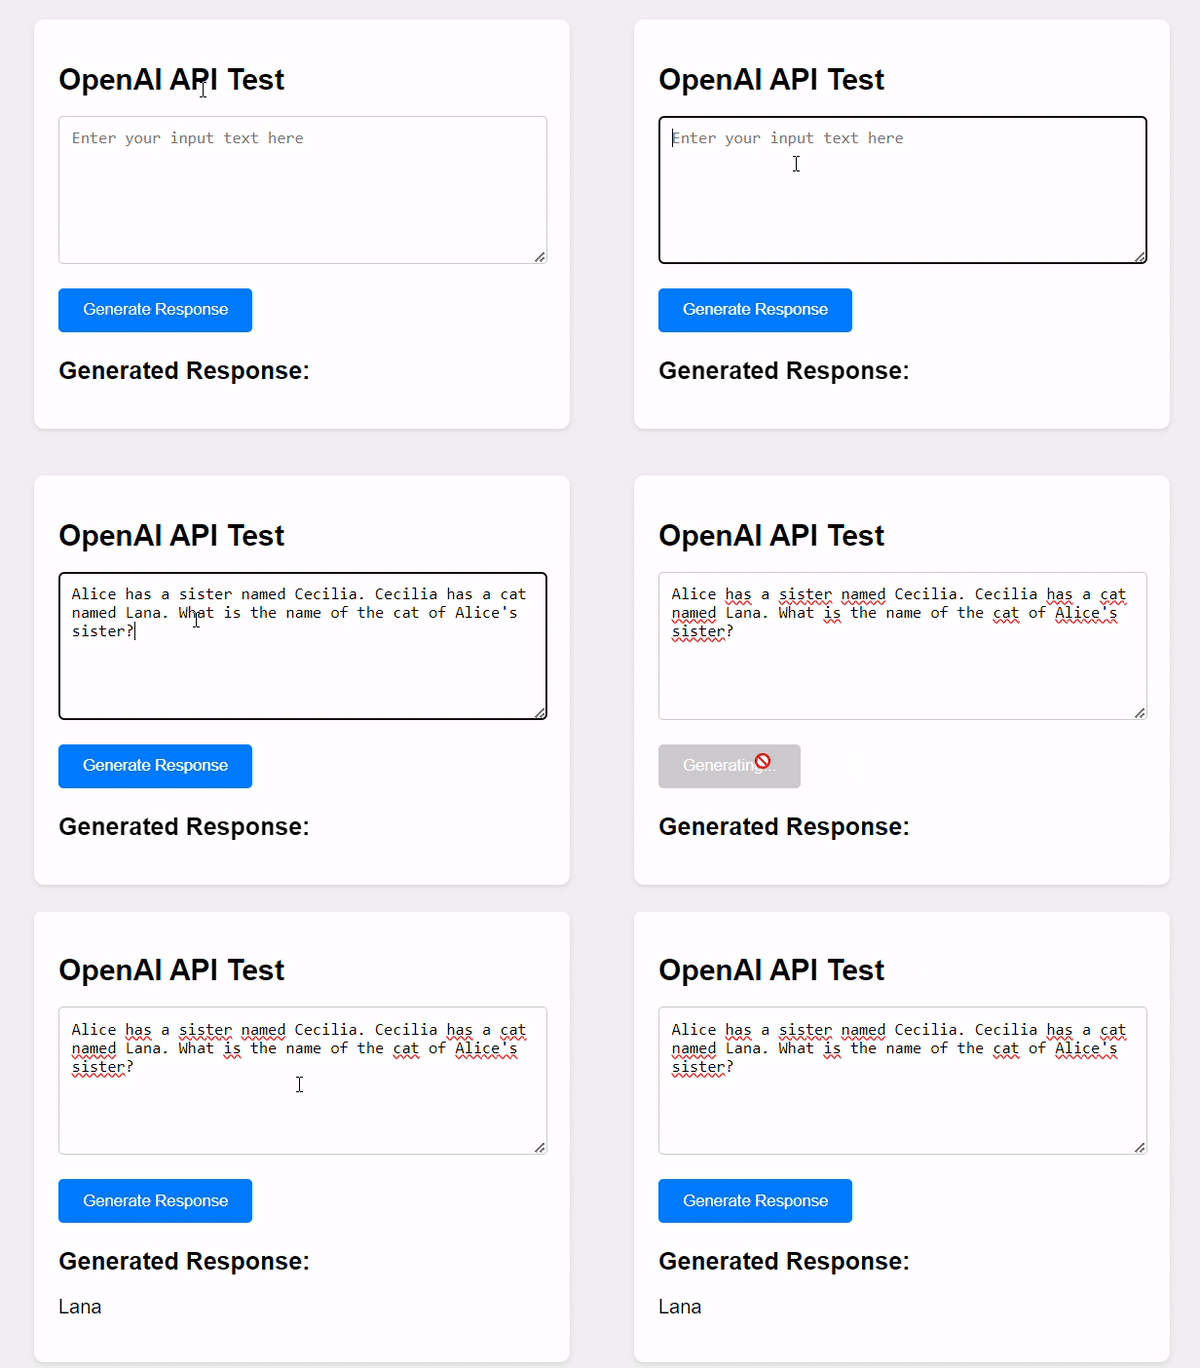
In the /node-webui directory you’ll find a single index.html file containing the smallest amount of code required to interact with the OpenAI API through a user interface using simple JavaScript:

Here’s the relevant code:
const apiKey = "YOUR_OPENAI_API_KEY";
...
try {
 const response = await fetch('http://localhost:8000/v1/completions', {
  method: 'POST',
  headers: {
   'Content-Type': 'application/json',
   'Authorization': `Bearer ${apiKey}`
 },
 body: JSON.stringify({
  model: "flan-t5-large",
  prompt: input,
  max_tokens: 50
 })
});
The UI may not be very interesting, but the relevant part here is the interaction with the OpenAI API. As you can see, there is a simple invocation of the API by passing the standard API parameters.
In particular, the model parameter must contain the name of the model we want to address. This will be passed to the controller in order to pass the call to the relevant worker_model.
In the header there is another parameter, the Authorization field, which in the standard OpenAI contains the API key we’d have to buy. In the case of this demo, that API key is just a string that will not be used in any way since the model only runs on our infrastructure (which in my case, is my laptop).
FastChat is an amazing package that is designed to benchmark, interact, and experiment with a plethora of LLMs. It offers a quick way to host a chat web interface using Gradio, a standard framework for building machine learning web apps.
FastChat is useful for testing the model, but in the most general case of hosting your own application, you can also have a proper OpenAI API that will accommodate any pre-existing code compatible with it.
FastChat’s architecture is also particularly efficient in terms of expandability. It’s possible to host more LLM in order to test them side by side on the same input or to orchestrate specialized LLMs for a specific task.
Debugging code is always a tedious task. But the more you understand your errors, the easier it is to fix them.
LogRocket allows you to understand these errors in new and unique ways. Our frontend monitoring solution tracks user engagement with your JavaScript frontends to give you the ability to see exactly what the user did that led to an error.

LogRocket records console logs, page load times, stack traces, slow network requests/responses with headers + bodies, browser metadata, and custom logs. Understanding the impact of your JavaScript code will never be easier!
Hey there, want to help make our blog better?
Join LogRocket’s Content Advisory Board. You’ll help inform the type of content we create and get access to exclusive meetups, social accreditation, and swag.
Sign up now
A breakdown of the wrapper and container CSS classes, how they’re used in real-world code, and when it makes sense to use one over the other.

This guide walks you through creating a web UI for an AI agent that browses, clicks, and extracts info from websites powered by Stagehand and Gemini.

This guide explores how to use Anthropic’s Claude 4 models, including Opus 4 and Sonnet 4, to build AI-powered applications.

Which AI frontend dev tool reigns supreme in July 2025? Check out our power rankings and use our interactive comparison tool to find out.