This tutorial is for frontend developers using Vue.js, so you should know about basic concepts and how to install packages. Here is what you will need:

node -v
npm uninstall -g vue-cli
Then install the new one:
npm install -g @vue/cli
According to the creators, Chakra UI is a simple modular and accessible component library that gives you the building blocks to build Vue applications with speed. It is one of the cleanest UI component libraries out there with support for Vue.js.
First and foremost, it is built to be very accessible from scratch, following strict WAI-ARIA standards. All the Chakra UI components ship with proper attributes, and even keyboard interactions, out of the box. It is also very fast, theme-able, and composable, this means that it is very easy to do referencing of values with the way Vue is set up easily without a new learning curve.
If you followed this post from the start you already have Vue installed so open up your VS Code and open a new terminal, navigate to a directory of your choice and then create a new project:
vue create newApp
When you are done with setting up a new Vue project called newApp, test it out to confirm it works without errors:
cd newApp
npm run serve
You will see the new Vue app scaffolded nicely if you visit localhost on the provided port.
After setting up Vue, the next step is installing Chakra UI on the project using your package manager of choice, we will use NPM. Open up the terminal in your VS Code and run the commands below:
npm install @chakra-ui/vue emotion --save
vue add chakra-ui
Follow the prompt and Vue will set up the dependencies for you, if you come across any errors concerning any specific package, reinstall it with this command:
npm install packageName
When you are done, navigate to your root folder and inside the main.js file replace the content with the code block below:
import Vue from 'vue'
import Chakra, { CThemeProvider, CReset } from '@chakra-ui/vue'
import App from './App.vue'
Vue.use(Chakra)
new Vue({
  el: '#app',
  render: (h) => h(CThemeProvider, [h(CReset), h(App)])
}).$mount()
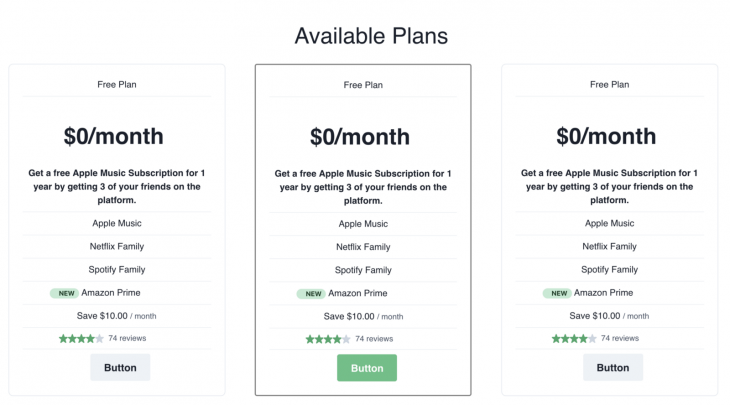
In this post, you will learn to build a modern pricing UI component for a SaaS product with different tiers, features, and even a creative highlight.
You will set up the app.vue file to use the HelloWorld component which comes out of the box for every Vue CLI scaffold as our pricing component for the course of this tutorial. Your app.vue file should look like this:
<template>
  <c-theme-provider>
    <c-reset />
    <!--Your application goes here -->
    <HelloWorld />
  </c-theme-provider>
</template>
<script>
import HelloWorld from './components/HelloWorld'
export default {
  name: "App",
  components: {
    HelloWorld
  }
};
</script>
Now we will look to build the UI component using the Chakra UI box element which is basically a card element. We will have three cards with equal spacing and styling to elaborate on our desired outcome.
For the presentation code, copy the code block below into the template section of your helloworld.vue file:
<template class="cbox">
<div id="mine">
<h1>Available Plans</h1>
<c-grid w="100%" template-columns="repeat(3, 1fr)" gap="6"  >
  <c-box maxW="sm" border-width="1px" rounded="lg" overflow="hidden">
    <c-box p="6">
      <h2>Free Plan</h2>
      <c-divider />
      <c-box
        mt="6"
        mb="6"
        font-weight="semibold"
        as="h3"
        text-align="center"
        line-height="tight"
        is-truncated>
        {{ property.title }} <br>
      </c-box>
      <c-box
      mt="6"
        font-weight="semibold"
        as="h5"
        text-align="center"
        line-height="tight"
        is-truncated>
        {{property.note}}</c-box>
      <c-divider />
      <h2>Apple Music</h2>
      <c-divider />
      <h2>Netflix Family</h2>
      <c-divider />
      <h2>Spotify Family</h2>
      <c-divider />
       <c-box d="flex" align-items="baseline">
        <c-badge rounded="full" px="2" variant-color="green" pl="4" ml="12">
          New
        </c-badge>
        <c-box
          ml="1"
          text-align="center">
         <h2>Amazon Prime</h2>
        </c-box>
      </c-box>
      <c-divider />
      <c-box pl="12" ml="12">
        Save {{ property.formattedPrice }}
        <c-box as="span" color="gray.600" fontSize="sm" >
          / month
        </c-box>
      </c-box>
      <c-divider />
      <c-box d="flex" mt="2" pl="4" ml="12" align-items="center">
        <c-icon
          v-for="(_, i) in Array(5).fill('')"
          name="star"
          :key="i"
          :color="i < property.rating ? 'green.500' : 'gray.300'"
        />
        <c-box as="span" ml="2" color="gray.600" font-size="sm">
          {{ property.reviewCount }} reviews
        </c-box>
      </c-box>
      <c-divider />
      <c-button-group pl="12" ml="12">
      <c-button ml="6" size="lg" variant-color="gray">Button</c-button>
      </c-button-group>
    </c-box>
  </c-box>
  <!-- new cards here -->
</c-grid>
</div>
</template>
First, you see that we used the card element, which are called boxes in Chakra UI, to create a container. Then we used various elements like badges, ratings, and buttons. You will also notice that the inline styling method is close to that of Bootstrap which is great for people who have used Bootstrap before as there are no new things to learn.
There are a few things we used, like the Vue property binding practice of text interpolation which every Vue developer must have come across. This was to reiterate that with Chakra UI in Vue.js, you carry all your Vue knowledge and nothing changes with the way things work:
<script>
  export default {
    name: 'Example',
    data () {
      return {
        property: {
          title: "$0/month",
          note: "Get a free Apple Music Subscription for 1 year by getting 3 of your friends on the platform.",
          formattedPrice: "$10.00",
          reviewCount: 74,
          rating: 4,
        }
      }
    }
  }
</script>
Here we bound some properties like star counts, number of reviews, and others. For your project, you can hard code the properties or dynamically request them using an API and it would be parsed well using the appropriate Vue syntax.
For the style, we scoped it to the helloworld component so that you can add other things with other styling to this, like headers and footers:
<style scoped>
#mine {
  margin: 20px;
}
h3, h1 {
  margin: 40px 10px 20px;
  text-align: center;
  font-size: 40px;
}
h2{
  text-align: center;
}
ul {
  list-style-type: none;
  padding: 0;
}
li {
  display: inline-block;
  margin: 0 10px;
}
a {
  color: #42b983;
}
</style>
Now you are done with putting all these UI elements nicely together, you can see that when you save and run the application again:
npm run serve
This was an introduction to the Chakra UI component library for Vue.js and how it can be easily set up. It also spoke to why Chakra UI is important especially for accessibility. You also got to build a pricing UI component for a SaaS product, happy hacking!
Debugging Vue.js applications can be difficult, especially when users experience issues that are difficult to reproduce. If you’re interested in monitoring and tracking Vue mutations and actions for all of your users in production, try LogRocket.

LogRocket lets you replay user sessions, eliminating guesswork by showing exactly what users experienced. It captures console logs, errors, network requests, and pixel-perfect DOM recordings — compatible with all frameworks.
With Galileo AI, you can instantly identify and explain user struggles with automated monitoring of your entire product experience.
Modernize how you debug your Vue apps — start monitoring for free.

Learn how to set up Meilisearch, index documents, and build keyword, semantic, and hybrid search with AI-powered retrieval.

Compare pnpm and npm across security defaults, disk usage, dependency strictness, and workspace policy to decide which package manager fits your project.

I migrated 20 production-style components from Tailwind to StyleX. Here’s what the data showed about LOC, CSS bundle size, build time, and type safety.

A guide for using JWT authentication to prevent basic security issues while understanding the shortcomings of JWTs.
Would you be interested in joining LogRocket's developer community?
Join LogRocket’s Content Advisory Board. You’ll help inform the type of content we create and get access to exclusive meetups, social accreditation, and swag.
Sign up now
