My greenfield project requires the usual song and dance: authentication. Our client wants to be sassy and found out that the trending tech in authentication is JWT (JSON Web Token), and the pressure soon built up in using it for all authentication purposes.

Being a React person, I don’t mind working on it and learning a new tech, but yeah — that’s why I am here writing my experience on this.
We are building a React frontend that talks to a .NET Core API Server. The authentication mechanism has been built on JWT on the .NET side of the project. I am implementing the JWT authentication on the frontend using React, and here it goes.
Also, please note that I haven’t added any MongoDB part, yet I referred to it as a MERN stack application — sorry. It just wasn’t in the scope of this article.
The Replay is a weekly newsletter for dev and engineering leaders.
Delivered once a week, it's your curated guide to the most important conversations around frontend dev, emerging AI tools, and the state of modern software.
JSON Web Tokens are an open, industry-standard RFC 7519 method for representing claims securely between two parties. A JWT is a JSON response that is defined in RFC 7519 as a safe way to represent a set of information between two parties. The token is composed of a header, a payload, and a signature.
In simple words, a JWT is just a string in the following format:

It should be noted that a double–quoted string is actually considered a valid JSON response:
"header.payload.signature"
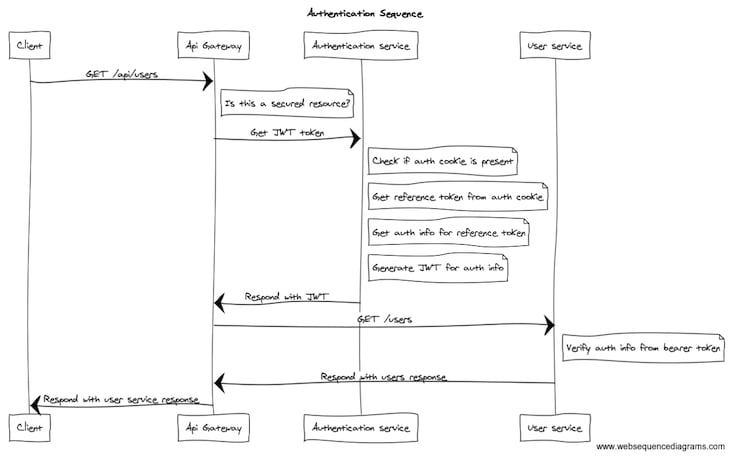
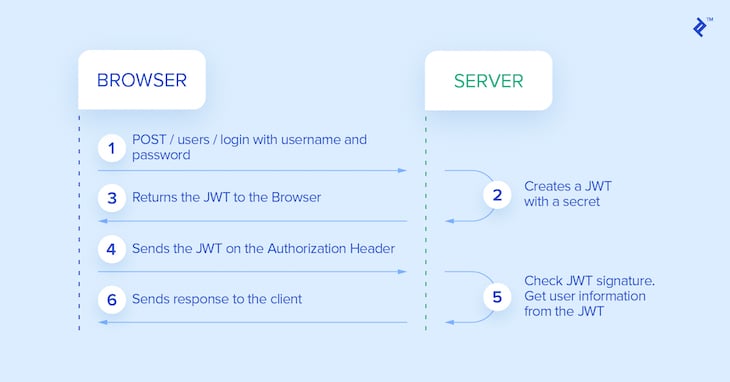
Since we are working in a microservice-based architecture, we have got different microservices, one being the Authentication Service. This is one of the backend services that’s written in .NET Core API, which retrieves a user claim based on a reference token in a domain cookie and generates a JWT for this claim.
If a valid JWT is returned, the call is forwarded to the corresponding service, and the JWT is passed in the request header as an OAuth bearer token for further authorization by the backing service.

The above sequence can be simplified using the following diagram:

Let’s start building something similar now.
As I said, this is a MERN stack application that we are going to build. The obvious requirements are:
I guess that’s enough for now.
Here’s the simplest form of code: index.js that says Hello World! on the browser when you open the localhost on port 3000 after running node index:
const express = require("express");
const app = express();
const port = 3000;

app.get("/", (req, res) => res.send("Hello World!"));

app.listen(port, () => console.log(`Example app listening on port ${port}!`));
We gotta start with things like a JWT-based Authentication and try to validate stuff. jwt.io gives you the list of different libraries that support different features of JWT. I tried finding the one that supports everything, but there’s none in JavaScript. 😔
Let’s think about what we need here. The backend should be able to support the algorithms HS512 and RS512, as these are recommended by a few banking clients of ours.
I have planned to use the jsrsasign, as that’s the closest to what my backend team generated, and it supports all the algorithms. Let’s include them this way, but don’t forget to install the package locally before you run the code:
const JSRSASign = require("jsrsasign");
The JWT payload is commonly referred as claims — not sure why. So let’s create a claims first:
const claims = {
  Username: "praveen",
  Age: 27,
  Fullname: "Praveen Kumar"
}
That’s everything I need for my application for now from the Users DB. I am not covering any database concepts here, so I am skipping them off. Next is the private key — as the name says, let’s keep it private and not use it in any of our client-side code.
const key = "$PraveenIsAwesome!";
Note: Keep this thing absolutely secret! 🤐
Now we have got our claims and key ready. Let’s start signing it and generating the token. We have to identify which algorithm we are going to use before signing. These details will be in header. So, let’s create a header.
const header = {
  alg: "HS512",
  typ: "JWT"
};
We will be using the HS512 (HMAC-SHA512) algorithm for signing the token, and we are going to generate a JWT. The other types you can generate or existing standards are:
Let’s carry on with the next main process of generating the token. We have got all we need: header, payload (claims), and key. We need to stringify the above objects and send to the generator.
var sHeader = JSON.stringify(header);
var sPayload = JSON.stringify(claims);
The key is already a string, so don’t bother stringifying it. To generate the key, we should pass the three strings along with the algorithm to the JSRSASign.jws.JWS.sign() function like this:
const sJWT = JSRSASign.jws.JWS.sign("HS512", sHeader, sPayload, key);
The output you get is a JWT! You can verify the correctness at jwt.io. Finally, logging the string to the console will get you the output:
console.log(sJWT);
And when I executed the above code, I got this:
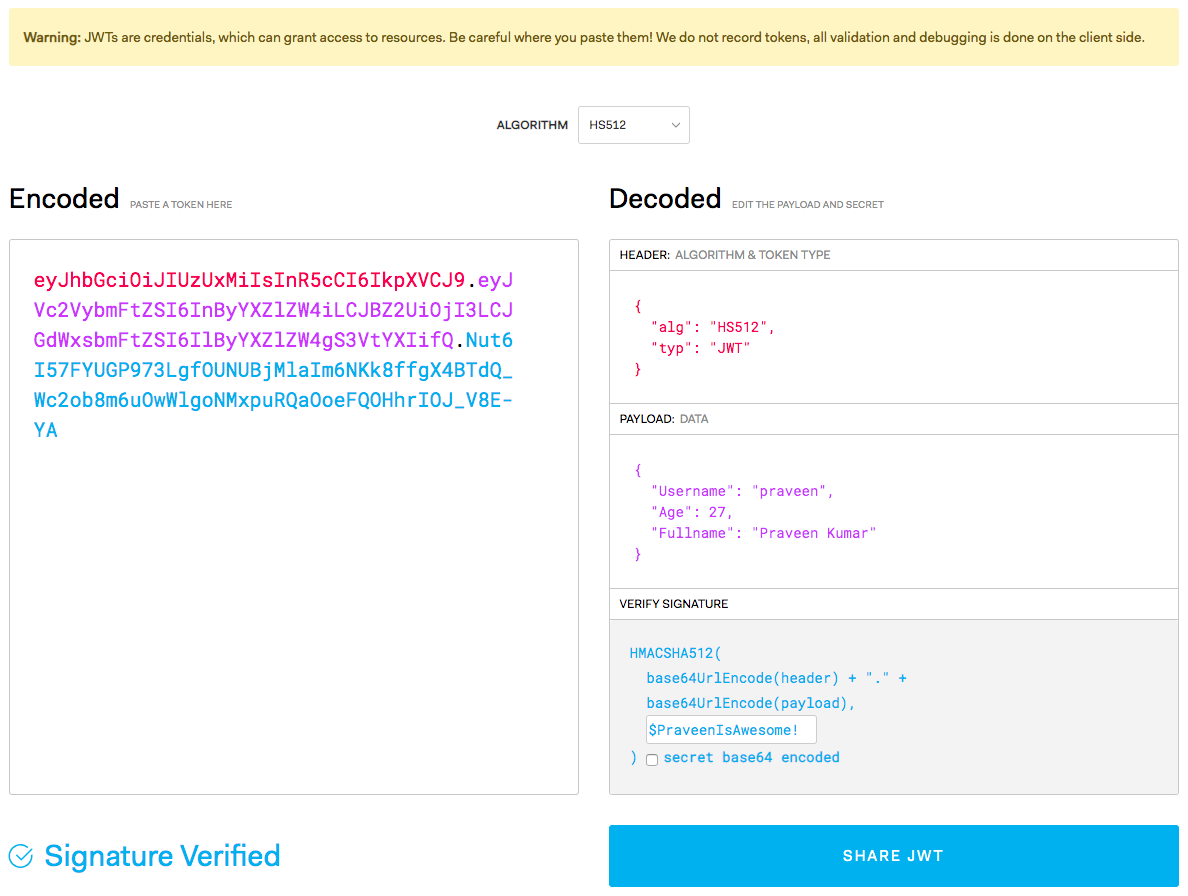
eyJhbGciOiJIUzUxMiIsInR5cCI6IkpXVCJ9.eyJVc2VybmFtZSI6InByYXZlZW4iLCJBZ2UiOjI3LCJGdWxsbmFtZSI6IlByYXZlZW4gS3VtYXIifQ.Nut6I57FYUGP973LgfOUNUBjMlaIm6NKk8ffgX4BTdQ_Wc2ob8m6uOwWlgoNMxpuRQaOoeFQOHhrIOJ_V8E-YA
Putting it into the online validator along with my signature, I got the same output with a signature-verified message:

Woohoo! You can actually check it out here.
The first step is to validate the token before decoding and getting to know what’s in it. Validation is only necessary to make sure that the token is not tampered with and that it has been signed with the same private key. This should not be done on the client side. Let’s try to decode the JSON Web Token by implementing the validation function, and then we will decode it.
Now that we have successfully generated the token based on the same algorithm my backend team uses, let’s try to validate it and verify that it works. To validate and verify the token, all we need is the algorithm, key, and the generated token. Let’s crack on with this.
const token = "eyJhbGciOiJIUzUxMiIsInR5cCI6IkpXVCJ9.eyJVc2VybmFtZSI6InByYXZlZW4iLCJBZ2UiOjI3LCJGdWxsbmFtZSI6IlByYXZlZW4gS3VtYXIifQ.Nut6I57FYUGP973LgfOUNUBjMlaIm6NKk8ffgX4BTdQ_Wc2ob8m6uOwWlgoNMxpuRQaOoeFQOHhrIOJ_V8E-YA";
const algorithm = "HS512";
const key = "$PraveenIsAwesome!";
The syntax is a bit weird — reason being, the validator can try to verify in any of the algorithms, so it takes an array of algorithms. The above information will be passed to the JSRSASign.jws.JWS.verifyJWT() function, which takes in the token, key, and {"alg": [ algorithm ]}, and the syntax is as follows:
console.log(
  JSRSASign.jws.JWS.verifyJWT(token, key, {
    alg: [algorithm]
  })
);
On the console, when I ran this, I got the following:
true
Ah, that’s a sweet success. Let us continue to decode the token now. The decoding part is really easy; even a browser on the client side can do it, and that is why my client prefers it for a safe and secure transmission of claims object in a single-page application framework like React.
To decode the JSON Web Token, we will be just passing the second part of the token. This contains the payload, or claims. We will also be requiring the algorithm, and that can be taken from the first part of the token.
The first thing we need to do is split the token on ., then convert it into an array and get the Header and Claim:
const aJWT = sJWS.split(".");
const uHeader = JSRSASign.b64utos(aJWT[0]);
const uClaim = JSRSASign.b64utos(aJWT[1]);
Let’s make them uHeader and uClaim because they are untrusted at this moment. Now let’s parse them. The JSRSASign.b64utos() will convert the untrusted Base64 to string, provided by the same library. We’ll now be using the function JSRSASign.jws.JWS.readSafeJSONString(), which is similar to JSON.parse() but has some more exception handling mechanisms.
const pHeader = JSRSASign.jws.JWS.readSafeJSONString(uHeader);
const pClaim = JSRSASign.jws.JWS.readSafeJSONString(uClaim);
Now we have got the parsed header and claims. Let’s try to log them and see the output.
console.log(pHeader);
console.log(pClaim);
Woohoo! We have got the decoded versions here.
{
  "alg": "HS512",
  "typ": "JWT"
}
{
  "Username": "praveen",
  "Age": 27,
  "Fullname": "Praveen Kumar"
}
Here we go! Now we can access the payload securely (well, at least not in plaintext) this way! 👍🏻
Here’s the complete code that includes signing, generating, validating, verifying, and decoding! 😇
const JSRSASign = require("jsrsasign");

// Generation
const claims = {
  Username: "praveen",
  Age: 27,
  Fullname: "Praveen Kumar"
};
const key = "$PraveenIsAwesome!";
const header = {
  alg: "HS512",
  typ: "JWT"
};

const sHeader = JSON.stringify(header);
const sPayload = JSON.stringify(claims);
// Generate the JWT
const sJWT = JSRSASign.jws.JWS.sign("HS512", sHeader, sPayload, key);
// Log it to the console.
console.log("JSON Web Token: ", sJWT);

const token =
  "eyJhbGciOiJIUzUxMiIsInR5cCI6IkpXVCJ9.eyJVc2VybmFtZSI6InByYXZlZW4iLCJBZ2UiOjI3LCJGdWxsbmFtZSI6IlByYXZlZW4gS3VtYXIifQ.Nut6I57FYUGP973LgfOUNUBjMlaIm6NKk8ffgX4BTdQ_Wc2ob8m6uOwWlgoNMxpuRQaOoeFQOHhrIOJ_V8E-YA";
const algorithm = "HS512";

// Log it to the console.
console.log(
  "Verification: ",
  // Validation
  JSRSASign.jws.JWS.verifyJWT(token, key, {
    alg: [algorithm]
  })
);

// Decoding
const sJWS = token;
const aJWT = sJWS.split(".");
const uHeader = JSRSASign.b64utos(aJWT[0]);
const uClaim = JSRSASign.b64utos(aJWT[1]);
const pHeader = JSRSASign.jws.JWS.readSafeJSONString(uHeader);
const pClaim = JSRSASign.jws.JWS.readSafeJSONString(uClaim);
// Decoded objects.
// Log it to the console.
console.log("Header: ", pHeader);
console.log("Claim: ", pClaim);
The above code will give you an output like this:
➜  MockAPIServer node dec-enc.js
JSON Web Token:  eyJhbGciOiJIUzUxMiIsInR5cCI6IkpXVCJ9.eyJVc2VybmFtZSI6InByYXZlZW4iLCJBZ2UiOjI3LCJGdWxsbmFtZSI6IlByYXZlZW4gS3VtYXIifQ.Nut6I57FYUGP973LgfOUNUBjMlaIm6NKk8ffgX4BTdQ_Wc2ob8m6uOwWlgoNMxpuRQaOoeFQOHhrIOJ_V8E-YA
Verification:  true
Header: { alg: 'HS512', typ: 'JWT' }
Claim: { Username: 'praveen',
  Age: 27,
  Fullname: 'Praveen Kumar' }
By the way, what I have done is just a server-side generation component and doesn’t include the “web server” to send you the token using a POST request.
Now that we have completed our work on the server side, let’s start building the REST API endpoints for the client to consume in part two!
Install LogRocket via npm or script tag. LogRocket.init() must be called client-side, not
server-side
$ npm i --save logrocket

// Code:

import LogRocket from 'logrocket';
LogRocket.init('app/id');
// Add to your HTML:

<script src="https://cdn.lr-ingest.com/LogRocket.min.js"></script>
<script>window.LogRocket && window.LogRocket.init('app/id');</script>

React Server Components and the Next.js App Router enable streaming and smaller client bundles, but only when used correctly. This article explores six common mistakes that block streaming, bloat hydration, and create stale UI in production.

Gil Fink (SparXis CEO) joins PodRocket to break down today’s most common web rendering patterns: SSR, CSR, static rednering, and islands/resumability.

@container scroll-state: Replace JS scroll listeners nowCSS @container scroll-state lets you build sticky headers, snapping carousels, and scroll indicators without JavaScript. Here’s how to replace scroll listeners with clean, declarative state queries.

Explore 10 Web APIs that replace common JavaScript libraries and reduce npm dependencies, bundle size, and performance overhead.
Hey there, want to help make our blog better?
Join LogRocket’s Content Advisory Board. You’ll help inform the type of content we create and get access to exclusive meetups, social accreditation, and swag.
Sign up now
3 Replies to "Creating a full-stack MERN app using JWT authentication: Part 1"
OMFG!!! Do *NOT* put passwords or any secrets in your claims… the JWT itself is *NOT* encrypted/secure, the payload is only base64 encoded, the signature only confirms authority.
JSON.parse(atob(YOUR_TOKEN.split(‘.’)[1]))
This is a *REALLY* bad example.
Agreed. This is just an example claim! Obviously we should not have any passwords in this.
The problem is, even putting it in the example is really bad form and should be updated… should include stuff like created, expires, and the user’s id. Having the password in the example could lead to false confidence and others following by this example.