Integrating AI into modern frontend applications is no small feat. Developers often find themselves juggling multiple APIs from providers like OpenAI, Anthropic, and Google, each with its own quirks around authentication, streaming, error handling, and response formats. What should be a straightforward task quickly becomes a fragmented, hard-to-maintain experience.

The Vercel AI SDK aims to change that. This article explores how the SDK simplifies AI integration by offering a unified interface that abstracts away the differences between providers, without sacrificing the unique strengths of each model.
Instead of wrestling with inconsistent APIs, you’ll use a consistent set of tools to unlock powerful capabilities like streaming responses, multimodal inputs, and adaptive UI generation. We’ll walk through building a multi-modal chat application that highlights these features: real-time feedback via streamed text, visual content processing through image analysis, and generative UI elements that respond to AI output.
By the end of this tutorial, you’ll have a solid foundation for integrating rich, AI-driven functionality into any frontend experience, with far less overhead.
The Replay is a weekly newsletter for dev and engineering leaders.
Delivered once a week, it's your curated guide to the most important conversations around frontend dev, emerging AI tools, and the state of modern software.
The Vercel AI SDK tackles the core challenges of building AI-powered frontends through four key features designed to streamline development. Together, these features eliminate the complexity of working with multiple AI providers while enabling sophisticated user interfaces.
The SDK’s provider abstraction eliminates the need to learn multiple AI APIs by offering a consistent interface across all supported models. Whether you’re working with OpenAI’s GPT-4, Anthropic’s Claude, or Google’s Gemini, the same code patterns apply for initialization, configuration, and response handling:
import { openai } from '@ai-sdk/openai';
import { anthropic } from '@ai-sdk/anthropic';
import { google } from '@ai-sdk/google';

// Switch between providers without changing your component logic
const model = openai('gpt-4o'); // or anthropic('claude-3-5-sonnet-20241022')
This abstraction extends beyond simple API calls to normalize response formats, error handling patterns, and streaming behaviors across providers. When business requirements change or new providers emerge, you can switch models with minimal code changes.
While the Vercel AI SDK simplifies cloud-based provider integration, there’s also growing interest in on-device inference using browser APIs. For example, Chrome’s window.ai API allows lightweight, privacy-focused AI experiences in the frontend. Learn how this works in Vue apps.
The SDK provides first-class React integration through specialized Hooks that handle complex state management for AI interactions. The useChat Hook manages conversations with built-in loading states, while useCompletion handles single-turn interactions:
import { useChat } from '@ai-sdk/react';

function ChatComponent() {
  const { messages, input, handleInputChange, handleSubmit, isLoading } = useChat();


  return (
    <div>
      {messages.map(message => (
        <div key={message.id}>
          <div>{message.role === 'user' ? 'User: ' : 'AI: '}</div>
          <div>{message.content}</div>
        </div>
      ))}
      <form onSubmit={handleSubmit}>
        <input
          value={input}
          onChange={handleInputChange}
          disabled={isLoading}
          placeholder="Type a message..."
        />
        <button type="submit">Send</button>
      </form>
    </div>
  );
}
The React integration improves performance by offloading heavy AI computations to the server while keeping the client-side interface fast and responsive:
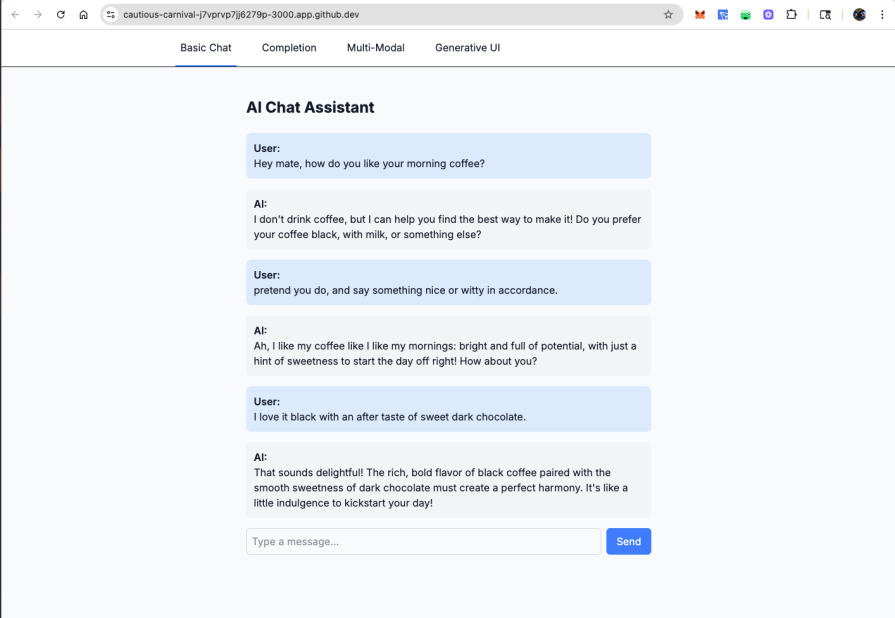
The Vercel AI SDK enables clean, streaming chat interfaces with minimal setup
Instead of waiting for complete responses, the SDK enables real-time streaming where text appears progressively as the AI generates it. This creates a more engaging user experience and provides immediate feedback:
import { useCompletion } from '@ai-sdk/react';

function StreamingComponent() {
  const { completion, input, handleInputChange, handleSubmit, isLoading } = useCompletion({
    api: '/api/completion',
  });

  return (
    <form onSubmit={handleSubmit}>
      <input
        name="prompt"
        value={input}
        onChange={handleInputChange}
        placeholder="Enter your prompt..."
      />
      <button type="submit" disabled={isLoading}>
        {isLoading ? 'Generating...' : 'Submit'}
      </button>
      <div>{completion}</div> {/* Streams in real-time */}
    </form>
  );
}

// Server-side API route that enables streaming
import { openai } from '@ai-sdk/openai';
import { streamText } from 'ai';

export async function POST(request: Request) {
  const { prompt } = await request.json();


  const result = streamText({
    model: openai('gpt-4o'),
    prompt,
  });

  return result.toDataStreamResponse();
}
The streaming implementation handles partial responses, maintains proper formatting, and provides graceful error recovery if connections are interrupted:
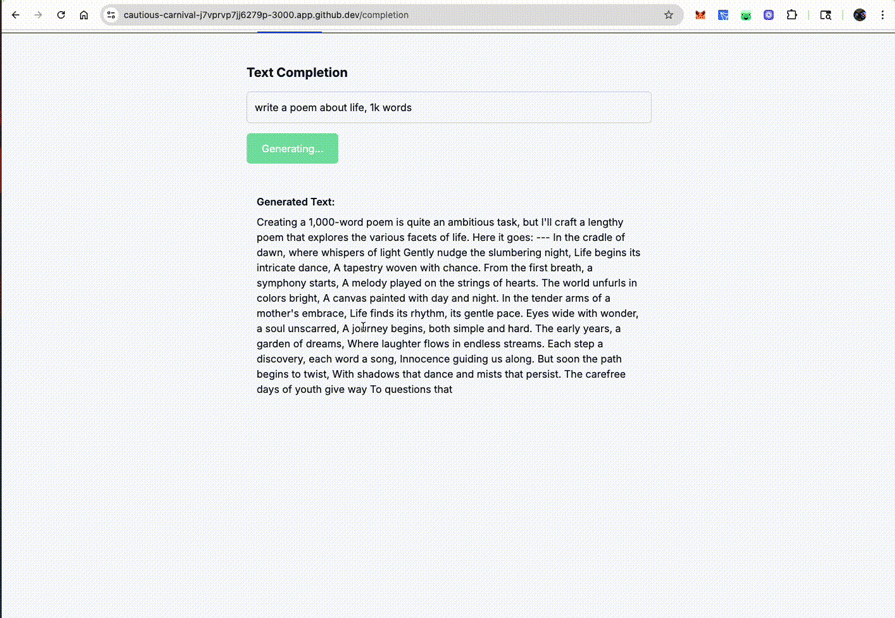
Text appears progressively as the AI generates it, creating engaging real-time interactions
For more on how React handles server-side streaming and Suspense, check out LogRocket’s guide to streaming SSR with React 18.
Function calling transforms static AI responses into dynamic interactions that can perform actions, fetch data, or integrate with external services. The SDK provides structured interfaces for defining custom tools with type safety and validation:
import { generateText, tool } from 'ai';
import { openai } from '@ai-sdk/openai';
import { z } from 'zod';

const { text } = await generateText({
  model: openai('gpt-4o'),
  prompt: 'What is the weather like today in San Francisco?',
  tools: {
    getWeather: tool({
      description: 'Get the weather in a location',
      parameters: z.object({
        location: z.string().describe('The location to get the weather for'),
      }),
      execute: async ({ location }) => ({
        location,
        temperature: 72 + Math.floor(Math.random() * 21) - 10,
      }),
    }),
  },
});
The SDK handles the complex orchestration of function calls, parameter validation, and response integration, allowing you to focus on implementing business logic:
These four core features work synergistically to create a development experience that prioritizes both ease of implementation and sophisticated AI capabilities.
Beyond the fundamentals, the SDK supports advanced use cases like image analysis, voice output, and generative UI. These patterns help developers build rich, multi-modal, and adaptive experiences.
The SDK’s built-in attachment system makes it straightforward to add image upload capabilities to your chat interface. The key is leveraging the experimental_attachments parameter in the handleSubmit function, which automatically processes files and sends them to your AI model for analysis.
Let’s start with the main component structure and state management:
'use client';
import { useChat } from '@ai-sdk/react';
import { useState } from 'react';

interface ImagePreviewsProps {
  files: File[];
  onRemove: (files: File[]) => void;
}
export default function MultiModalChat() {
  const [selectedFiles, setSelectedFiles] = useState<File[]>([]);


  const {
    messages,
    input,
    handleInputChange,
    handleSubmit,
    status
  } = useChat({
    api: '/api/multi-modal',
  });

  const handleFileChange = (event: React.ChangeEvent<HTMLInputElement>) => {
    const files = Array.from(event.target.files || []);
    setSelectedFiles(files);
  };

  const fileToDataURL = (file: File): Promise<string> => {
    return new Promise((resolve, reject) => {
      const reader = new FileReader();
      reader.onload = (e) => resolve(e.target?.result as string);
      reader.onerror = reject;
      reader.readAsDataURL(file);
    });
  };
The custom submit handler converts selected files into the attachment format that the SDK expects. This transformation is crucial because it ensures the AI model receives properly formatted image data:
    const customSubmit = async (event: React.FormEvent<HTMLFormElement>) => {
    event.preventDefault();


    // Convert files to data URLs for API compatibility
    const attachments = await Promise.all(
      selectedFiles.map(async (file) => ({
        name: file.name,
        contentType: file.type,
        url: await fileToDataURL(file)
      }))
    );
    handleSubmit(event, {
      experimental_attachments: attachments
    });


    setSelectedFiles([]);
  };
Now we’ll build the UI structure that displays messages and provides file upload functionality. The messages container establishes the conversational layout with proper styling and responsive design. This component handles the display of both user and AI messages, including attached images and streaming indicators:
  return (
    <div className="max-w-4xl mx-auto p-6">
      <h2 className="text-3xl font-bold mb-8 text-gray-900">Multi-Modal AI Chat</h2>


      {/* Messages container */}
      <div className="bg-white rounded-xl shadow-sm border border-gray-200 mb-6">
        <div className="p-6 space-y-4 max-h-96 overflow-y-auto">
          {messages.length === 0 ? (
            <div className="text-center text-gray-500 py-8">
              <p>Start a conversation by uploading images and asking questions!</p>
            </div>
          ) : (
            messages.map((message) => (
              <div key={message.id} className={`flex ${message.role === 'user' ? 'justify-end' : 'justify-start'}`}>
                <div className={`max-w-[80%] p-4 rounded-lg ${
                  message.role === 'user'
                    ? 'bg-blue-600 text-white'
                    : 'bg-gray-100 text-gray-900 border border-gray-200'
                }`}>
                  <div className="text-sm font-medium mb-1 opacity-75">
                    {message.role === 'user' ? 'You' : 'AI Assistant'}
                  </div>
                  <div className="text-sm leading-relaxed">{message.content}</div>


                  {/* Show attached images for user messages */}
                  {message.role === 'user' && message.experimental_attachments && (
                    <div className="mt-2 flex gap-2 flex-wrap">
                      {message.experimental_attachments.map((attachment, index) => (
                        <img
                          key={index}
                          src={attachment.url}
                          alt={attachment.name || 'Uploaded image'}
                          className="w-20 h-20 object-cover rounded border border-white/20"
                        />
                      ))}
                    </div>
                  )}
                </div>
              </div>
            ))
          )}


          {status === 'streaming' && (
            <div className="flex justify-start">
              <div className="bg-gray-100 text-gray-900 border border-gray-200 max-w-[80%] p-4 rounded-lg">
                <div className="text-sm font-medium mb-1 opacity-75">AI Assistant</div>
                <div className="flex items-center space-x-2">
                  <div className="flex space-x-1">
                    <div className="w-2 h-2 bg-gray-500 rounded-full animate-bounce"></div>
                    <div className="w-2 h-2 bg-gray-500 rounded-full animate-bounce" style={{animationDelay: '0.1s'}}></div>
                    <div className="w-2 h-2 bg-gray-500 rounded-full animate-bounce" style={{animationDelay: '0.2s'}}></div>
                  </div>
                  <span className="text-sm text-gray-600">Analyzing images...</span>
                </div>
              </div>
            </div>
          )}
        </div>
      </div>
The file upload interface combines functionality with accessibility, using a hidden input element and a custom-styled label for better control over appearance. The design provides immediate feedback about selected files and integrates seamlessly with the chat interface:
        {/* Input form */}
      <div className="bg-white rounded-xl shadow-sm border border-gray-200 p-6">
        <form onSubmit={customSubmit} className="space-y-4">
          {/* File upload section */}
          <div className="flex items-center gap-3">
            <input
              type="file"
              accept="image/*"
              multiple
              onChange={handleFileChange}
              className="hidden"
              id="file-upload"
            />
            <label
              htmlFor="file-upload"
              className="inline-flex items-center px-4 py-2 bg-gray-50 hover:bg-gray-100 text-gray-700 font-medium rounded-lg border border-gray-300 cursor-pointer transition-colors"
            >
              <svg className="w-4 h-4 mr-2" fill="none" stroke="currentColor" viewBox="0 0 24 24">
                <path strokeLinecap="round" strokeLinejoin="round" strokeWidth={2} d="M15.172 7l-6.586 6.586a2 2 0 102.828 2.828l6.414-6.586a4 4 0 00-5.656-5.656l-6.415 6.585a6 6 0 108.486 8.486L20.5 13" />
              </svg>
              Attach Images
            </label>
            {selectedFiles.length > 0 && (
              <span className="text-sm text-gray-600 font-medium">
                {selectedFiles.length} image{selectedFiles.length > 1 ? 's' : ''} selected
              </span>
            )}
          </div>
          {/* File previews */}
          {selectedFiles.length > 0 && (
            <ImagePreviews files={selectedFiles} onRemove={setSelectedFiles} />
          )}
          {/* Input and submit */}
          <div className="flex gap-3">
            <input
              value={input}
              onChange={handleInputChange}
              placeholder="Describe what you want to know about the images..."
              className="flex-1 px-4 py-3 border border-gray-300 rounded-lg focus:outline-none focus:ring-2 focus:ring-blue-500 focus:border-transparent text-gray-900 placeholder-gray-500"
              disabled={status === 'streaming'}
            />
            <button
              type="submit"
              disabled={status === 'streaming' || (!input.trim() && selectedFiles.length === 0)}
              className="px-6 py-3 bg-blue-600 hover:bg-blue-700 disabled:bg-gray-300 disabled:cursor-not-allowed text-white font-medium rounded-lg transition-colors"
            >
              {status === 'streaming' ? 'Analyzing...' : 'Send'}
            </button>
          </div>
        </form>
      </div>
    </div>
  );
}
The ImagePreviews component provides a clean interface for managing selected images before they’re sent to the AI model:
function ImagePreviews({ files, onRemove }: ImagePreviewsProps) {
  const removeFile = (indexToRemove: number) => {
    onRemove(files.filter((_, index) => index !== indexToRemove));
  };
  return (
    <div className="bg-gray-50 rounded-lg p-4 border border-gray-200">
      <div className="flex gap-3 flex-wrap">
        {files.map((file, index) => (
          <div key={index} className="relative group">
            <img
              src={URL.createObjectURL(file)}
              alt={file.name}
              className="w-20 h-20 object-cover rounded-lg border border-gray-300 shadow-sm"
            />
            <button
              type="button"
              onClick={() => removeFile(index)}
              className="absolute -top-2 -right-2 w-6 h-6 bg-red-500 hover:bg-red-600 text-white rounded-full flex items-center justify-center text-sm font-medium transition-colors shadow-sm"
            >
              ×
            </button>
            <div className="absolute bottom-0 left-0 right-0 bg-black bg-opacity-50 text-white text-xs p-1 rounded-b-lg truncate">
              {file.name}
            </div>
          </div>
        ))}
      </div>
    </div>
  );
}
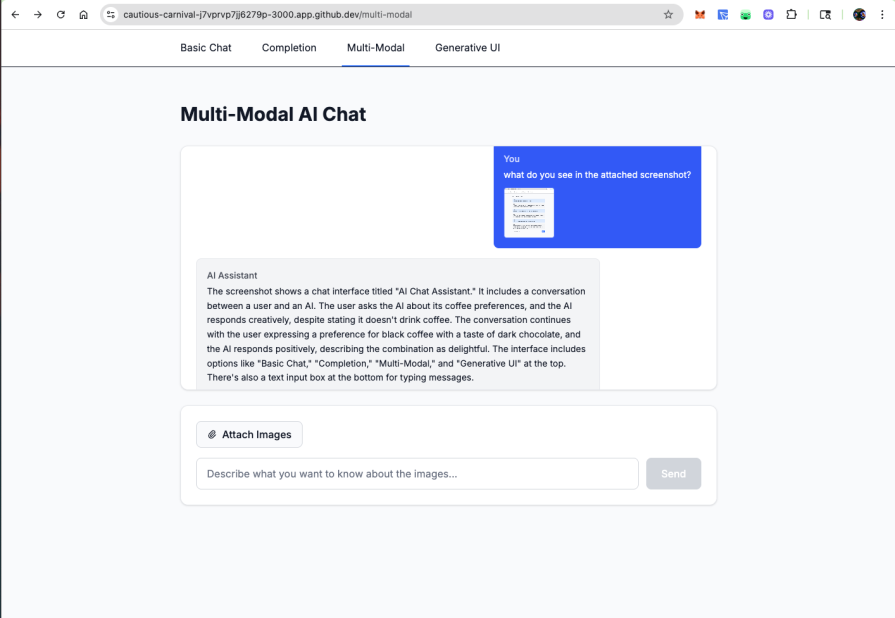
Multi-modal support makes image upload and analysis straightforward with built-in preview functionality
The AI SDK’s speech capabilities enable applications to generate natural-sounding audio responses, creating more immersive and accessible user experiences. The generateSpeech function transforms text into high-quality audio using advanced speech synthesis models.
In addition to enhancing user engagement, speech synthesis can improve accessibility for users with visual impairments or reading difficulties, making AI-driven applications more inclusive and user-friendly.
The core speech generation functionality allows you to convert any text response into audio format using various voice models and configurations:
import { experimental_generateSpeech as generateSpeech } from 'ai';
import { openai } from '@ai-sdk/openai';

export async function createAudioResponse(text: string, voice: string = 'alloy') {
  const audio = await generateSpeech({
    model: openai.speech('tts-1'),
    text: text,
    voice: voice, // Options: alloy, echo, fable, onyx, nova, shimmer
  });

  return audio.audioData; // Returns Uint8Array for audio data
}
The backend API route handles the actual speech generation and returns audio data in a streamable format:
// app/api/generate-speech/route.ts
import { experimental_generateSpeech as generateSpeech } from 'ai';
import { openai } from '@ai-sdk/openai';

export async function POST(request: Request) {
  try {
    const { text, voice = 'alloy' } = await request.json();

    const audio = await generateSpeech({
      model: openai.speech('tts-1'),
      text: text,
      voice: voice,
    });

    // Return audio as blob response
    return new Response(audio.audioData, {
      headers: {
        'Content-Type': 'audio/mpeg',
        'Content-Length': audio.audioData.length.toString(),
      },
    });
  } catch (error) {
    return Response.json({ error: 'Speech generation failed' }, { status: 500 });
  }
}
For more user experience in your applications, you can implement voice selection and audio processing features:
const voiceOptions = [
  { value: 'alloy', label: 'Alloy (Neutral)' },
  { value: 'echo', label: 'Echo (Male)' },
  { value: 'fable', label: 'Fable (British Male)' },
  { value: 'onyx', label: 'Onyx (Deep Male)' },
  { value: 'nova', label: 'Nova (Female)' },
  { value: 'shimmer', label: 'Shimmer (Soft Female)' }
];

function VoiceSettings({ selectedVoice, onVoiceChange }) {
  return (
    <div className="voice-settings">
      <label>AI Voice:</label>
      <select value={selectedVoice} onChange={(e) => onVoiceChange(e.target.value)}>
        {voiceOptions.map(option => (
          <option key={option.value} value={option.value}>
            {option.label}
          </option>
        ))}
      </select>
    </div>
  );
}
This implementation provides a complete voice output system that enhances user engagement through natural speech synthesis, making AI interactions more accessible and humanlike.
The foundation of generative UI lies in tool invocations that trigger specific React components. When the AI determines a user needs a particular interface element, it calls the appropriate tool and passes the results to a corresponding component:
export const formGeneratorTool = createTool({
  description: 'Generate a dynamic form based on user requirements',
  parameters: z.object({
    formType: z.string().describe('Type of form to create'),
    fields: z.array(z.object({
      name: z.string(),
      type: z.enum(['text', 'email', 'select', 'textarea']),
      label: z.string(),
      required: z.boolean(),
      options: z.array(z.string()).optional()
    }))
  }),
  execute: async function ({ formType, fields }) {
    return {
      title: `${formType} Form`,
      fields: fields.map(field => ({
        ...field,
        options: field.options?.map(opt => ({ value: opt, label: opt }))
      }))
    };
  },
});
The chat interface checks for tool invocations and renders appropriate components based on the tool name and state:
const renderMessage = (message) => {
  if (message.toolInvocations?.length > 0) {
    return message.toolInvocations.map((tool) => {
      if (tool.state === 'result') {
        switch (tool.toolName) {
          case 'generateForm':
            return <DynamicForm key={tool.toolCallId} formData={tool.result} />;
          case 'createChart':
            return <DataVisualization key={tool.toolCallId} chartConfig={tool.result} />;
          case 'buildSurvey':
            return <InteractiveSurvey key={tool.toolCallId} surveyData={tool.result} />;
        }
      }
      return <LoadingIndicator key={tool.toolCallId} toolName={tool.toolName} />;
    });
  }
  return <div>{message.content}</div>;
};
Generative UI extends beyond forms to include dynamic chart creation. Users can request visualizations through conversational queries, and the AI generates appropriate chart configurations:
const chartTool = createTool({
  description: 'Create data visualizations from user queries',
  parameters: z.object({
    chartType: z.enum(['line', 'bar', 'pie', 'area']),
    data: z.array(z.record(z.union([z.string(), z.number()]))),
    xAxis: z.string(),
    yAxis: z.string(),
    title: z.string()
  }),
  execute: async function ({ chartType, data, xAxis, yAxis, title }) {
    // In practice, this might fetch real data from APIs
    return { chartType, data, xAxis, yAxis, title };
  }
});
The resulting visualization component adapts to different chart types while maintaining consistent styling and interaction patterns, making data analysis accessible through natural language requests.
For a complementary exploration of AI agents in frontend apps, including how to bridge reasoning with action, check out LogRocket’s tutorial on building an AI agent for your frontend project.
MCP integration allows your AI applications to connect with external data sources and services, enabling context-aware applications that can access real-time information and perform complex operations.
Note: MCP integration is currently experimental and may change in future SDK releases:
// Server-side MCP client setup
import { experimental_createMCPClient as createMCPClient } from 'ai';

const mcpClient = createMCPClient({
  name: 'data-connector',
  version: '1.0.0',
  transport: {
    type: 'stdio',
    command: 'node',
    args: ['./mcp-servers/database-server.js']
  }
});

const tools = await mcpClient.tools();

const result = await streamText({
  model: openai('gpt-4o'),
  tools,
  messages: 'What is the weather in Brooklyn, New York?',
  onFinish: async () => {
    await mcpClient.close();
  },
});
By integrating MCP (multi-context prompting) capabilities with the standard AI SDK tools, the API route allows your AI to query external systems on demand. This approach makes it possible to build more context-aware applications, ones that can understand and respond to information beyond the immediate user input.
These advanced patterns highlight how the Vercel AI SDK supports rich, dynamic interactions that go well beyond basic text generation. The real power lies in how these features work together to deliver seamless, intelligent user experiences.
AI-powered features introduce unique performance challenges that traditional web applications don’t face. The Vercel AI SDK provides several built-in optimizations and patterns to ensure your AI features remain fast and responsive.
Effective streaming hinges on balancing responsiveness with resource efficiency. When the rate of data production outpaces consumption, stream backpressure prevents resource overload by slowing the flow. The Vercel AI SDK manages this seamlessly using lazy evaluation data is only pulled when the consumer is ready, ensuring efficient, real-time interactions without overwhelming the client:
function createOptimizedStream(generator) {
  return new ReadableStream({
    async pull(controller) {
      const { value, done } = await generator.next();


      if (done) {
        controller.close();
      } else {
        controller.enqueue(value);
      }
    },
  });
}
This mechanism also helps prevent memory leaks when users navigate away or connections drop unexpectedly. Without proper backpressure handling, servers may continue pulling data from AI providers even after the client has disconnected, wasting resources and risking exhaustion.
Cancellation works hand-in-hand with backpressure. When streams are implemented with lazy evaluation, unused resources are cleaned up automatically as soon as the consumer stops reading.
Additionally, the SDK allows you to render multiple streamable UI elements in parallel, rather than waiting for a single large response, enabling faster, more interactive user experiences:
export async function generateDashboard() {
  const analyticsUI = createStreamableUI(<Skeleton />);
  const chartsUI = createStreamableUI(<Skeleton />);
  const summaryUI = createStreamableUI(<Skeleton />);

  // These update independently as data becomes available
  Promise.all([
    fetchAnalytics().then(data => analyticsUI.done(<Analytics data={data} />)),
    fetchCharts().then(data => chartsUI.done(<Charts data={data} />)),
    fetchSummary().then(data => summaryUI.done(<Summary data={data} />))
  ]);

  return {
    timestamp: Date.now(),
    analytics: analyticsUI.value,
    charts: chartsUI.value,
    summary: summaryUI.value,
  };
}
This approach reduces perceived loading time by showing progressive updates rather than blocking until all data is ready. Users see immediate feedback while background processes complete asynchronously.
Modern AI applications need intelligent caching to balance performance with cost. The AI SDK provides multiple layers of caching that work seamlessly together.
You can utilize server-side response caching. This involves response caching to prevent redundant API calls by storing and replaying previous responses. Using language model middleware, you can cache both streaming and non-streaming responses while preserving the user experience:
export const cacheMiddleware: LanguageModelV1Middleware = {
  wrapStream: async ({ doStream, params }) => {
    const cacheKey = JSON.stringify(params);
    const cached = await redis.get(cacheKey);


    if (cached !== null) {
      return {
        stream: simulateReadableStream({
          chunkDelayInMs: 10,
          chunks: cached,
        }),
      };
    }


    // Cache new responses after streaming completes
    const { stream } = await doStream();
    const fullResponse = [];


    return {
      stream: stream.pipeThrough(new TransformStream({
        transform(chunk, controller) {
          fullResponse.push(chunk);
          controller.enqueue(chunk);
        },
        flush() {
          redis.set(cacheKey, fullResponse);
        },
      })),
    };
  },
};
The simulateReadableStream function replays cached responses chunk-by-chunk, maintaining the streaming experience users expect while eliminating redundant API calls.
Also, you can leverage a dynamic LLM provider selection during runtime. The SDK’s provider abstraction enables intelligent model switching based on system load, cost constraints, or response requirements. This allows applications to optimize performance and expenses dynamically:
const getOptimalProvider = (requestType) => {
  const currentLoad = getSystemLoad();
  const isSimpleQuery = requestType === 'simple';


  if (currentLoad > 0.8 || isSimpleQuery) {
    return openai('gpt-4o-mini');
  }
  return openai('gpt-4o');
};

const result = streamText({
  model: getOptimalProvider(queryType),
  messages,
});
This approach lets you route expensive queries to premium models while handling routine requests with cost-effective alternatives, all without changing your application logic.
AI API costs can escalate quickly without proper controls. The SDK provides several mechanisms to help you monitor and control costs effectively.
Rate limiting is essential for preventing abuse and managing costs. You can implement limits at both the client and server level – client-side for immediate user feedback, and server-side for enforcement. The SDK’s built-in request tracking makes it straightforward to implement per-user or per-session limits.
Usage monitoring becomes critical as your application scales. Token usage varies significantly based on conversation length, model choice, and feature complexity. The onFinish callback in useChat provides detailed usage statistics,including prompt tokens, completion tokens, and finish reasons, allowing you to track costs in real-time.
The Vercel AI SDK reshapes frontend AI development by offering unified APIs, seamless React integration, real-time streaming, function calling, and generative UI capabilities, all in one cohesive toolkit. It removes the friction of integrating multiple AI providers while enabling advanced, responsive user experiences.
With provider abstraction to avoid vendor lock-in, intuitive React Hooks to streamline state management, and streaming for fluid interactions, the SDK makes AI feel like a native part of your app. Function calling connects AI-driven reasoning with real-world actions, and generative UI unlocks adaptive, dynamic interfaces.
Start simple with a basic chat interface, layer in multimodal features as needed, and explore generative UI where it enhances the experience. The AI-first future of frontend development is already here, and the Vercel AI SDK makes it easier than ever to build for it.
You can explore the full sample project and source code on GitHub.

Why the future of DX might come from the web platform itself, not more tools or frameworks.

A hands-on test of Claude Code Review across real PRs, breaking down what it flagged, what slipped through, and how the pipeline actually performs in practice.

CSS art once made frontend feel playful and accessible. Here’s why it faded as the web became more practical and prestige-driven.

Learn how inline props break React.memo, trigger unnecessary re-renders, and hurt React performance — plus how to fix them.
Would you be interested in joining LogRocket's developer community?
Join LogRocket’s Content Advisory Board. You’ll help inform the type of content we create and get access to exclusive meetups, social accreditation, and swag.
Sign up now

