Editor’s note: This article was last updated by Kayode Adeniyi on 19 April 2023 to include information about the different types of event handlers provided by JavaScript, and the lifecycle of a JavaScript event. For more information, learn how to create custom events for your app in JavaScript.
In this article, we’ll look at how to dynamically create JavaScript elements and how to attach event handlers to the dynamically created JavaScript elements.
We’ll cover the following:
document.createElement() methodIn JavaScript, events are the actions or triggers that happen in the web browser, such as clicking on a button, scrolling down a page, or submitting a form. These events/triggers can be generated by the user or by the browser itself. After they are generated, they trigger a JavaScript code to perform a certain action in response.
Similarly, events in JavaScript are triggered by specific actions and can then trigger a response in the JavaScript code that’s listening for that particular event. The way a traffic light controls the flow of traffic at an intersection, events in JavaScript can control the behavior of code.
When an event inside the JavaScript is triggered, a piece of code is executed. That code, also known as the event handler, is usually wrapped up inside a function. The event handler is usually attached to an HTML element, and it waits for the execution of an event to happen on that element.
To understand this more clearly, let’s build on our traffic light analogy. Think of an event handler as a traffic cop at an intersection. The cop waits for certain events, such as a car running a red light, to take an action that is a response to that event, such as writing the driver a ticket.
Similarly, an event handler is “listening” for specific events to occur on an HTML element. When the action occurs, the events handler is triggered and takes action by executing the JavaScript code associated with it.
Event handlers and event listeners perform similar, but not identical, tasks. The main difference between them is how they are attached to the HTML element. Event handlers are attached as attributes to the HTML element itself, while event listeners are attached using JavaScript.
Millions of developers are actively using JavaScript and changing its ecosystem. As such, there are different types of event handlers provided by the JavaScript:
Let’s take a look at each of the handlers above to understand what functionalities they provide.
Inline event handlers can be added directly to the HTML element using the on attribute. The main benefit of using inline event handlers is their simplicity. Some examples of inline events are:
onclick: This event is triggered when the HTML on which it is attached gets clicked by the user. This event handler executes the code specified in its attributeonsubmit: This event handler is triggered when a form is submitted. It also executes the code specified in its attributesonmouseover: This event is triggered when the user moves their mouse on the element on which it is attachedTraditional event handlers are used in web development to attach event listeners to HTML elements. As every browser supports them and they have been in use for very long, their main benefit is their compatibility and flexibility.
The main difference between traditional event handlers and inline event handlers is the way they are attached to the code. Inline event handlers are attached directly with the HTML code whereas traditional event handlers are attached with HTML through a separate JavaScript code block.
Some of the traditional event handlers are:
onkeydown: This event is triggered and the code is executed when the user presses the down key on their keyboardonscroll: When a user scrolls through an HTML document, this event handler triggers the functiononload: When all the resources of the HTML page are loaded, this event is triggeredDOM level 0 event handlers refer to the traditional approach that was used during the early days of the web. During this approach, we simply used to set a property on an HTML element that usually corresponds to the name of the event we want to listen for, and then we assign a function to it that gets called after the event occurs.
Some of the DOM level 0 event handlers are the same as what we have already discussed. The only difference is the way they get attached to the HTML code is different. DOM level 0 event handlers include:
onload: This event is triggered when a webpage has finished loadingonmouseout: This event is triggered when a user moves their mouse out of an elementonsubmit: This event is triggered when a form is submittedWhen an event is triggered, there are three phases that the event flows through the DOM (Document Object Model). These phases are the capture phase, target phase, and bubbling phase.
During the capture phase, the event first moves from the top of the DOM hierarchy towards the target element.
After the event reaches the target element, it triggers the event listener attached to that element. The target phase is the phase where the event actually happens.
After the target phase, the event bubbles up from the target element towards the top of the DOM hierarchy. It’s important to note that not all events go through all three phases. Some events only have a target phase, while others may skip the capture or bubbling phase. It depends on where the event was triggered.
In JavaScript, attaching event handlers on an element that is not yet created or does not exist on the page will throw an error. As a result, the event handler code won’t work.
For example:
In the example above, the btn class does not exist in our index.html page. Therefore, this will throw an error of addEventListener of null.
We can dynamically create an element in JavaScript and attach event handlers with these two methods.
document.createElement() methodThe document.createElement() method allows us to create the HTML elements by their tag names, like <div>, <p>,<img>, and <h1>.
When we create an element with document.createElement, it doesn’t appear on the page immediately. It is going to be stored in the JavaScript memory until it is injected in the DOM. In this article, we are going to create a simple dog profile.
We’ll dynamically create our elements, inject it to the DOM, and also attach event handlers. Follow the link to the live CodePen demo:
Here is our index.html with no element in its body. We are going to dynamically create the element from JavaScript, inject it into the DOM, and also attach event handlers to the dynamically created elements:
In our index.js, we used document.createElement() to dynamically create a new div. Then, we added a dog class to the div we created earlier.
The classList property is used to add, remove, and toggle CSS classes on an element. Next, we created an image tag with src and alt attributes. We also created the h2 tag and added text contents in it. Then, we added a new p element with a class of info that will contain more information about the dog.
Next, we’ll dynamically create a button with a class of btn. We’ll add text saying click here to read more. If you inspect your browser, you won’t see the div with a class of dog we created because we haven’t appended it yet to the DOM.
Now, we’ve dynamically created an element. The next question is: how do we inject it to the page? To inject it into the DOM, we are going to use the .appendChild() method to append the dynamically created elements.
If you inspect your console, you will see the dynamically created elements injected in your DOM. Now we can add event handlers. To attach event handlers to the dynamically created button, we need to select the button with a class of btn and add an event listener of click.
We’re saying that onclick of the button, the p tag with a class of moreInfo should display block. Here is the CSS code for styling the dog profile:
JavaScript backtick strings are also known as template literals. According to MDN, template literals are string literals allowing embedded expressions. You can use multi-line strings and string interpolation features with them.
We are going to dynamically create an element with JavaScript template literals, inject them to the DOM, and also attach event handlers.
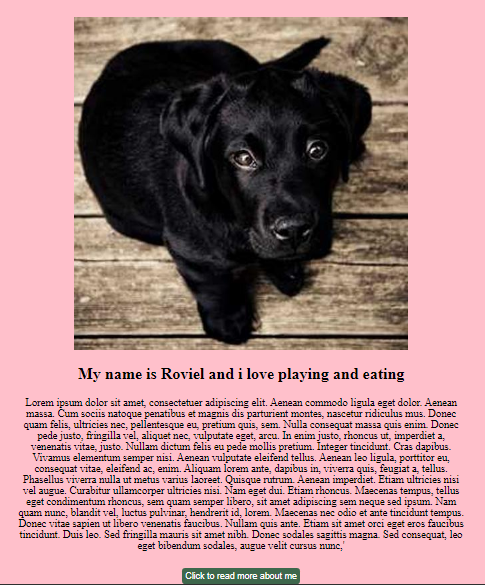
Check out this live demo at CodePen. Below is the screenshot of the dog profile before triggering the event that will happen after Click to read more about me is clicked:

Below is the screenshot of the site after the event gets triggered. Notice the difference, and observe how triggering the event transforms the DOM and reveals a new dev that was previously hidden and has text inside of it:
Now, we are going to create the dog profile we created earlier, but with a difference in the JavaScript file. Our HTML and CSS remains the same.
In the template literals.js file, we declared newDog, and use template literals to create multiple elements in it. If you console.log(newDog), you will see the element created like a string in the console. Or, if you console.log(typeof newDog), it is going to return a string showing that it is not yet a DOM element.
Next, we are going to use document.createRange() to turn the string into a DOM element. Then, we call the createContextualFragment() method that leaves on the range. When you console.log myFragment, you will see a range of objects (a collection of elements, or part of HTML we can work with). Then, we append myFragment to the body of the page.
N.B., If you need to do things like add event listeners or change classes, we should put it in the DOM with a createcontextual fragment and then put it in the body or anywhere else in the page.
Next, we are selecting the button with a class of .btn where the users click to read more about the dog. If you console.log(btn), you find out that it is in the DOM because we have injected it to the DOM through the createContextual fragment.
We added an event listener of click, and called a showMore function. In the showMore function, we selected the class moreInfo. If you check on our css you find out that the text was set to display none. So now we are saying that onclick of the button, let the display none change to display block.
Congratulations! Our dog profile is complete. All elements were created dynamically, and the event handler of onclick was added to the dynamically created elements.
In this article, we explored the concepts of events, event listeners, and dynamically creating new JavaScript elements by using document.createElement and template literals. We also conveyed the different approaches that one can take while writing an event listener. Remember that each approach has its own pros and cons.
Debugging code is always a tedious task. But the more you understand your errors, the easier it is to fix them.
LogRocket allows you to understand these errors in new and unique ways. Our frontend monitoring solution tracks user engagement with your JavaScript frontends to give you the ability to see exactly what the user did that led to an error.

LogRocket records console logs, page load times, stack traces, slow network requests/responses with headers + bodies, browser metadata, and custom logs. Understanding the impact of your JavaScript code will never be easier!
Hey there, want to help make our blog better?
Join LogRocket’s Content Advisory Board. You’ll help inform the type of content we create and get access to exclusive meetups, social accreditation, and swag.
Sign up now
A breakdown of the wrapper and container CSS classes, how they’re used in real-world code, and when it makes sense to use one over the other.

This guide walks you through creating a web UI for an AI agent that browses, clicks, and extracts info from websites powered by Stagehand and Gemini.

This guide explores how to use Anthropic’s Claude 4 models, including Opus 4 and Sonnet 4, to build AI-powered applications.

Which AI frontend dev tool reigns supreme in July 2025? Check out our power rankings and use our interactive comparison tool to find out.


One Reply to "Dynamically creating JavaScript elements with event handlers"
Thanks for the content. He helped me a lot.