Basic understanding and knowledge of Node.js, Git, and Prisma is a prerequisite for this tutorial.

In cases where large data sets are involved, querying for data can be both a time-consuming and expensive activity, both on the infrastructure and business operations.
Take an example where we are trying to fetch data that satisfies the query SELECT * FROM users WHERE 'email' = '[email protected]' within a table that contains millions of rows of data (possibly operated by some ecommerce business).
The database will need to do a sequential scan on the table users, reading every record until it arrives at the row where our query is satisfied and return the data to our application.
Such a process is expensive because it will take an enormous amount of time for this query to be completed, time that would interfere with smooth execution of our imaginary ecommerce business’s operations, given we still expect several queries to be made to this database under normal circumstances.
Under such conditions is where we need to implement the use of database indexes, a database data structure that can be the tool to bail us out of the predicament we might find ourselves in.
In this tutorial, we’ll teach you about database indexes. Here is what we are going to cover:
In databases, indexes are special data structures that optimize data access by helping in quick execution of queries, hence improving database performance.
In the above scenario, indexes would facilitate the quick access of the information that our databases are querying for, without having to read all the data that is found within the users table.
One of the best examples to explain database indexes are the index pages we usually find at the rear ends of books.
Normally, when we need to read only certain portions of books, we use the indexes found at the back pages of a book to easily find the page numbers to the topics or subjects we are interested in. We then skip to targeted pages to consume the information we are looking for.
This saves the time that we would have used to scan through every page of a book trying to find what we wanted to read.
As observed, database indexes would make data retrieval operations in databases that have large datasets — which under normal circumstances would have taken minutes, hours, or even days to complete — take seconds or less to finish.
This would then translate to the smooth running of our applications, hence business operations, and eventually revenue (since the time used to deliver services to users, especially in business applications, usually directly affects revenue).
Prisma is an Object-Relational Mapping (ORM) tool for JavaScript applications. Object-relational mapping is a programming technique that enables us to abstract our code from the database behind it. We model our data in human-friendly schemas, and at the most, worry very little about database-specific differences.
This means we can simply change the database being used without the need for vast changes in our data model–creating code (apply changes mostly at the minimum). ORM helps simplify the retrieval of data from our database since instead of writing database-explicit queries to get data from databases, we only interact with objects of specific classes that represent records created within them.
Prisma, has two main components: the Prisma client and Prisma Migrate.
The Prisma client is a query builder that composes queries autogenerated from the Prisma schema we define in our apps.
Prisma Migrate is a database schema migration tool that enables us to keep our database schema in sync with our Prisma schema as changes are made while maintaining existing data inside our databases.
Prisma integrates with a number of popular databases, including MySQL, SQLite, PostgreSQL, SQL Server, MongoDB, and CockroachDB.
From Prisma version 3.5.0 and above, indexes can be enabled through the extendedIndexes preview feature. But, from version 4.0.0 and above, Prisma allows the configuration of database indexes out of the box with some exceptions that we’ll see later.
Usually, we can configure our databases to use single- or double-column indexes, Prisma has support for both.
Indexes in Prisma can be configured using the @@index attribute. This attribute can be further configured with the following attribute arguments:
fields: the fields argument is the only required argument on this list that allows you to list the table columns that are being indexed inside our data modelsname: the name argument allows you to set a name for an index being definedmap: this argument allows you to define the naming convention of the index name if not provided explicitly using the name argument. Prisma defaults to this syntax: tablename.field1_field2_field3_uniquelength: this argument allows you to specify a maximum length for the subpart of the value to be indexed on String and Bytes types. It can be set on MySQL databases only. This argument is essential for these types, especially for cases where the full value would exceed MySQL’s limits for index sizessort: this argument allows you to specify the order that the entries of indexes are stored in the database. The supported options are Asc and Desctype: this is a PostgreSQL-only (only available in the PostgreSQL database) argument that allows you to support index access methods other than PostgreSQL’s default BTree access method. Other than BTree, it supports Hash, Gist, Gin, SpGist, and Brin access methodsclustered: this argument allows you to configure whether an index is clustered or non-clustered. It is supported on the SQL server database onlyops: this is another PostgreSQL-only supported argument that allows you to define the index operators for certain index typesGit, Node.js, and a JavaScript package manager of choice need to be installed before proceeding (Node.js usually comes with npm pre-installed).
To make our learning process intuitive, we are going to work on a project we will be configuring indexes onto.
To start off, run the following commands on your terminal to copy the base source code for the project we will be working on, then switch into its directory:
git clone [email protected]:xinnks/indexes-in-prisma.git

cd indexes-in-prisma
Our project is an Express.js server containing blog data that can be consumed by a typical frontend blog.
You can get the idea by observing the data models we are dealing with inside the ./prisma/schema.prisma file.
Going through our server’s endpoints in ./src/index.js, you’ll see that it provides requests to register, fetch user data, and run CRUD operations on user posts. We can see the fields such as the Post model’s title and content columns that are being queried upon to fetch the posts feed.
Other fields that we can observe to being queried frequently are the User and Post model IDs. We won’t be creating indexes for these fields, and we’ll learn the reason in the near future.
Let’s see how we can configure indexes for the title and content columns of the Post model.
Before proceeding, run npm install to install the project’s dependencies.
Next, rename the sample.env file at the root of this project to .env. Opening the resulting environmental variables file .env, the following should be the contents contained.
DATABASE_URL_SQLITE='file:./dev.db'
DATABASE_URL_MYSQL=
DATABASE_URL_MONGODB=
As we proceed with this example, we will be populating these environmental variables with different database URLs belonging to the databases that we’ll be configuring indexes for.
By now, we know that indexes can be added by using the @@index attribute in Prisma. But, since constraints and indexes are almost similar in SQL databases, when unique constraints are defined for a column, SQL databases create corresponding unique indexes.
This means that every @unique column gets an index assigned to it too. If we fancy it, we can use constraints to add indexes to SQL databases instead of using the @@index API.
Let’s demonstrate how to configure indexes inside a SQLite database with Prisma.
As you will notice, the base state of our app is SQLite ready. Thus, running the Prisma command below will create the database file ./prisma/dev.db, create a database migration, generate the Prisma client corresponding to the data models found in the ./prisma/schema.prisma file, and seed our database as per the instructions found in ./prisma/seed.js:
#npm
npx prisma migrate dev --name init

#pnpm
pnpm dlx prisma migrate dev --name init
The data is seeded automatically with the Prisma migration command since we have set the node prisma/seed.js command in the seed key of the prisma key within the package.json file.
By running the Prisma studio command npx prisma studio, we can preview our database and see the data that has been seeded into the User and Post models.


If you open the migrations file created after running the Prisma migrate command above, you will see that a unique index has been created for the User model email column:
-- CreateIndex
CREATE UNIQUE INDEX "User_email_key" ON "User"("email");
This is a result of what was iterated above: SQL databases create indexes for declared constraints.
Up to this point, you can locally deploy the REST API by running npm run dev and accessing the various endpoints available in this project, expecting to get the anticipated responses from them.
Try visiting the /feed endpoint after deploying the server.
N.B., SQLite does not support the ALTER TABLE statement together with the ADD CONSTRAINT operation. So, if you decide to use constraints to define indexes for your SQLite database, you can only do so initially with the CREATE TABLE operation.
Now, proceed with the configuration of a double column index for this SQLite database by adding the following attributes to the Post model found in the ./prisma/schema.prisma file:
model Post {
  id        Int      @id @default(autoincrement())
  createdAt DateTime @default(now())
  updatedAt DateTime @updatedAt
  title     String
  content   String?
  published Boolean  @default(false)
  viewCount Int      @default(0)
  author    User?    @relation(fields: [authorId], references: [id])
  authorId  Int?

  @@index([title, content])
}
The index has been added in the last line with the @@index([title, content]) attribute and its respective arguments, the title and content columns.
Again, run the Prisma migrate command afterward, assigning a worthy name to the --name flag:
#npm
npx prisma migrate dev --name add_some_indexes

#pnpm
pnpm dlx prisma migrate dev --name add_some_indexes
When we observe the newly created migration file under the prisma migrations directory, we’ll see the following index creation SQL script with the same arguments we defined on the @@index attribute:
-- CreateIndex
CREATE INDEX "Post_title_content_idx" ON "Post"("title", "content");
Create a new database on Planetscale or any other MySQL DBaaS service of choice that integrates with Prisma. If you used Planetscale, and are new to it, use this guide to learn how to create a smooth integration with Prisma.
Acquire the URL to your MySQL database, head over to the .env file on our project root, and assign it to the DATABASE_URL_MYSQL variable.
Update the generator and Post model inside the ./prisma/shema.prisma file with the following code:
generator client {
  provider = "prisma-client-js"
  previewFeatures = ["fullTextIndex", "referentialIntegrity"]
}

model Post {
  id        Int      @id @default(autoincrement())
  createdAt DateTime @default(now())
  updatedAt DateTime @updatedAt
  title     String   @db.VarChar(255)
  content   String?  @db.Text
  published Boolean  @default(false)
  viewCount Int      @default(0)
  author    User?    @relation(fields: [authorId], references: [id])
  authorId  Int?

  @@fulltext([content])
  @@index([title, authorId])
}
Observing the modified data model schema above, you can see that together with the regular index, we have added a new @@fulltext attribute, assigning it the content column name.
From version 3.0.6 onwards, Prisma introduced the support for migration and introspection of full text indexes in MySQL and MongoDB databases. This is made possible through the @@fulltext attribute made available through the fullTextIndex Preview feature. This explains the addition of fullTextIndex on the previewFeatures attribute of the generator.
Next, use the Prisma db push command to push the schema in ./prisma/schema.prisma, your online database.
The Prisma db push command on this example is based on a remote MySQL database hosted on Planetscale. Hence, the use of the Prima db push command. While using local MySQL setups, you can use the migrate commands like we had on the SQLite example:
# npm
npx prisma db push

# pnpm
pnpm dlx prisma db push
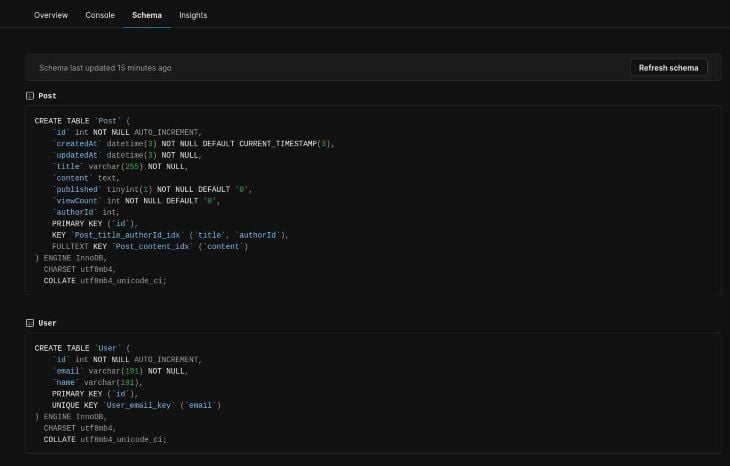
When you view your database schema, wherever it is hosted, you will see something like this.

As we discussed above, Prisma supports MongoDB, one of the most popular NoSQL databases. And, from version 3.12.0 onwards, Prisma has supported the definition of indexes on the composite type.
Composite types (embedded documents in MongoDB) provide support for documents embedded inside other records by allowing you to define new object types structured and typed in a similar way to Prisma models.
In addition to the index declaration API that we have already seen, @@index(column_name)), Prisma allows the use of embedded documents’ fields (composite types) as index field arguments.
Hence, when working with MongoDB, we can define a single column index as @@index([field_name]), @@index([compositeType.field]), and multiple column indexes with the mix of one or more model and composite type fields such as @@index([field_name, compositeType.field]), and @@index([compositeType.field_one, compositeType.field_two], …).
Let’s proceed to creating a multiple-column index in a MongoDB model utilizing composite fields of documents among the index field arguments.
First, update the DATABASE_URL_MONGODB environmental variable, assigning the URL of your MongoDB database to it.
Modify the ./prisma/schema.prisma file in our project with the following code:
generator client {
  provider = "prisma-client-js"
  previewFeatures = ["fullTextIndex"]
}
datasource db {
  provider = "mongodb"
  url      = env("DATABASE_URL_MONGODB")
}

model User {
  id    String  @id @default(auto()) @map("_id") @db.ObjectId
  email String  @unique
  name  String?
  posts Post[]
}

type Banner {
  height  Int?
  width   Int?
  url     String?
}

model Post {
  id        String  @id @default(auto()) @map("_id") @db.ObjectId
  createdAt DateTime @default(now())
  updatedAt DateTime @updatedAt
  title     String
  content   String?
  banner    Banner?
  published Boolean  @default(false)
  viewCount Int      @default(0)
  author    User?    @relation(fields: [authorId], references: [id])
  authorId  String?   @db.ObjectId

  @@fulltext([title(sort: "Asc"), content])
  @@index([title, banner.url], map: "title_banner_url_idx")
}
In the above Prisma schema, we have modified our datasource provider to “mongodb,” declared the composite type Banner, and added it as an embedded document inside the Post model.
We have also set up the proper model IDs corresponding with MongoDB.
We have defined two indexes for the Post model: one a multiple-column fulltext index made up with the title and content columns, with the title column sorted in ascending order. The second index is another multiple-column index made up with the title post model column and the url field of the Banner composite type.
Also, replace the code inside the ./prisma/seed.js file with the following:
const { PrismaClient } = require('@prisma/client')
const userData = require("./data.json")
const banners = require("./banners.json")

const prisma = new PrismaClient()

async function main() {
  console.log(`Start seeding ...`);
  await prisma.$connect();

  try {
    let index = 0
    for (const u of userData) {
      const uPosts = u.posts.map(x => {
        index++
        return Object.assign(x, {
          banner: banners[index]
        })
      })
      delete u.posts;
      const user = await prisma.user.create({
        data: u,
      })

      await prisma.post.createMany({
        data: uPosts.map(p => Object.assign(p, {
          authorId: user.id
        })),
      })
      console.log(`Created user with id: ${user.id}; added ${uPosts.length} posts`)
    }
    console.log(`Seeding finished.`)
  } catch(err) {
    console.log({err})
  }
}

main()
  .then(async () => {
    await prisma.$disconnect()
  })
  .catch(async (e) => {
    console.error(e)
    await prisma.$disconnect()
    process.exit(1)
  })
Afterwards, run Prisma’s generate and seed commands to recreate our Prisma client code and seed data into our MongoDB database:
npx prisma generate && npx prisma db seed
From here, you can proceed to making requests to our server with the expected advantages that come with using database indexes.
Note that, not much of a difference will be noticed while calling the requests within the project we worked on since it comprised of a very small data-set. The advantages of using indexes are evident while using large data sets.
Database indexes do come with overhead costs of extra writes and memory consumption when not managed carefully; not every queried column needs to be indexed. We risk detrimental effects to the storage and write operations of a database in doing so.
When used properly, indexes optimize access to frequently queried data and improve performance. Vice versa, when proper care is not taken with adding them, we risk negative impacts, including database size and write efficiency.
To summarize, we have covered the following in this article:
To learn more about Prisma and see its integration with various databases, you can visit Prisma’s official docs here.
Install LogRocket via npm or script tag. LogRocket.init() must be called client-side, not
server-side
$ npm i --save logrocket

// Code:

import LogRocket from 'logrocket';
LogRocket.init('app/id');
// Add to your HTML:

<script src="https://cdn.lr-ingest.com/LogRocket.min.js"></script>
<script>window.LogRocket && window.LogRocket.init('app/id');</script>
Would you be interested in joining LogRocket's developer community?
Join LogRocket’s Content Advisory Board. You’ll help inform the type of content we create and get access to exclusive meetups, social accreditation, and swag.
Sign up now
A breakdown of the wrapper and container CSS classes, how they’re used in real-world code, and when it makes sense to use one over the other.

This guide walks you through creating a web UI for an AI agent that browses, clicks, and extracts info from websites powered by Stagehand and Gemini.

This guide explores how to use Anthropic’s Claude 4 models, including Opus 4 and Sonnet 4, to build AI-powered applications.

Which AI frontend dev tool reigns supreme in July 2025? Check out our power rankings and use our interactive comparison tool to find out.