There are many things that make up a progressive web application, whether that be with a mobile-friendly user experience (UX), having a native desktop and mobile API integration, or just being able to use the application without an internet connection.

In this tutorial, we’re going to explore how to make web applications work offline through the use of service workers generated from Workbox, a tool designed to make caching significantly easier.
If you’ve never been exposed to a service worker before, it is a script that the browser runs in the background and can implement features that don’t need a web page or any user interaction for that matter. The problem is that service workers can be tricky to design, even if their APIs aren’t difficult to use. This is because you have to consider many scenarios such as cache expiration, updates, and more. This is why frameworks like Workbox have such a benefit on development.
If you’re a Hugo developer, like myself, you might remember that I wrote a tutorial that demonstrated how to make a static generated website PWA friendly. This is great, but this time we want to make the process a little more generic so it can be used outside of the Hugo scenario.
Getting started with progressive web applications through Workbox and service workers
Try LogRocket for free: https://logrocket.com/?yt4 In this tutorial, we’re going to explore how to make web applications work offline through the use of service workers generated from Workbox.
Let’s create a simple website and understand what is happening and why service workers help us, not just for reasons of being able to call our application a PWA.
Almost every website is going to have HTML, CSS, and JavaScript files, so let’s get a project started with just that. Somewhere on your computer, create a new folder with an index.html file, a styles.css file, and a scripts.js file.
Within the scripts.js file, add the following code:
console.log("HELLO WORLD!");
Definitely not the most complex script you’ve ever seen, but it will prove our point when the time comes. We just want to be able to say that we have JavaScript in a separate file within our application. Similarly, add the following to the project’s styles.css file:
body { margin: 0; }
h1 { margin: 0; }
Again, complexity is not the goal of this particular tutorial. The goal is to demonstrate how service workers add value to our project and how you should include them. Let’s finish this very basic project by creating an HTML file that includes the scripts and styles. Open the project’s index.html file and include the following:
<!DOCTYPE html>
<html>
    <head>
        <link rel="stylesheet" href="styles.css" />
    </head>
    <body>
        <div>
            <h1>Hello World!</h1>
        </div>
        <script src="scripts.js"></script>
    </body>
</html>
If we wanted to, we could open our HTML file and see a perfectly acceptable website. To set things right early on, we cannot just open our files from the filesystem to see things in action. We’re going to need to serve our project, either with a tool like Python or Caddy, or publish our application to a hosting provider.
If you’re using macOS or Linux, or have Python installed on your Windows computer, you can execute the following:
python -m SimpleHTTPServer
The above command will serve our application at http://localhost:8000/index.html which is perfect for this example.
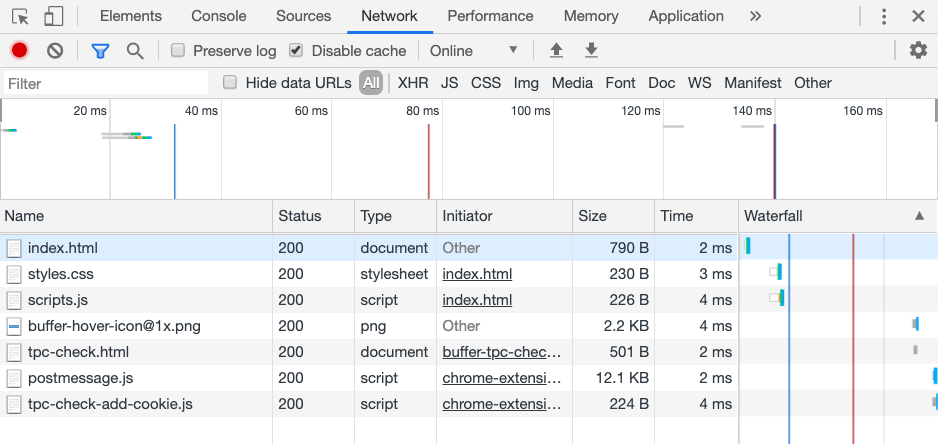
Now that we have a simple web application being served, let’s open our Chrome Inspector, assuming that you’re using Google Chrome. If you cruise over to the Network tab, you’ll see something like the image below:

While not particularly large, and not particularly slow, each of the HTML, CSS, and JavaScript resources had to be fetched. These resources will be fetched on every request made by every user. If you’re looking at a realistic production web application, this could add up to MB of download and seconds of time, which is no good in the web world, more so when done on mobile devices over a cellular signal.
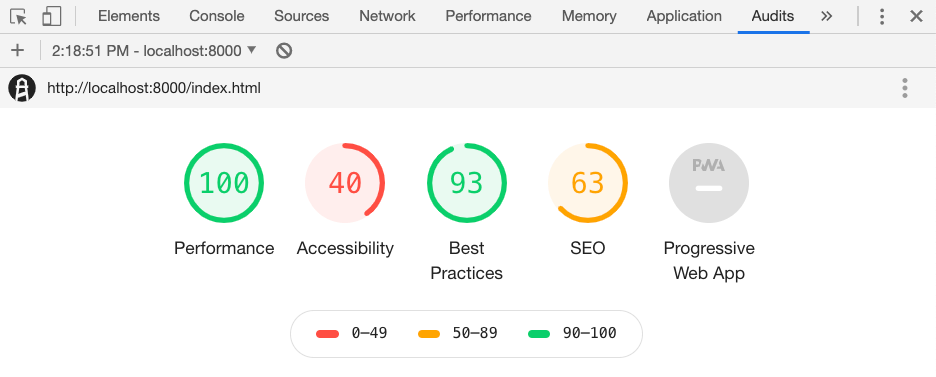
You can further evaluate things by going to the Audits tab of your Chrome Inspector.

You’ll find out that the application is not being rated as a progressive web application, and when you check why, it is missing things, offline functionality is one of them. While we aren’t too interested in building a 100% PWA rated application, we do care about the service worker and offline aspect. This helps beyond being able to tell people our site is a PWA.
So let’s start by adding a cache strategy with Workbox formatted service workers.
Workbox can be used in numerous ways, but first being a runtime replacement to service workers. To see how it works, let’s create a sw.js file to represent our service worker.
importScripts("https://storage.googleapis.com/workbox-cdn/releases/4.3.1/workbox-sw.js");

workbox.routing.registerRoute(
    /\.(?:css|js)$/,
    new workbox.strategies.StaleWhileRevalidate({
        "cacheName": "assets",
        plugins: [
            new workbox.expiration.Plugin({
                maxEntries: 1000,
                maxAgeSeconds: 31536000
            })
        ]
    })
);

workbox.routing.registerRoute(
    /\.(?:png|jpg|jpeg|gif|bmp|webp|svg|ico)$/,
    new workbox.strategies.CacheFirst({
        "cacheName": "images",
        plugins: [
            new workbox.expiration.Plugin({
                maxEntries: 1000,
                maxAgeSeconds: 31536000
            })
        ]
    })
);
The above JavaScript represents a service worker created with Workbox. There are two main things happening in the above code and it could change depending on your business requirements. The two things happening are two different caching strategies depending on the file.
For JavaScript and CSS files, the StaleWhileRevalidate strategy is used. This means the asset will always be obtained and then cached, unless the internet is not available, at which point use the cached version. For the CacheFirst strategy that the images are using, the cached version will always be used until that cached version expires or it is manually cleared from the cache.
Again, you’ll want to pick strategies for your business needs. More than the StaleWhileRevalidate and CacheFirst strategies exist.
To activate this service worker, we can edit our index.html file to look like the following:
<!DOCTYPE html>
<html>
    <head>
        <link rel="stylesheet" href="styles.css" />
    </head>
    <body>
        <div>
            <h1>Hello World!</h1>
        </div>
        <script src="scripts.js"></script>
        <script>
            if ("serviceWorker" in navigator) {
                window.addEventListener("load", () => {
                    navigator.serviceWorker.register("sw.js").then(swReg => { }).catch(err => {
                        console.error('Service Worker Error', err);
                    });
                });
            }
        </script>
    </body>
</html>
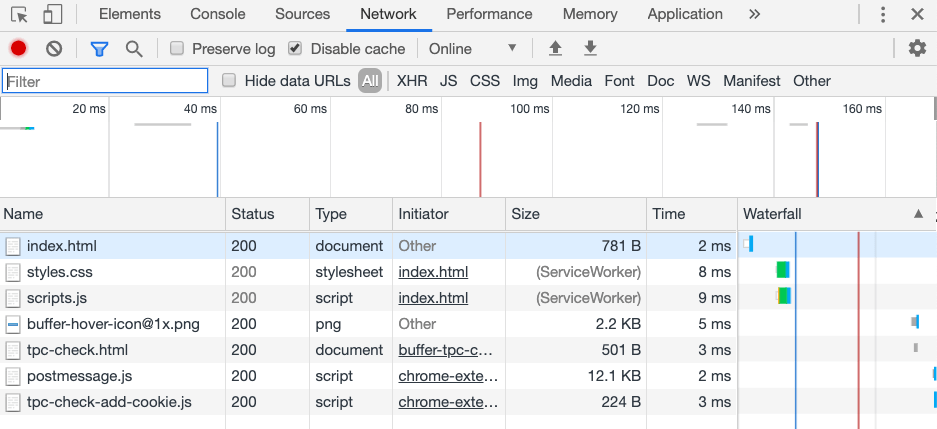
Notice that the sw.js file is now being registered by the web application. If we reloaded the browser and went to the Network tab of the Chrome Inspector, things should be slightly different.

This time, the JavaScript and CSS files are being loaded from the cache through the service worker. The savings on request time may not be obvious for this example, but when it comes to files that might be close to a MB in size, loading from the cache will significantly speed up your application in addition to making it offline compatible.
So how can we improve upon this process?
Using Workbox isn’t particularly difficult, but we can make some changes to not only improve the process but also improve the functionality.
Let’s say that we wanted to cache our resources when the website first loads, not on-demand. We would need to come up with a pre-caching strategy. The best way to do this is through a Workbox Build configuration which can be executed with Node.js, or in the example of Hugo, through Gulp.
Go ahead and create a new generator.js file within your project. Before we open it, we need to configure our project to use Node.js, which means get our dependencies. Assuming you have Node.js installed, execute the following:
npm init -y
npm install workbox-build --save-dev
To be clear, these are development dependencies. Your web application doesn’t need to use Node.js.
With the dependencies in place, open the project’s generator.js file and include the following:
const workbox = require("workbox-build");

workbox.generateSW({
    cacheId: "example",
    globDirectory: "./",
    globPatterns: [
        "**/*.{css,js}"
    ],
    globIgnores: [
        "node_modules/**/*",
        "**/gulpfile.js",
        "**/sw.js"
    ],
    swDest: "./sw.js",
    runtimeCaching: [
        {
            urlPattern: /\.(?:html|htm|xml)$/,
            handler: "staleWhileRevalidate",
            options: {
                cacheName: "markup",
                expiration: {
                    maxAgeSeconds: 60 * 60 * 24 * 7,
                },
            },
        }
    ],
});
So let’s figure out what’s happening in this generator script, starting with what should look the most familiar, the runtimeCaching part.
In the runtimeCaching we are defining strategies for any given file type. In this case, we are defining a strategy for our HTML or XML files, but we could easily include more. Rather than caching our assets such as JavaScript and CSS at runtime, we are opting to pre-cache these. To pre-cache a resource, it should be added to the globPatterns array. To eliminate the risk of caching our development dependencies, we can add resources to the globIgnores array.
Pre-caching should be used with caution because it happens as soon as the application loads. If you’re trying to pre-cache too much upfront or very large files, the user experience will be terrible. Instead, only pre-cache the resources that will give your users the best experience.
If you execute node generator.js it should add a sw.js file to your project. This file will look similar to the service worker that was created manually, except now it will have pre-caching defined.
We just looked at how to cache web application resources to not only improve the performance of your web application but also make it so that it can be used offline. Service workers are the first step towards developing a fully compliant progressive web application (PWA) and frameworks like Workbox make it very easy.
While we didn’t make a PWA in the sense that we were using native APIs like push notifications, we still did work towards building a PWA that browsers like Google Chrome will recognize.
Install LogRocket via npm or script tag. LogRocket.init() must be called client-side, not
server-side
$ npm i --save logrocket

// Code:

import LogRocket from 'logrocket';
LogRocket.init('app/id');
// Add to your HTML:

<script src="https://cdn.lr-ingest.com/LogRocket.min.js"></script>
<script>window.LogRocket && window.LogRocket.init('app/id');</script>
Would you be interested in joining LogRocket's developer community?
Join LogRocket’s Content Advisory Board. You’ll help inform the type of content we create and get access to exclusive meetups, social accreditation, and swag.
Sign up now
Discover how to use Gemini CLI, Google’s new open-source AI agent that brings Gemini directly to your terminal.

This article explores several proven patterns for writing safer, cleaner, and more readable code in React and TypeScript.

A breakdown of the wrapper and container CSS classes, how they’re used in real-world code, and when it makes sense to use one over the other.

This guide walks you through creating a web UI for an AI agent that browses, clicks, and extracts info from websites powered by Stagehand and Gemini.