WebRTC (web real-time communication) is an open-source project that enables web applications to capture and stream audio and video streams. The technology is available on all modern browsers and major native platforms. It is developed and maintained by companies like Google, Apple, Microsoft, etc.

At this point, WebRTC is a well-established technology and is the de facto way to build video conferencing applications.
The Replay is a weekly newsletter for dev and engineering leaders.
Delivered once a week, it's your curated guide to the most important conversations around frontend dev, emerging AI tools, and the state of modern software.
We will build a React Native application using the react-native-webrtc plugin. As we implement the app, we will learn the fundamentals of WebRTC.
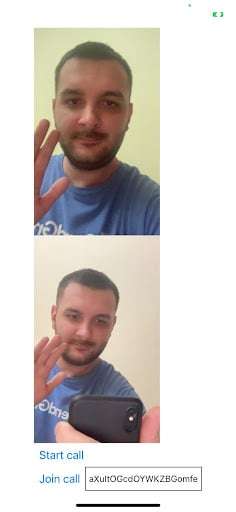
Here is the final version of the app. It’s actually a video call initiated on my phone and answered on my laptop. After starting the webcam, we can begin a new video call or join an existing one.
If we start the call, we get a unique ID. Someone else can join that call by typing this ID in the text box and pressing the Answer Call button. The code for this whole project is available here.
First, let’s create a blank React Native project:
npx react-native init ReactNativeWebRTCExample
Then, we need to install react-native-webrtc:
npm install react-native-webrtc
To finish the installation, we have a few extra steps depending on the platform.
Install CocoaPods:
npx pod-install
Update permissions in Info.plist file:
<key>NSCameraUsageDescription</key>
<string>Camera permission description</string>
<key>NSMicrophoneUsageDescription</key>
<string>Microphone permission description</string>
Similarly, on Android, we need to request these permissions in the AndroidManifest.xml file:
    <uses-permission android:name="android.permission.ACCESS_NETWORK_STATE" />
    <uses-permission android:name="android.permission.BLUETOOTH" />
    <uses-permission android:name="android.permission.CAMERA" />
    <uses-permission android:name="android.permission.INTERNET" />
    <uses-permission android:name="android.permission.MODIFY_AUDIO_SETTINGS" />
    <uses-permission android:name="android.permission.RECORD_AUDIO" />
    <uses-permission android:name="android.permission.SYSTEM_ALERT_WINDOW" />
    <uses-permission android:name="android.permission.WAKE_LOCK" />
We also need to enable Java 8 support by adding the following code to android/app/build.gradle, inside the Android section:
compileOptions {
        sourceCompatibility JavaVersion.VERSION_1_8
        targetCompatibility JavaVersion.VERSION_1_8
}
And we are done with the installation.
Next, we need to create an instance of RTCPeerConnection that will manage the connection between the local computer and a remote peer.
Although the data transmission is peer-to-peer, we do need some servers. One of them is the ICE (Interactive Connectivity Establishment) server. To establish a peer-to-peer connection, two clients need to find a way to discover each other. Because of NAT, this can be tricky, so the ICE server is responsible for doing all the work for us. Thankfully, Google provides ICE servers for free:
//App.js

  const [remoteStream, setRemoteStream] = useState(null);
  const [localStream, setLocalStream] = useState(null);
  const [webcamStarted, setWebcamStarted] = useState(false);
  const [channelId, setChannelId] = useState(null);
  const pc = useRef();
  const servers = {
    iceServers: [
      {
        urls: [
          'stun:stun1.l.google.com:19302',
          'stun:stun2.l.google.com:19302',
        ],
      },
    ],
    iceCandidatePoolSize: 10,
  };
Here we declare the configuration for the ICE server. We are also declaring some state variables that we will use soon.
In the next step, we will capture the local stream from the user’s camera and add it to the RTCPeerConnection. The MediaDevices interface provides access to connected media inputs like cameras and microphones. By calling the mediaDevices.getUserMedia() method, we ask the user to grant permission to access those media inputs. We are also updating the local and remote tracks (audio and video tracks):
const startWebcam = async () => {
    pc.current = new RTCPeerConnection(servers);
    const local = await mediaDevices.getUserMedia({
      video: true,
      audio: true,
    });
    pc.current.addStream(local);
    setLocalStream(local);

    const remote = new MediaStream();
    setRemoteStream(remote);

    // Push tracks from local stream to peer connection
    local.getTracks().forEach(track => {
      pc.current.getLocalStreams()[0].addTrack(track);
    });

    // Pull tracks from peer connection, add to remote video stream
    pc.current.ontrack = event => {
      event.streams[0].getTracks().forEach(track => {
        remote.addTrack(track);
      });
    };

    pc.current.onaddstream = event => {
      setRemoteStream(event.stream);
    };
  };
At this point, we created an RTCPeerConnection to manage our peer-to-peer connection. We captured the video and audio stream from the local peer and added that stream to the RTCPeerConnection.
We are now ready to connect to another peer. For this, we need a signaling server. Its job is to serve as an intermediary to let two peers establish a connection. As an initiator, you need to signal your offer of starting a call. Other peers will also have to signal that they want to connect to your specific video call.
WebRTC doesn’t have an opinion on how to do the signaling. We can do it via WebSockets, HTTP, or whatever we like. In this demo, we will use Firebase Firestore as a signaling server.
Connecting to Firebase and working with Firestore is not in the scope of this article, so I will let you create the Firebase applications and connect to them from React Native. I will use https://rnfirebase.io/ to interact with Firebase.
With all these in place, we can now create the function that will initiate a call:
   const startCall = async () => {
    const channelDoc = firestore().collection('channels').doc();
    const offerCandidates = channelDoc.collection('offerCandidates');
    const answerCandidates = channelDoc.collection('answerCandidates');

    setChannelId(channelDoc.id);

    pc.current.onicecandidate = async event => {
      if (event.candidate) {
        await offerCandidates.add(event.candidate.toJSON());
      }
    };

    //create offer
    const offerDescription = await pc.current.createOffer();
    await pc.current.setLocalDescription(offerDescription);

    const offer = {
      sdp: offerDescription.sdp,
      type: offerDescription.type,
    };

    await channelDoc.set({offer});

    // Listen for remote answer
    channelDoc.onSnapshot(snapshot => {
      const data = snapshot.data();
      if (!pc.current.currentRemoteDescription && data?.answer) {
        const answerDescription = new RTCSessionDescription(data.answer);
        pc.current.setRemoteDescription(answerDescription);
      }
    });

    // When answered, add candidate to peer connection
    answerCandidates.onSnapshot(snapshot => {
      snapshot.docChanges().forEach(change => {
        if (change.type === 'added') {
          const data = change.doc.data();
          pc.current.addIceCandidate(new RTCIceCandidate(data));
        }
      });
    });
  };
I know this is a lot, but let’s try to break it down.
In Firestore, we keep a document, channels, with all the communication channels. Each channel ID represents a unique call ID. As part of the signaling mechanism, we create two sub-collections: offerCandidates and answerCandidates.
The createOffer() method initiates the creation of an SDP offer for the purpose of starting a new WebRTC connection to a remote peer. We write this offer to the channel’s document on Firestore. We then listen for channelDoc updates. After receiving an answer offer, we create an RTCSessionDescription object. Negotiating a connection between two peers involves exchanging RTCSessionDescription objects back and forth.
If a new document gets added to the answerCandidates sub-collection, it means that someone has answered, so we add that new candidate to the RTCPeerConnection.
Similarly, let’s implement the function used to answer a call:
const joinCall = async () => {
    const channelDoc = firestore().collection('channels').doc(channelId);
    const offerCandidates = channelDoc.collection('offerCandidates');
    const answerCandidates = channelDoc.collection('answerCandidates');

    pc.current.onicecandidate = async event => {
      if (event.candidate) {
        await answerCandidates.add(event.candidate.toJSON());
      }
    };

    const channelDocument = await channelDoc.get();
    const channelData = channelDocument.data();

    const offerDescription = channelData.offer;

    await pc.current.setRemoteDescription(
      new RTCSessionDescription(offerDescription),
    );

    const answerDescription = await pc.current.createAnswer();
    await pc.current.setLocalDescription(answerDescription);

    const answer = {
      type: answerDescription.type,
      sdp: answerDescription.sdp,
    };

    await channelDoc.update({answer});

    offerCandidates.onSnapshot(snapshot => {
      snapshot.docChanges().forEach(change => {
        if (change.type === 'added') {
          const data = change.doc.data();
          pc.current.addIceCandidate(new RTCIceCandidate(data));
        }
      });
    });
  };
In this case, we create an answerOffer and update the channelDoc in Firestore. We also listen for any changes in the offerCandidates sub-collection. More or less, we are mirroring the start call behavior.
In the end, we need to call these functions when we want to start or join a call:
<KeyboardAvoidingView style={styles.body} behavior="position">
      <SafeAreaView>
        {localStream && (
          <RTCView
            streamURL={localStream?.toURL()}
            style={styles.stream}
            objectFit="cover"
            mirror
          />
        )}

        {remoteStream && (
          <RTCView
            streamURL={remoteStream?.toURL()}
            style={styles.stream}
            objectFit="cover"
            mirror
          />
        )}
        <View style={styles.buttons}>
          {!webcamStarted && (
            <Button title="Start webcam" onPress={startWebcam} />
          )}
          {webcamStarted && <Button title="Start call" onPress={startCall} />}
          {webcamStarted && (
            <View style={{flexDirection: 'row'}}>
              <Button title="Join call" onPress={joinCall} />
              <TextInput
                value={channelId}
                placeholder="callId"
                minLength={45}
                style={{borderWidth: 1, padding: 5}}
                onChangeText={newText => setChannelId(newText)}
              />
            </View>
          )}
        </View>
      </SafeAreaView>
WebRTC is a powerful technology, and using react-native-webrtc we can build React Native applications with the same APIs available on browsers.
You can try it out yourself with the code for this project.

LogRocket's Galileo AI watches sessions for you and and surfaces the technical and usability issues holding back your React Native apps.
LogRocket also helps you increase conversion rates and product usage by showing you exactly how users are interacting with your app. LogRocket's product analytics features surface the reasons why users don't complete a particular flow or don't adopt a new feature.
Start proactively monitoring your React Native apps — try LogRocket for free.

Learn about TypeScript v6’s breaking changes, new ES2025 features, and deprecated options. A complete migration guide from v5 to prepare for v7.

Learn how Vite+ unifies Vite, Vitest, Oxlint, Oxfmt, Rolldown, and Node.js management in one CLI.

AI companies are buying developer tools as coding agents turn runtimes, package managers, and linters into strategic infrastructure.

Learn how AI-assisted development governance uses rules, agents, hooks, and protocols to help AI coding tools produce safer, more consistent code.
Hey there, want to help make our blog better?
Join LogRocket’s Content Advisory Board. You’ll help inform the type of content we create and get access to exclusive meetups, social accreditation, and swag.
Sign up now

