One of the most basic requirements of good application monitoring is to have robust logging to keep track of everything that’s going on. By themselves, however, the log messages can only tell us so much. Seeing a log message indicating that a video has been uploaded is informative, but usually we would also like to have some context for this “event.”

The bare minimum contextual information that should be included in each log message is a request identifier. Being able to group together all logs produced by a single request allows us to easily track its lifecycle and monitor its behavior at various stages. A context could also include the currently authenticated user’s ID and the place from which the log was sent, like UserService, among other things.
The Replay is a weekly newsletter for dev and engineering leaders.
Delivered once a week, it's your curated guide to the most important conversations around frontend dev, emerging AI tools, and the state of modern software.
Let’s take a look at how we would go about attaching a request identifier to each log created by an Express.js application. If you want to go straight to the code, you can find the repo here.
The most straightforward approach would be to attach an ID to a request and use it everywhere, like so:
req.id = uuid.v4();
And then manually attach it to the log in a handler:
// handler
logger.log('This is a log from the handler for the request with id:', req.id)
At first it may seem a good solution, albeit a little bit tedious and repetetive.
Manually attaching req.id to each log would be repetitive, yes, but one could argue that it would be eventually replaced by an object that could then be easily formatted by the log method:
logger.log('This is a log from the handler for the request', { requestId: req.id })
By passing this “context” object as a second argument, we could then attach it to the log message automatically. However, the problem is more apparent when we try to log a message from a function that doesn’t have access to the request object:
app.use((req) => createUser())

function createUser() { logger.log('User created!', {}) }
The createUser function has no clue which request caused its execution.
The issue could be fixed by passing the “context” argument to the createUser function, but that wouldn’t solve anything. What if there was another function that was called by createUser? All the functions that had to log something would have to accept this “context” parameter, making the code a mess as a result.
Instead, a better solution would be for the logger to somehow know that this incoming log message was called by a handler dealing with a request with a given ID. By having this “context-aware” logger, we wouldn’t have to worry about passing this context object around and get all the necessary information directly in the logger.log method. The information could then be attached to each outgoing log message automatically.
Although many developers may not be familiar with this feature, Node allows us to track a “chain” of function calls, both synchronous and asynchronous, with the use of a feature called async hooks introduced back in Node 8.
Although you might assume the feature is mature since it’s been around for quite a while, it’s actually still considered experimental as of Node 15. There’s no need to worry, though — a library called cls-hooked has been around even longer than async hooks and has provided a consistent and stable API for creating and keeping track of asynchronous context that is propagated through a chain of function calls.
A chain of function calls is a fancy way of saying that there’s a function one(), which calls function two(), which then goes and calls a bunch of other functions. So it’s like a function call stack for both synchronous and asynchronous functions.
Let’s take a look at how to create and manage an asynchronous context with cls-hooked.
In order to install the library, run:
npm install --save cls-hooked
A namespace is an object that provides an API for getting and setting values in the asynchronous context available in the current function chain.
Creating a namespace is as simple as writing:
const applicationNamespace = createNamespace('APP_NAMESPACE');
In order to make use of the asynchronous context in a chain of function calls, we have to explicitly run the “top” function in a context-aware callback, like so:
applicationNamespace.run(contextAwareFunction);
By using the .run() method we are saying that the namespace should create an empty context and supply it to the contextAwareFunction and all the function calls originating therefrom.
The usage of the get and set methods of the namespace is very intuitive, as you can see in the following example:
import { createNamespace } from 'cls-hooked';

const applicationNamespace = createNamespace('APP_NAMESPACE');

function deepContextAwareFunction() {
  console.log(applicationNamespace.get('TEST'));
}

function contextAwareFunction() {
  applicationNamespace.set('TEST', 150);

  deepContextAwareFunction();
}

applicationNamespace.run(() => contextAwareFunction());
The console.log method will yield 150, as expected.
Now that we know the library’s API, let’s try to integrate it into a real-world example with an Express application.
The cls-hooked library can be easily plugged into the Express ecosystem. This is due to the fact that Express’ most powerful feature — middleware — is based on the same concept as the asynchronous context — the chain of function calls.
Here’s the boilerplate Express application used in this example:
const log = (message: string) => {
  console.log(message);
}

const nestedHandler = () => {
  log('This is a nested handler.');
};

const helloWorldHandler: RequestHandler = (req, res) => {
  log('This is a hello world log message.');

  nestedHandler();

  res.send('Hello world');
};

async function bootstrap() {
  const app = express();
  const port = 3000;

  // routes
  app.get('/', helloWorldHandler);

  app.listen(port, () => {
    console.log(`Listening on port: ${port}.`);
  });
}

bootstrap();
It is a very straightforward setup. It creates a server that listens on port 3000 and has only one route, /, that responds with a "hello world" message.
Aside from the / route handler called helloWorldHandler, there is also a function called nestedHandler that is executed by the route handler. Both functions log a message to the console using the log function. Our goal here is to get both log messages to have the context information attached to them.
Each middleware has the responsibility of calling the next() function in order to allow Express to continue with the handling of the request. By wrapping the next() function in the .run() method, we can make all the middleware — and, as a result, route handlers — context-aware. So let’s do just that:
const attachContext: RequestHandler = (req, res, next) => {
  applicationNamespace.run(() => next());
}
By calling the next function inside the callback provided to the run method, we can be sure that all of the following middleware will make use of the same asynchronous context. It has to be placed before any functions that make use of the context; usually, it would be a good idea to just place it as the first middleware.
Now that we know our middleware can use the namespace to get and set values, let’s create a middleware function that sets the request’s ID in the context.
const setRequestId: RequestHandler = (req, res, next) => {
  applicationNamespace.set('REQUEST_ID', v4());

  next();
}
Here we make use of the uuid library to generate a random UUID v4 ID for the request. The ID is saved under the REQUEST_ID key.
With both middleware created, let’s attach them to the application:
async function bootstrap() {
  const app = express();
  const port = 3000;

  // context middleware
  app.use(attachContext, setRequestId);

  // routes
  app.get('/', helloWorldHandler);

  app.listen(port, () => {
    console.log(`Listening on port: ${port}.`);
  });
}
The attachContext middleware has to be first since setRequestId makes use of the namespace.
The last thing to do is to rewrite the log function to make use of the context values and attach them to each logged message:
export const log  = (message: string) => {
  const requestId = applicationNamespace.get('REQUEST_ID');

  console.log({
    message,
    requestId,
  });
};
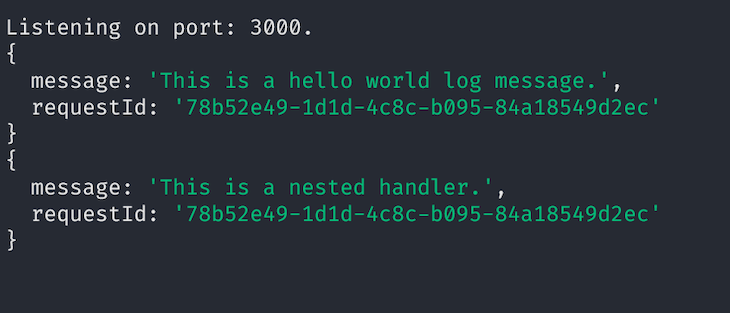
Now each time there’s a request to our server at localhost:3000/, we will see the following in the console:

As expected, the ID of the request is correctly set in the context and then retrieved by the log function.
Asynchronous context doesn’t have to be limited to logging only. One of the most exciting examples of how asynchronous hooks can help us to simplify our code is a package called typeorm-transactional-cls-hooked, which allows developers to take care of database transaction management by using a simple @Transactional() decorator. I encourage you to take a look at its codebase and how it uses cls-hooked under the hood.
Each log created by an application should have contextual information attached to it to help developers during monitoring and debugging. By using asynchronous context, we can significantly simplify our codebase by not having to pass this contextual information to each function that logs something and instead keep it in the context.
Although async hooks are yet to be pronounced stable as of Node 15, thanks to libraries like cls-hooked, we don’t have to worry about the underlying API.
One thing to remember is that asynchronous hooks may come with a performance hit since Node has to keep track of all the functions and various stages of their lifecycles. However, the performance impact will be less noticeable once the feature becomes stable.
 Monitor failed and slow network requests in production
Deploying a Node-based web app or website is the easy part. Making sure your Node instance continues to serve resources to your app is where things get tougher. If you’re interested in ensuring requests to the backend or third-party services are successful, try LogRocket.

LogRocket lets you replay user sessions, eliminating guesswork around why bugs happen by showing exactly what users experienced. It captures console logs, errors, network requests, and pixel-perfect DOM recordings — compatible with all frameworks.
LogRocket's Galileo AI watches sessions for you, instantly identifying and explaining user struggles with automated monitoring of your entire product experience.
LogRocket instruments your app to record baseline performance timings such as page load time, time to first byte, slow network requests, and also logs Redux, NgRx, and Vuex actions/state. Start monitoring for free.

Compare the top AI development tools and models of February 2026. View updated rankings, feature breakdowns, and find the best fit for you.

Broken npm packages often fail due to small packaging mistakes. This guide shows how to use Publint to validate exports, entry points, and module formats before publishing.

Discover what’s new in The Replay, LogRocket’s newsletter for dev and engineering leaders, in the February 11th issue.

Cut React LCP from 28s to ~1s with a four-phase framework covering bundle analysis, React optimizations, SSR, and asset/image tuning.
Hey there, want to help make our blog better?
Join LogRocket’s Content Advisory Board. You’ll help inform the type of content we create and get access to exclusive meetups, social accreditation, and swag.
Sign up now