Developers once built cloud-based applications using a monolithic architecture, where they typically embedded the entire application logic into one process and ran it inside a single server computer. But the monolithic architecture pattern creates scaling challenges and maintainability problems for modern web application backends.

Nowadays, almost all developers use microservices architecture to avoid those problems. One way we can do this in using Go, a fast, simple, general-purpose, and developer-friendly programming language.
We can also use the Gin framework, which offers you every feature you need for building RESTful modern microservices. In this tutorial, I will explain how to build microservices in Go with Gin.
The Replay is a weekly newsletter for dev and engineering leaders.
Delivered once a week, it's your curated guide to the most important conversations around frontend dev, emerging AI tools, and the state of modern software.
Gin is a fully-featured, high-performance HTTP web framework for the Go ecosystem. It’s becoming more popular every day among Gophers (Go developers) due to the following features.
Gin comes with a very fast and lightweight Go HTTP routing library (see the detailed benchmark). It uses a custom version of the lightweight HttpRouter routing library, which uses a fast, Radix tree-based routing algorithm.
Gin’s middleware system lets you extend the framework as you wish. It also allows you to customize the HTTP server instance for your needs. Gin comes with a productive API for developers with features like route grouping, struct binding, inbuilt validators, etc.
Gin offers a competitively fast HTTP routing implementation. Gin is faster than other popular routing libraries and web frameworks. It’s actively maintained by many open-source contributors, is well-tested, and the API is locked down. Therefore, future Gin releases won’t break your existing microservices.
We could also use the inbuilt Go net/http package for building microservices, but it doesn’t offer parameterized routing. You could use Gorilla mux as your routing library, but Gorilla mux is not as fully-featured a web framework as compared to Gin — it’s just an HTTP request multiplexer. Gorilla mux doesn’t offer inbuilt data rendering, JSON binding or validation, or pre-built middleware like Gin.
Gin offers you pre-built middlewares for CORS, timeout, caching, authentication, and session management.
Let’s create a simple microservice to get started with the framework. First, we need to set up our development environment.
Make sure that your computer already has Go ≥ v1.13. You can install the latest stable version any time from the official Go binary releases.
Now, we need to initialize a new Go project to use remote dependencies and download the Gin framework package. Enter the following commands to initialize a new project.
mkdir simpleservice
cd simpleservice
go mod init simpleservice
Now, download and make reference to the Gin framework.
go get -u github.com/gin-gonic/gin
Add the following code to the main.go source file to get started.
package main
import (
    "runtime"
    "github.com/gin-gonic/gin"
)
func main() {
    router := gin.Default()
    router.GET("/hello", func(c *gin.Context) {
        c.JSON(200, gin.H{
            "message": "Hello World!",
        })
    })

    router.GET("/os", func(c *gin.Context) {
        c.String(200, runtime.GOOS)
    })
    router.Run(":5000")
}
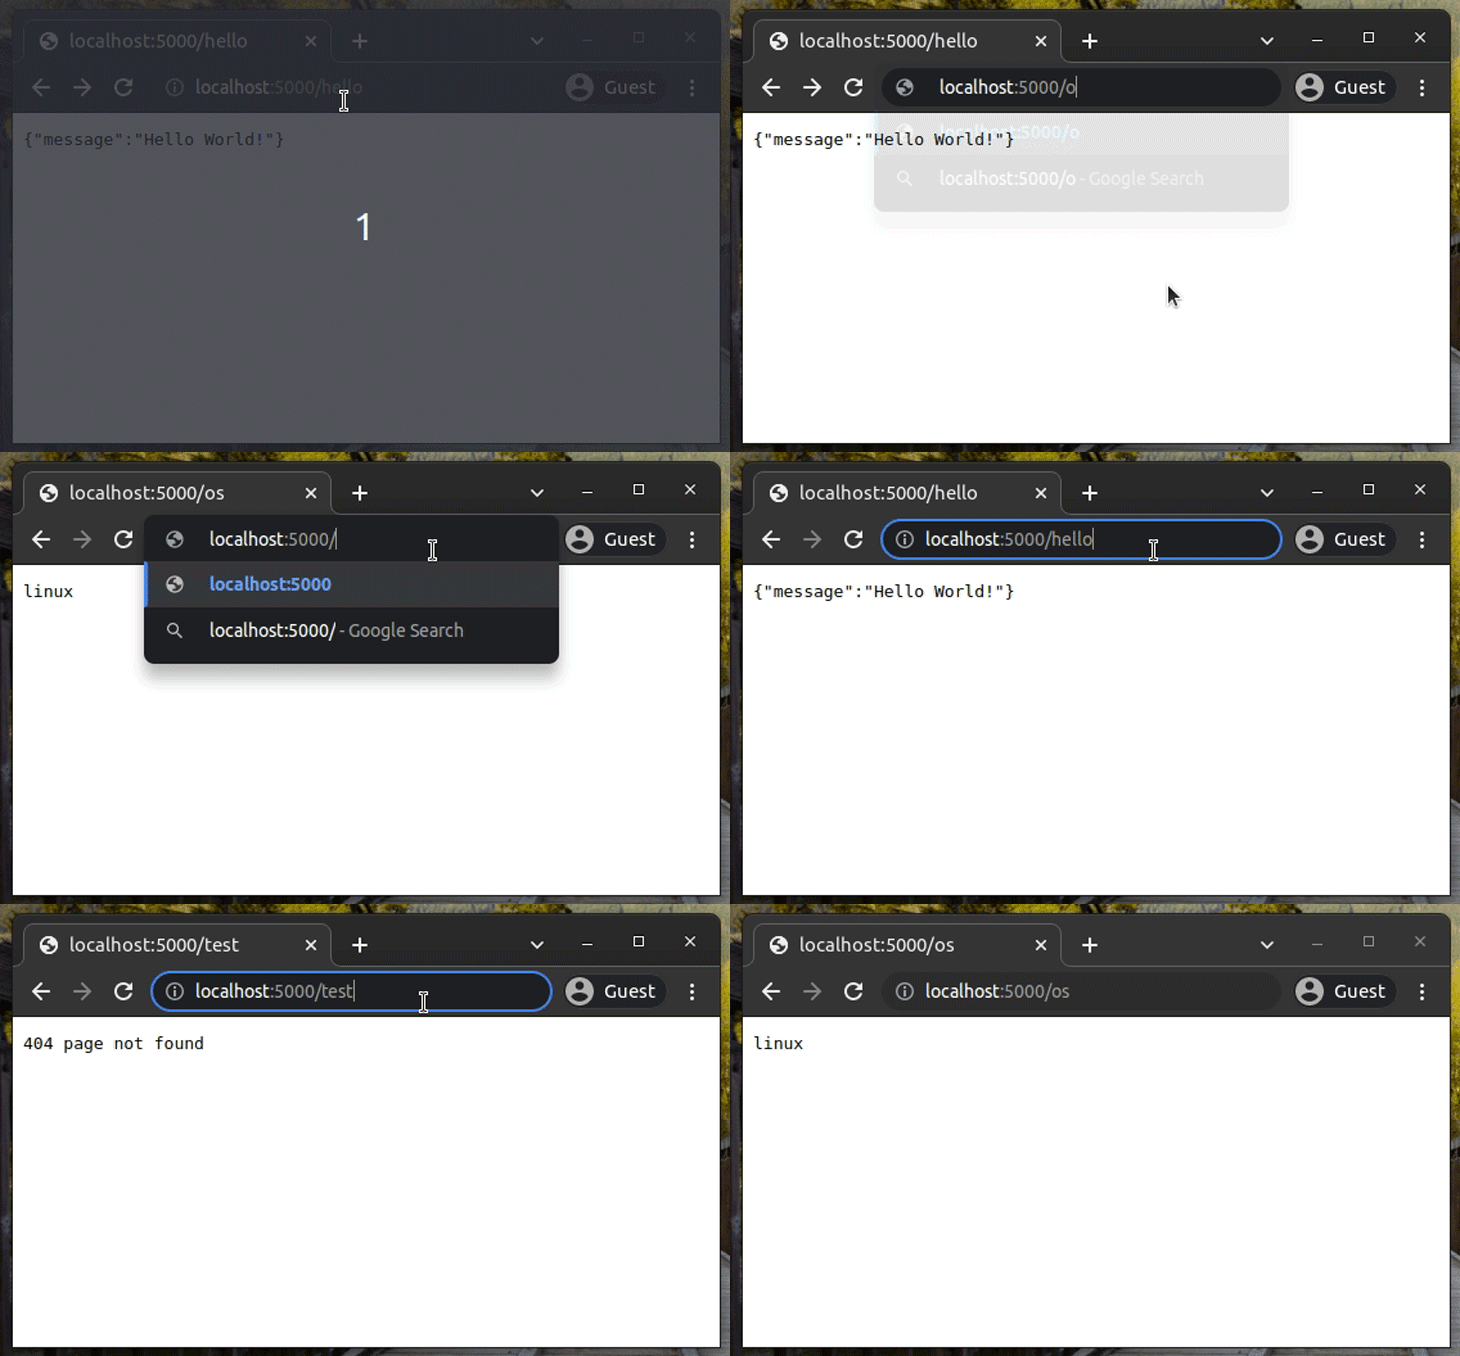
The above code defines two HTTP GET endpoints: /hello and /os. The /hello endpoint returns a JSON formatted message. The /os endpoint returns the current operating system name in plain text format.
After defining the endpoints and handlers, we need to start the HTTP server instance via the Run() function call.
Run this sample microservice with the following command.
go run main.go
Test it by navigating to the following URLs from your web browser.
http://localhost:5000/hello
http://localhost:5000/os

Just now, we sent an HTTP GET request with the web browser. We can also use the cURL command-line tool to test HTTP-based microservices.
API testing applications like Postman offers all the features you need to test microservices. I will use the Postman tool for the upcoming demonstrations. If you are new to Postman, test the example microservice to get started.

We can create a microservice with just one endpoint to execute a single action, like the well-known serverless concept. But we often let microservices perform multiple actions. For example, you may build a microservice to get product details, add new products, and remove existing products. This approach is known as the RESTful pattern.
Take a look at the following RESTful routes.
/products/products/:productId/reviewsDevelopers usually create multiple endpoints for each route. For example, it’s possible to use the following endpoints under the /products route.
GET /products – to list several productsGET /products/:productId – to get details of one productPOST /products – to add a new productPUT /products/:productId – to update a productDELETE /products/:productId – to delete a productGin offers us API functions to structure our microservices by creating multiple endpoints. Also, we can group routes for better maintainability.
Look at the following example code.
package main
import (
    "github.com/gin-gonic/gin"
)
func endpointHandler(c *gin.Context) {
    c.String(200, "%s %s", c.Request.Method, c.Request.URL.Path)
}

func main() {
    router := gin.Default()
    router.GET("/products", endpointHandler)
    router.GET("/products/:productId", endpointHandler)
    // Eg: /products/1052
    router.POST("/products", endpointHandler)
    router.PUT("/products/:productId", endpointHandler)
    router.DELETE("/products/:productId", endpointHandler)
    router.Run(":5000")
}
The above code defines five endpoints to perform CRUD operations on products. Here, the code uses a generic endpoint handler called endpointHandler, but you can create different handlers to perform different actions using the Gin context reference.
If your RESTful API has multiple versions, you can use Gin’s route grouping feature to write clean API code. Look at the following example.
package main
import (
    "github.com/gin-gonic/gin"
)
func v1EndpointHandler(c *gin.Context) {
    c.String(200, "v1: %s %s", c.Request.Method, c.Request.URL.Path)
}
func v2EndpointHandler(c *gin.Context) {
    c.String(200, "v2: %s %s", c.Request.Method, c.Request.URL.Path)
}

func main() {
    router := gin.Default()

    v1 := router.Group("/v1")

    v1.GET("/products", v1EndpointHandler)
    // Eg: /v1/products
    v1.GET("/products/:productId", v1EndpointHandler)
    v1.POST("/products", v1EndpointHandler)
    v1.PUT("/products/:productId", v1EndpointHandler)
    v1.DELETE("/products/:productId", v1EndpointHandler)

    v2 := router.Group("/v2")

    v2.GET("/products", v2EndpointHandler)
    v2.GET("/products/:productId", v2EndpointHandler)
    v2.POST("/products", v2EndpointHandler)
    v2.PUT("/products/:productId", v2EndpointHandler)
    v2.DELETE("/products/:productId", v2EndpointHandler)

    router.Run(":5000")
}
Every RESTful microservice performs three key actions:
Microservices typically send responses to external environments, such as web or mobile apps, but they can communicate with each other, too. Developers use different data formats for microservice communication such as JSON, XML, or YAML.
We used :productId in previous endpoint, but we can also provide values other than :productId in the URL. URL params are a good choice to accept short inputs to the microservice.
Let’s write a simple calculator with two URL params. Add the following code to the main.go file and start the server.
package main
import (
    "fmt"
    "strconv"
    "github.com/gin-gonic/gin"
)
func add(c *gin.Context) {
    x, _ := strconv.ParseFloat(c.Param("x"), 64)
    y, _ := strconv.ParseFloat(c.Param("y"), 64)
    c.String(200,  fmt.Sprintf("%f", x + y))
}

func main() {
    router := gin.Default()
    router.GET("/add/:x/:y", add)
    router.Run(":5000")
}
The above code implements a GET resource that lets us send two numbers via URL params. When it receives two numbers, it responds with the sum of those numbers. For example, GET /add/10/5 will return 15, as shown below.

We don’t typically send a lot of data with URL params for various reasons — URLs can get lengthy, we can run into generic RESTful pattern violations, etc. An HTTP message body is the best place to send any large input.
But URL params remain the best way to send filters and model identifiers, like short data such as customerId, productId, etc.
Let’s refactor the previous calculator endpoint by using the HTTP message body to accept data.
package main
import (
    "github.com/gin-gonic/gin"
)
type AddParams struct {
    X float64 `json:"x"`
    Y float64 `json:"y"`
}
func add(c *gin.Context) {
    var ap AddParams
    if err := c.ShouldBindJSON(&ap); err != nil {
        c.JSON(400, gin.H{"error": "Calculator error"})
        return
    }

    c.JSON(200,  gin.H{"answer": ap.X + ap.Y})
}

func main() {
    router := gin.Default()
    router.POST("/add", add)
    router.Run(":5000")
}
Our new calculator implementation has a POST endpoint and accepts data in JSON format. We don’t need to unmarshal JSON payloads manually within Gin handlers — instead, the Gin framework offers inbuilt functions to bind JSON structures to internal Go structs. The above code binds the incoming JSON payload to the AddParams struct.
Test the above example code with Postman by sending the following JSON payload to POST /add
{
    "x": 10,
    "y": 5
}

As we discussed before, microservices use various data formats for communication purposes. Almost all modern microservices use JSON for data exchanges, but you can use YAML and XML data exchange formats according to your needs. You can serialize various data formats from the Gin router as follows.
package main
import (
    "github.com/gin-gonic/gin"
)
type Product struct {
    Id int `json:"id" xml:"Id" yaml:"id"`
    Name string `json:"name" xml:"Name" yaml:"name"`
}

func main() {
    router := gin.Default()
    router.GET("/productJSON", func(c *gin.Context) {
        product := Product{1, "Apple"}
        c.JSON(200, product)
    })

    router.GET("/productXML", func(c *gin.Context) {
        product := Product{2, "Banana"}
        c.XML(200, product)
    })
    router.GET("/productYAML", func(c *gin.Context) {
        product := Product{3, "Mango"}
        c.YAML(200, product)
    })
    router.Run(":5000")
}
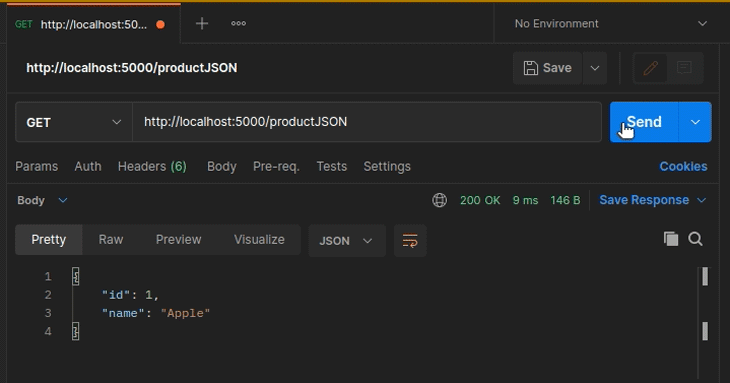
The above code has three endpoints that return data in three different data formats: JSON, XML, and YAML. You can pass a Go struct instance and let Gin serialize data automatically based on struct tags. Run the above code snippet and test it with Postman, as shown below.

Microservices can handle various incoming requests. Assume that you are implementing a microservice to physically print digital documents on paper by communicating with a printing device. What if you need to limit the number of pages in one print job? What if the request doesn’t contain the required inputs to initiate a new print job? Then you have to validate requests and respond with each error message accordingly.
Gin offers a struct-tag-based validation feature to implement validation with less code. Look at the following source code.
package main
import (
    "fmt"
    "github.com/gin-gonic/gin"
)
type PrintJob struct {
    JobId int `json:"jobId" binding:"required,gte=10000"`
    Pages int `json:"pages" binding:"required,gte=1,lte=100"`
}

func main() {
    router := gin.Default()
    router.POST("/print", func(c *gin.Context) {
        var p PrintJob
        if err := c.ShouldBindJSON(&p); err != nil {
            c.JSON(400, gin.H{"error": "Invalid input!"})
            return
        }
        c.JSON(200, gin.H{"message":
            fmt.Sprintf("PrintJob #%v started!", p.JobId)})
    })
    router.Run(":5000")
}
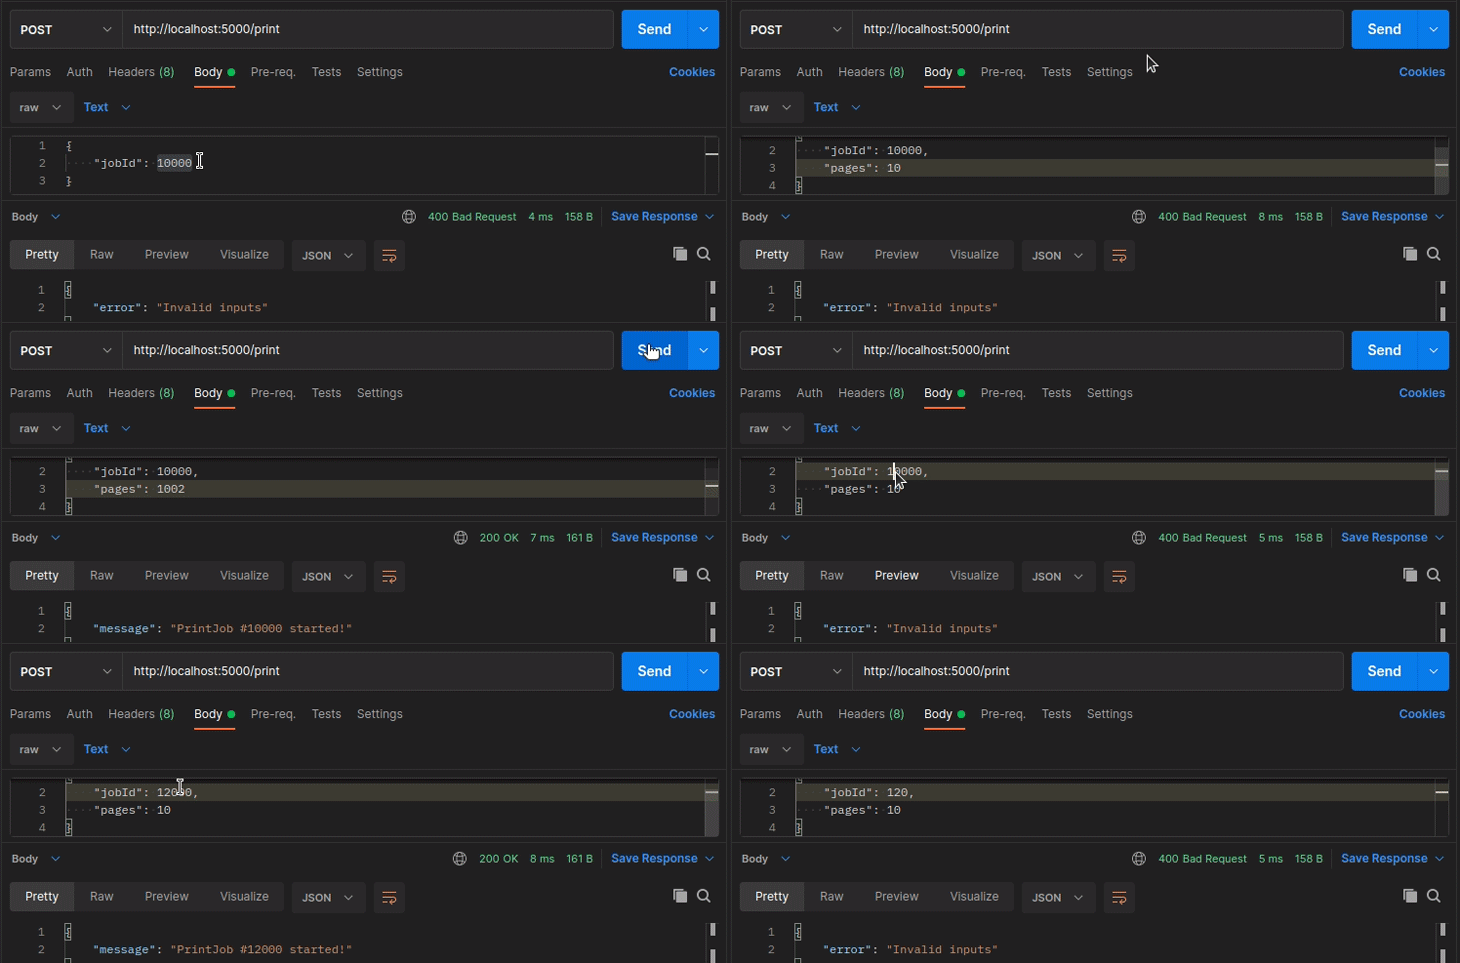
We need to use the binding struct tag to define our validation rules inside the PrintJob struct. Gin uses go-playground/validator for the internal binding validator implementation. The above validation definition accepts inputs based on the following rules:
JobId: Required, x ≥ 10000The above microservice will accept inputs based on validation definitions, as shown below.

Middleware refers to components that act between two connected software components. The Gin community maintains several general-purpose middleware in this GitHub repository.
Gin’s middleware system lets developers modify HTTP messages and perform common actions without writing repetitive code inside endpoint handlers. When you create a new Gin router instance with the gin.Default() function, it attaches logging and recovery middleware automatically.
For example, you can enable CORS in microservices with the following code snippet:
package main
import (
    "github.com/gin-gonic/gin"
    "github.com/gin-contrib/cors"
)

func main() {
    router := gin.Default()
    router.Use(cors.Default())
    router.GET("/", func(c *gin.Context) {
        c.JSON(200, gin.H{"message": "CORS works!"})
    })
    router.Run(":5000")
}
It’s possible to build your own middleware with Gin’s middleware API, too. For example, the following custom middleware intercepts and prints (logs to the console) the User-Agent header’s value for each HTTP request.
package main
import (
    "log"
    "github.com/gin-gonic/gin"
)

func FindUserAgent() gin.HandlerFunc {
    return func(c *gin.Context) {
        log.Println(c.GetHeader("User-Agent"))
        // Before calling handler
        c.Next()
        // After calling handler
    }
}
func main() {
    router := gin.Default()
    router.Use(FindUserAgent())
    router.GET("/", func(c *gin.Context) {
        c.JSON(200, gin.H{"message": "Middleware works!"})
    })
    router.Run(":5000")
}
External application clients usually connect and communicate with microservices directly or via API gateway-like services. Software architects use various inter-service messaging protocols according to their architectural requirements — some software development teams implement RESTful inter-service communications, while other teams implement asynchronous, messaging-based inter-service communications using message brokers like RabbitMQ.
The Gin framework was built specifically to build microservices with the RESTful pattern. Therefore, we can quickly build synchronous, HTTP-based inter-service communication with Gin.
Let’s build two microservices: InvoiceGenerator and PrinterService. The InvoiceGenerator microservice will be responsible for generating invoices. Once it generates a new invoice, it asks PrinterService to start a new print job via inter-service communication.
Note that these microservices simulate invoice generation and printing documents with console messages. In other words, these microservices demonstrate only synchronous inter-service communication, not actual invoice generation and printing.
First, add the following code to printer_service.go
package main
import (
    "math/rand"
    "time"
    "log"
    "github.com/gin-gonic/gin"
)

type PrintJob struct {
    Format string `json:"format" binding:"required"`
    InvoiceId int `json:"invoiceId" binding:"required,gte=0"`
    JobId int `json:"jobId" binding:"gte=0"`
}
func main() {
    router := gin.Default()
    router.POST("/print-jobs", func(c *gin.Context) {
        var p PrintJob
        if err := c.ShouldBindJSON(&p); err != nil {
            c.JSON(400, gin.H{"error": "Invalid input!"})
            return
        }
        log.Printf("PrintService: creating new print job from invoice #%v...", p.InvoiceId)
        rand.Seed(time.Now().UnixNano())
        p.JobId = rand.Intn(1000)
        log.Printf("PrintService: created print job #%v", p.JobId)
        c.JSON(200, p)
    })
    router.Run(":5000")
}
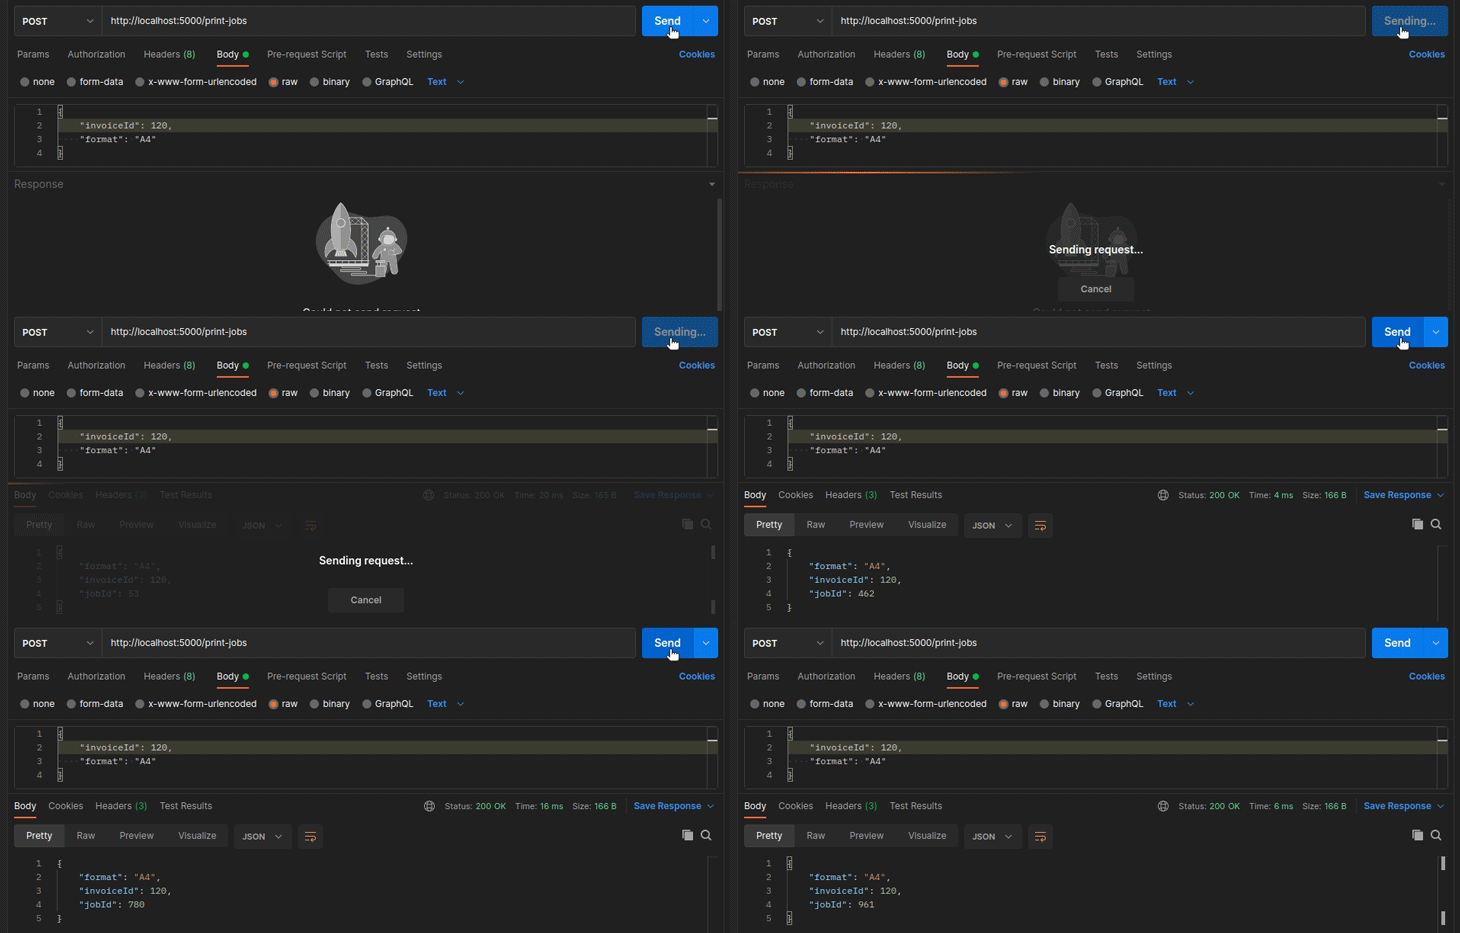
Run the above code and test with Postman — it simulates print job creation when you make a POST request via Postman.

Now we are going to create the InvoiceGenerator microservice, which is responsible for creating invoices based on price, customer details, and purchase description.
We need to call PrinterService from the InvoiceGenerator. Therefore, we need an HTTP client in our project. Install Go’s resty HTTP client library with the following command.
go get -u github.com/go-resty/resty/v2
Now add the following code to invoice_generator.go
package main
import (
    "math/rand"
    "time"
    "log"
    "github.com/gin-gonic/gin"
    "github.com/go-resty/resty/v2"
)

type Invoice struct {
    InvoiceId int `json:"invoiceId"`
    CustomerId int `json:"customerId" binding:"required,gte=0"`
    Price int `json:"price" binding:"required,gte=0"`
    Description string `json:"description" binding:"required"`
}
type PrintJob struct {
    JobId int `json:"jobId"`
    InvoiceId int `json:"invoiceId"`
    Format string `json:"format"`
}
func createPrintJob(invoiceId int) {
    client := resty.New()
    var p PrintJob
    // Call PrinterService via RESTful interface
    _, err := client.R().
        SetBody(PrintJob{Format: "A4", InvoiceId: invoiceId}).
        SetResult(&p).
        Post("http://localhost:5000/print-jobs")

    if err != nil {
        log.Println("InvoiceGenerator: unable to connect PrinterService")
        return
    }
    log.Printf("InvoiceGenerator: created print job #%v via PrinterService", p.JobId)
}
func main() {
    router := gin.Default()
    router.POST("/invoices", func(c *gin.Context) {
        var iv Invoice
        if err := c.ShouldBindJSON(&iv); err != nil {
            c.JSON(400, gin.H{"error": "Invalid input!"})
            return
        }
        log.Println("InvoiceGenerator: creating new invoice...")
        rand.Seed(time.Now().UnixNano())
        iv.InvoiceId = rand.Intn(1000)
        log.Printf("InvoiceGenerator: created invoice #%v", iv.InvoiceId)

        createPrintJob(iv.InvoiceId) // Ask PrinterService to create a print job
        c.JSON(200, iv)
    })
    router.Run(":6000")
}
The above code implements the POST /invoices endpoint, which creates a new invoice based on a JSON input payload. After creating a new invoice, it communicates with the PrinterService microservice synchronously to create a new print job, and prints the job identifier on the console.
Test the inter-service communication by creating a new invoice and checking the console logs. Make sure to start both microservices before sending HTTP requests via Postman. Send the following JSON payload to POST /invoices:
{
    "customerId": 10,
    "description": "Computer repair",
    "price": 150
}
Now check the InvoiceGenerator logs. You will note that it shows a new print job identifier received from the other microservice.

If you check the PrinterService logs, you will notice the same print job identifier. We can also see the same invoice identifier from both logs, which means that our inter-service communication implementation worked just fine.

Programmers use different strategies to write maintainable codebases, usually REST design best practices for REST pattern-based microservice development activities.
We can follow the MVC pattern principles to structure our code. Also, we can try to use common practices that most Go developers accept and use. Verify the following checklist when you work with Gin-based microservices.
controllers/product.go and add handlers for each CRUD operationnet/http package instead of hardcoded integer status codes — I used hardcoded values in the examples for simplicity of demonstration
http.StatusOK instead of 200gin.H shortcut can generate repetitive code — try to use structs if possible
gin.H is just a short type definition for map[string]interface{}You can also get started with the following boilerplate projects that already use REST best practices. Moreover, it’s possible to inherit some design patterns from these projects into your own code without using the entire boilerplate code.
In this tutorial, we learned how to create microservices in Go with the Gin web framework. We also tested our example microservices with the Postman tool.
In reality, we typically consume microservices via web applications, mobile apps, and IoT frameworks. However, modern backend developers usually don’t call microservices directly because of scaling problems and network security issues. Therefore, before exposing your microservices to the internet, developers will connect them to an API gateway or load balancer.
Most modern software development projects let a Kubernetes container orchestrator manage and scale microservice instances automatically. We can also transfer microservices among various deployment environments and cloud service providers easily, thanks to container services like Docker.
But migrating to a new HTTP web framework requires time-consuming code refactoring. Therefore, consider starting your RESTful microservices with a batteries-included web framework like Gin.
Install LogRocket via npm or script tag. LogRocket.init() must be called client-side, not
server-side
$ npm i --save logrocket

// Code:

import LogRocket from 'logrocket';
LogRocket.init('app/id');
// Add to your HTML:

<script src="https://cdn.lr-ingest.com/LogRocket.min.js"></script>
<script>window.LogRocket && window.LogRocket.init('app/id');</script>

@container scroll-state: Replace JS scroll listeners nowCSS @container scroll-state lets you build sticky headers, snapping carousels, and scroll indicators without JavaScript. Here’s how to replace scroll listeners with clean, declarative state queries.

Explore 10 Web APIs that replace common JavaScript libraries and reduce npm dependencies, bundle size, and performance overhead.

Russ Miles, a software development expert and educator, joins the show to unpack why “developer productivity” platforms so often disappoint.

Discover what’s new in The Replay, LogRocket’s newsletter for dev and engineering leaders, in the February 18th issue.
Would you be interested in joining LogRocket's developer community?
Join LogRocket’s Content Advisory Board. You’ll help inform the type of content we create and get access to exclusive meetups, social accreditation, and swag.
Sign up now
6 Replies to "Building microservices in Go with Gin"
can you write a post of this type instead for go fiber framework ?
Thanks for the suggestion — we’ll consider it!
Thank you 🙂 It’s a perfect example for whom want to enter the go0server world! It’s really helpful
Thanks for sharing, curious what you think of Encore (https://encore.dev)?
It’s quite a bit more comprehensive in terms of tooling; Architecture Diagram generation, API docs generation, Built-in tracing, and boilerplate generation.
Would be awesome to see a 2023 write-up with all the latest Go frameworks.
Thanks so much for this has just made me to have get introduced to the new concept of microservices
Thank you. Hats off 🙂