Forms are more expensive than they look. What begins as a handful of input fields can quickly turn into duplicated validation rules, inconsistent error messages, and subtle bugs where the frontend accepts data that the backend rejects. As applications grow, form logic often becomes one of the most fragile parts of the codebase.

This tutorial shows how to move away from ad hoc, component-level validation and toward a JSON schema-driven approach, where a single source of truth defines your data, validation rules, and form behavior. By the end, you’ll know how to build forms that are reliable, maintainable, and able to evolve safely as your product grows.
The Replay is a weekly newsletter for dev and engineering leaders.
Delivered once a week, it's your curated guide to the most important conversations around frontend dev, emerging AI tools, and the state of modern software.
While the ideas in this tutorial can be applied in any modern framework, you’ll use Vue.js 3 for the frontend and Node.js with Express for the backend to demonstrate the schema-driven approach.
These tools work especially well here because both handle JSON natively, which makes it simple to share your schema between the client and server. You’ll also use Ajv, a high-performance JSON Schema validator, to keep your data consistent across the entire stack.
Schema-driven forms treat the data definition as the core driver of the application. Instead of hardcoding validation rules directly inside UI components, the rules live in a central schema that determines how the rest of the app behaves. The code then follows that schema to render fields and enforce constraints.
These schemas describe the data structure, validation requirements, and even conditional logic, such as displaying a field only when a certain option is selected. By making the schema the primary source of authority, you define the rules once and let the system handle the rest. The same definition can generate the form UI, validate user input in real time, and enforce constraints on the server before any data is saved.
Because the schema acts as a shared contract, the frontend and backend remain aligned. When a field is added or a validation rule changes in the schema, both layers of the application update automatically. There’s no need to manually modify multiple files or worry about the frontend and backend interpreting “valid” data differently.
Most applications end up with validation logic duplicated across the frontend and backend, inconsistent error handling, a higher risk of regressions when requirements change, and forms that are tightly tied to specific UI components.
Component-level validation usually begins simply. You add a password field. You write a regex in your Vue component to enforce a minimum length. You add the same check in your Express route. Everything works.
Then the requirements change. Passwords now need a special character. You update the Vue component but forget the backend. The frontend accepts password123!, but the API rejects it. The user gets a generic 400 error and leaves.
Or maybe you remember to update both places. Months later, a teammate adds a confirm password field. They copy the original validation logic but introduce a small typo. Now the two password fields enforce slightly different rules. Users pass the frontend validation but fail when they submit the form.
Every new form multiplies this issue. Login forms, registration forms, profile updates, password resets, each carries its own validation logic. Over time, they drift apart. Testing becomes more expensive because every form must be verified in both layers.
The coupling only grows stronger. Your form component ends up knowing about email formats, password strength rules, and age restrictions. Change the minimum age from 18 to 21 and suddenly you’re editing the component, the backend, the tests, and the documentation. Four places that all need to stay in sync.
Schema-driven forms address this by centralizing all rules in a single definition. Update the schema once, and the entire system follows.
This section walks through setting up your workspace. You will create the directories for both the client and server, install the required packages, and prepare the initial files for your Vue application and Express server. By the end of this setup, you will have a working environment ready to support schema-driven logic.
Create the main project directory and move into it:
mkdir schema-forms
cd schema-forms
Create the Vue frontend inside the client directory:
npm create vite@latest client -- --template vue
cd client
npm install
Using your preferred code editor, open client/index.html and add Bootstrap before the closing tag:
<!DOCTYPE html>
<html lang="en">
  <head>
    ...
    <link href="https://cdn.jsdelivr.net/npm/[email protected]/dist/css/bootstrap.min.css" rel="stylesheet">
  </head>
  ...
</html>
Create a new file named UserForm.vue in the client/src/components directory and leave it empty for now.
Replace the contents of client/src/App.vue with the following:
<script setup>
import UserForm from './components/UserForm.vue'
</script>
This imports the UserForm component you created earlier.
Add the template:
<template>
  <div class="card">
    <div class="card-body">
      <UserForm />
    </div>
  </div>
</template>
This template wraps the UserForm component inside a Bootstrap card. This provides a clean, bordered container that separates the form from the background.
Remove the entire existing styling or leave it empty:
<style>
</style>
Go back to the terminal, create a new terminal tab, go back to the project root directory, and create the server:
cd ..
mkdir server
cd server
npm init -y
Install the required dependencies:
npm install express cors ajv ajv-formats
The command above installed the following packages:
express – A web framework for Node.js. This handles routing, middleware, and HTTP requests. You will use this to create API endpoints for serving the schema and validating form data.cors – A middleware package for Express. This enables cross-origin resource sharing between your frontend and backend. Without this, browsers block requests from your Vue app (running on port 5173) to your Express server (running on port 3000).ajv – Another JSON Schema Validator. This validates data against your schema definitions. You will use this to check form submissions and individual field values against the rules defined in your schema.ajv-formats – An extension for Ajv. This adds support for string format validation like email, date, and URL patterns. The base Ajv package does not include these format validators by default.Using your preferred code editor, open server/package.json and add the type field after the name field:
{
  "name": "server",
  "type": "module",
  ...
}
This enables ES6 module syntax (import/export) in your Node.js project.
This section focuses on defining the central data structure for your application. Rather than writing separate validation rules for the frontend and backend, you will define everything in a single JSON schema. This file becomes the single source of truth for your data types, field constraints, and the conditional logic that controls how your form behaves.
Create a file named userSchema.js in the server root directory and start with the following basic structure:
export const createUserSchema = {
  type: "object",
  required: ["email", "password", "role"],
  additionalProperties: false,
  properties: {
    // field definitions go here
  }
};
The type: "object" tells the validator this schema describes an object with properties. The required array lists the fields the user must fill out. Setting additionalProperties: false prevents users from sending extra fields you didn’t define.
Now add the email field:
properties: {
  email: {
    type: "string",
    format: "email",
    title: "Email address"
  },
},
The type: "string" enforces that this field accepts text. The format: "email" tells Ajv to validate the email pattern (like checking for @ and a domain). The title becomes the label text in your UI.
Add the password field:
password: {
  type: "string",
  format: "password"
  minLength: 8,
  title: "Password"
},
The minLength: 8 enforces that passwords must have at least 8 characters. The validator rejects anything shorter before the data reaches your database. By adding format: "password", you are providing a hint to the frontend; your dynamic form logic will see this and know to render a secure type="password" input, masking the characters as the user types.
Add the age field:
age: {
  type: "number",
  minimum: 18,
  title: "Age"
},
The type: "number" ensures users enter numeric values. The minimum: 18 enforces an age restriction. The validator will reject values like 17 or non-numeric input.
Add the role field:
role: {
  type: "string",
  enum: ["user", "admin"],
  title: "Role"
},
The enum array restricts values to exactly “user” or “admin”. Users cannot submit “moderator” or any other value. This renders as a dropdown in the UI.
Add the admin code field:
adminCode: {
  type: "string",
}
This field has no minLength or title yet. Those properties get added conditionally based on the role selection.
Now add the conditional logic at the end of the schema:
allOf: [
  {
    if: {
      properties: { role: { const: "admin" } }
    },
    then: {
      properties: {
        adminCode: {
          type: "string",
          minLength: 6,
          title: "Admin access code"
        }
      },
      required: ["adminCode"]
    }
  }
]
The allOf array holds conditional rules. The if block checks whether the role equals “admin”. When true, the then block activates. This adds a minLength: 6 constraint to adminCode and makes the field required. When the user selects “user” as their role, the adminCode field disappears from the form entirely.
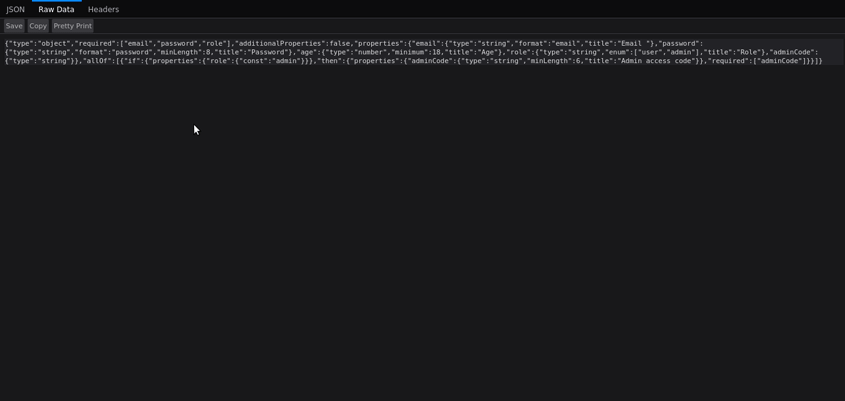
Here is the complete schema:
export const createUserSchema = {
  type: "object",
  required: ["email", "password", "role"],
  additionalProperties: false,
  properties: {
    email: { type: "string", format: "email", title: "Email " },
    password: { type: "string", format: "password", minLength: 8, title: "Password" },
    age: { type: "number", minimum: 21, title: "Age" },
    role: { type: "string", enum: ["user", "admin"], title: "Role" },
    adminCode: { type: "string" }
  },
  allOf: [
    {
      if: { properties: { role: { const: "admin" } } },
      then: {
        properties: {
          adminCode: { type: "string", minLength: 6, title: "Admin access code" }
        },
        required: ["adminCode"]
      }
    }
  ]
};
This section connects the schema to your Node.js backend. You will set up an Express server to deliver the schema to the frontend and create routes to validate incoming data. This ensures your server stays in sync with your rules and rejects any invalid submissions before they reach your database.
Create a file named server.js in the server root directory.
Inside this file, start by importing dependencies and setting up Express:
import express from "express";
import cors from "cors";
import Ajv from "ajv";
import addFormats from "ajv-formats";
import { createUserSchema } from "./userSchema.js";

const app = express();
app.use(express.json());
app.use(cors());
The cors() middleware allows your frontend (running on a different port) to make requests to this server. The express.json() middleware parses incoming JSON request bodies.
Initialize Ajv and compile the schema:
const ajv = new Ajv({ allErrors: true });
addFormats(ajv);
const validateCreateUser = ajv.compile(createUserSchema);
The allErrors: true option tells Ajv to collect all validation errors, not stop at the first one. The addFormats function adds support for formats like “email”. The ajv.compile method compiles the schema. Here, the schema is being compiled once instead of on each request received to improve performance for repeated validations.
Create the endpoint to serve the schema:
app.get("/schemas/create-user", (req, res) => {
  res.json(createUserSchema);
});
The frontend fetches this endpoint on page load. The response contains the entire schema definition, which the frontend uses to build the form dynamically.
Create the endpoint to validate form submissions:
app.post("/users", (req, res) => {
  const valid = validateCreateUser(req.body);

  if (!valid) {
    return res.status(400).json({
      errors: validateCreateUser.errors
    });
  }

  res.json({ message: "User created successfully", data: req.body });
});
The validateCreateUser function checks the request body against the schema. When validation fails, validateCreateUser.errors contains detailed error information. When validation passes, you would normally save the data to your database here.
Create the endpoint for async field validation:
app.post("/validate/user", async (req, res) => {
  const { field, value } = req.body;

  const fieldDef = createUserSchema.properties[field];

  if (fieldDef) {
    const valid = ajv.validate(fieldDef, value);
    if (!valid) {
      return res.json({ valid: false, message: `Invalid format.` });
    }
  }
This endpoint receives a field name and value from the frontend. The code extracts the field definition from the schema, then validates just a single value. This catches format errors before checking the database.
Add the database check logic:
if (field === "email") {
  const emailTaken = value === "[email protected]";
  if (emailTaken) {
    return res.json({ valid: false, message: "Email already taken" });
  }
}

res.json({ valid: true });
});
This simulates a database lookup. In production, you would query your database to check if the email exists. Only emails with a valid format reach this check, saving database queries.
Start the server:
app.listen(3000, () => console.log("Server running on port 3000"));
Here, the Express server is started using the app.listen() method on port 3000.
Go back to your terminal and run the following command to start the application:
node --watch --watch-path=. server.js
The command above not only starts the application but also watches all files in the server directory and restarts the server whenever a change occurs.
Open a browser tab and navigate to http://localhost:3000/schemas/create-user to check if the server is running properly:
The server should respond successfully by sending the user schema.
This section focuses on building the frontend logic. Instead of writing static HTML for every input field, you will create a Vue component that reads the schema and renders the inputs automatically. This setup allows your form to update its layout and behavior whenever you change the central schema file.
Open the UserForm.vue file located in the client/src/components directory. Inside this file, add the following code for the imports and state setup:
<script setup>
import { reactive, ref, computed, onMounted } from "vue";

const formData = reactive({});
const rawSchema = ref(null);
const errors = reactive({});
const baseURL = "http://localhost:3000";
</script>
The formData object holds user input values. The rawSchema stores the fetched schema definition. The errors object stores validation messages for each form field. When a field has an error, the error appears below the input. The baseURL constant is the URL of the express server that you created in the previous section.
Fetch the schema when the component loads:
onMounted(async () => {
  const res = await fetch(`${baseURL}/schemas/create-user`);
  rawSchema.value = await res.json();

  Object.keys(rawSchema.value.properties).forEach(key => {
    formData[key] = "";
  });
});
This runs once when the page loads. The code fetches the schema from the backend, then initializes formData with empty strings for each property. This ensures Vue’s reactivity system tracks all fields.
Create the computed property to process conditional fields:
const dynamicSchema = computed(() => {
  if (!rawSchema.value) return [];

  const schema = rawSchema.value;
  const fields = { ...schema.properties };
  const required = new Set(schema.required || []);
This function recalculates whenever formData changes. The code copies the schema properties and creates a set of required fields for quick lookups.
Process the conditional rules:
(schema.allOf || []).forEach(rule => {
  const ifKey = Object.keys(rule.if.properties)[0];
  const ifVal = rule.if.properties[ifKey].const;

  if (formData[ifKey] === ifVal) {
    if (rule.then.properties) Object.assign(fields, rule.then.properties);
    if (rule.then.required) rule.then.required.forEach(r => required.add(r));
  } else {
    if (rule.then.properties) {
      Object.keys(rule.then.properties).forEach(k => delete fields[k]);
    }
  }
});
This loop checks each conditional rule. When the condition matches (like role === "admin"), the code merges the then properties and requirements. When the condition does not match, the code removes those fields. This makes the adminCode field appear and disappear based on role selection.
Convert the fields to an array for rendering:
return Object.entries(fields).map(([name, def]) => {
  let type = "text";
  if (def.enum) type = "select";
  else if (def.type === "boolean") type = "checkbox";
  else if (def.type === "number") type = "number";
  if (name === "password") type = "password";

  return {
    name,
    label: def.title || name,
    type,
    options: def.enum,
    required: required.has(name)
  };
});
});
This transforms the schema properties into a format the template uses. Each field gets a name, label, type, options (for dropdowns), and a required flag. The template loops over this array to render inputs.
Create the submit handler by first sending the data to the backend:
async function submit() {
  const res = await fetch(`${baseURL}/users`, {
    method: "POST",
    headers: { "Content-Type": "application/json" },
    body: JSON.stringify(formData)
  });
  const data = await res.json();
This part sends the current form values to the server and waits for a response. The backend will either confirm the data is valid or return a list of specific validation errors.
Clear any existing errors from previous attempts:
Object.keys(errors).forEach(key => {
  delete errors[key];
});
The code loops through the local errors object and removes all entries. This ensures that the user only sees messages relevant to their most recent submission attempt.
Process the validation errors returned by the server:
if (data.errors) {
  data.errors.forEach((error) => {
    const field = error.instancePath.replace("/", "")
    errors[field] = error.message;
  })
}
When the backend finds issues, it returns an array of errors. The code iterates through these, removes the forward slash from the path to match your form field keys, and stores the error message so Vue can display it next to the correct input.
Handle successful submissions:
else {
  alert("Success!");
}
}
If no errors are found, a simple alert confirms the user was created. In a production app, you would typically redirect the user to a new page or clear the form at this stage.
Create the form container:
<template>
  <div class="container mt-5" style="max-width: 500px;">
    <h2 class="mb-4">Schema-Driven Form</h2>

    <form @submit.prevent="submit" v-if="rawSchema">
The @submit.prevent prevents the default form submission and calls your custom handler. The v-if ensures the form only renders after the schema loads.
Loop over the fields and create labels:
<div v-for="field in dynamicSchema" :key="field.name" class="mb-3">

  <label class="form-label fw-bold">
    {{ field.label }}
    <span v-if="field.required" class="text-danger">*</span>
  </label>
The v-for creates one div per field in the schema. The label displays the field’s title, with a red asterisk for required fields.
Render text and number inputs:
<input
v-if="field.type !== 'select' && field.type !== 'checkbox'" :type="field.type"
  v-model="formData[field.name]" class="form-control" :class="{ 'is-invalid': errors[field.name] }"
  />
This renders for all non-select, non-checkbox fields. The v-model creates two-way data binding between the input and your formData object. The :class binding applies Bootstrap’s is-invalid class whenever an error exists for that field, turning the input border red.
Render select dropdowns:
<select
  v-if="field.type === 'select'"
  v-model="formData[field.name]"
  class="form-select"
>
  <option v-for="opt in field.options" :key="opt" :value="opt">
    {{ opt }}
  </option>
</select>
</div>
This renders for fields with an enum property. The options come from the schema definition. When the user picks “admin”, the computed property recalculates and shows the adminCode field.
Add the error message display after the select element:
...
</select>

<div v-if="errors[field.name]" class="invalid-feedback">
  {{ errors[field.name] }}
</div>
</div>
This shows the error message below the input when validation fails. The invalid-feedback class from Bootstrap styles the message in red.
Close the form and add the submit button:
<button type="submit" class="btn btn-primary w-100">Submit</button>
</form>

<div v-else>Loading form...</div>
  </div>
</template>
The submit button sends all data for final validation. The loading message displays while fetching the schema.
Go back to your terminal tab where you created the client application and run the following command to start it:
npm run dev
Open a browser tab and navigate to http://localhost:5173/, and you should see the dynamic form you have just created:
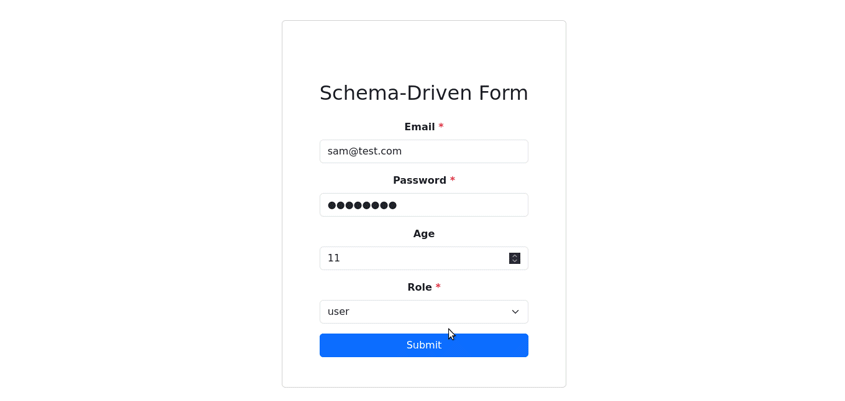
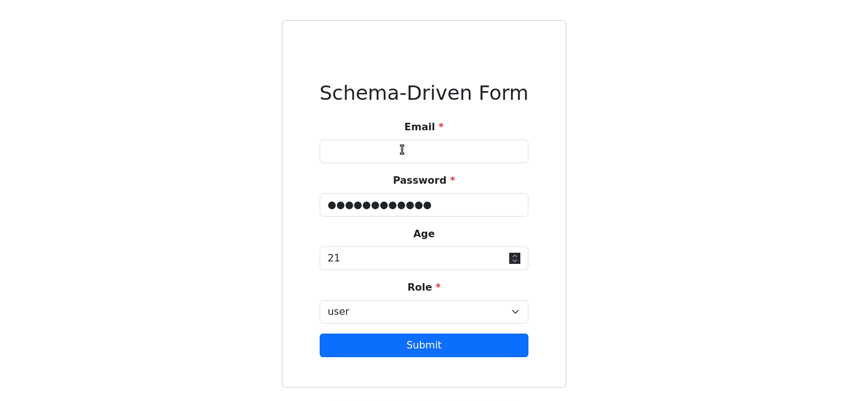
Fill out the form fields and see how the validation is up and running. Change the minimum age to 21 in the userSchema.js file, wait for the server to restart automatically, fill out the form again, and watch how the new rule is now being enforced.
While the schema handles structural rules like string length and formatting, some checks require a trip to the database. This section adds real-time feedback for specific fields, such as checking if an email is already in use, before the user even hits the submit button. By offloading these checks to a dedicated endpoint, you keep your frontend lightweight while maintaining strict data integrity.
The backend endpoint /validate/user checks individual fields as users fill out the form. This catches errors early, before submission.
Go back to the Userform.vue file and create the async validation function after your submit handler:
async function validateField(field) {
  if (field !== 'email') return;

  try {
    const res = await fetch(`${baseURL}/validate/user`, {
      method: "POST",
      headers: { "Content-Type": "application/json" },
      body: JSON.stringify({ field, value: formData[field] })
    });
This function runs when a user leaves an input field. For now, only the email field triggers server validation. The code sends the field name and current value to the backend.
Handle the validation response:
const result = await res.json();
if (!result.valid) {
  errors[field] = result.message;
} else {
  delete errors[field];
}
} catch (e) {
  console.error(e);
}
}
When the server returns valid: false, the code stores the error message. When validation passes, it clears any existing errors for this field.
Update the input template to trigger validation on blur:
<input
  v-if="field.type !== 'select' && field.type !== 'checkbox'"
  :type="field.type"
  v-model="formData[field.name]"
  class="form-control"
  :class="{ 'is-invalid': errors[field.name] }"
  @blur="validateField(field.name)" // code added
/>
The @blur event fires when the user leaves the input field. The :class binding adds Bootstrap’s error styling when the field has an error.
This setup gives you hybrid validation. When the user types an email, the backend checks the format: "email" using the schema logic first. This is fast and cheap. Only if the format is valid does the backend check the database.
When the blur event fires, Vue sends, for example, { field: "email", value: "[[email protected]](mailto:[email protected])" } to the server. The server responds with { valid: false, message: "Email already taken" }. Vue puts this message into errors.email, then the :class binding turns the input border red.
This keeps the UI simple (knows nothing about regex or databases) and the logic centralized.
Please note that right now, the only field being asynchronously validated is the email field because it is the only field you have configured in the server.js and UserForm.vue files.
Go back to the browser tab opened at http://localhost:5173/. Next, fill the email field with an invalid email format and watch how, once you select another field, the email you wrote is validated, and a message appears stating that the email format is invalid. Finally, fill the email field with [[email protected]](mailto:[email protected]), select another field, and watch a message appear stating that the email is already taken.
Maintaining forms does not have to be a constant struggle. By centralizing your logic in a JSON schema, you eliminate the need to write validation rules more than once and ensure your frontend and backend always speak the same language. This approach turns form management into a predictable task rather than a frequent source of bugs.
You now have a system where adding a new field or changing a rule only happens in one place. Your forms are no longer fragile, hardcoded components, but flexible components that scale alongside your application. This foundation lets you build faster and keep your data clean as your product grows.

Learn how to use Gemini CLI subagents to delegate frontend, backend, testing, and docs tasks to specialized agents with guardrails and clear ownership.

Learn how next-browser gives AI agents runtime context for debugging Next.js apps, including React props, hydration, PPR, forms, and performance.

Build dynamic LLM routing in Next.js with OpenRouter, TanStack AI, task classification, model fallbacks, and cost-aware routing.

TSRX adds first-class control flow, conditional hooks, and scoped styles to React via a TypeScript compiler extension — no new framework required.
Would you be interested in joining LogRocket's developer community?
Join LogRocket’s Content Advisory Board. You’ll help inform the type of content we create and get access to exclusive meetups, social accreditation, and swag.
Sign up now

